
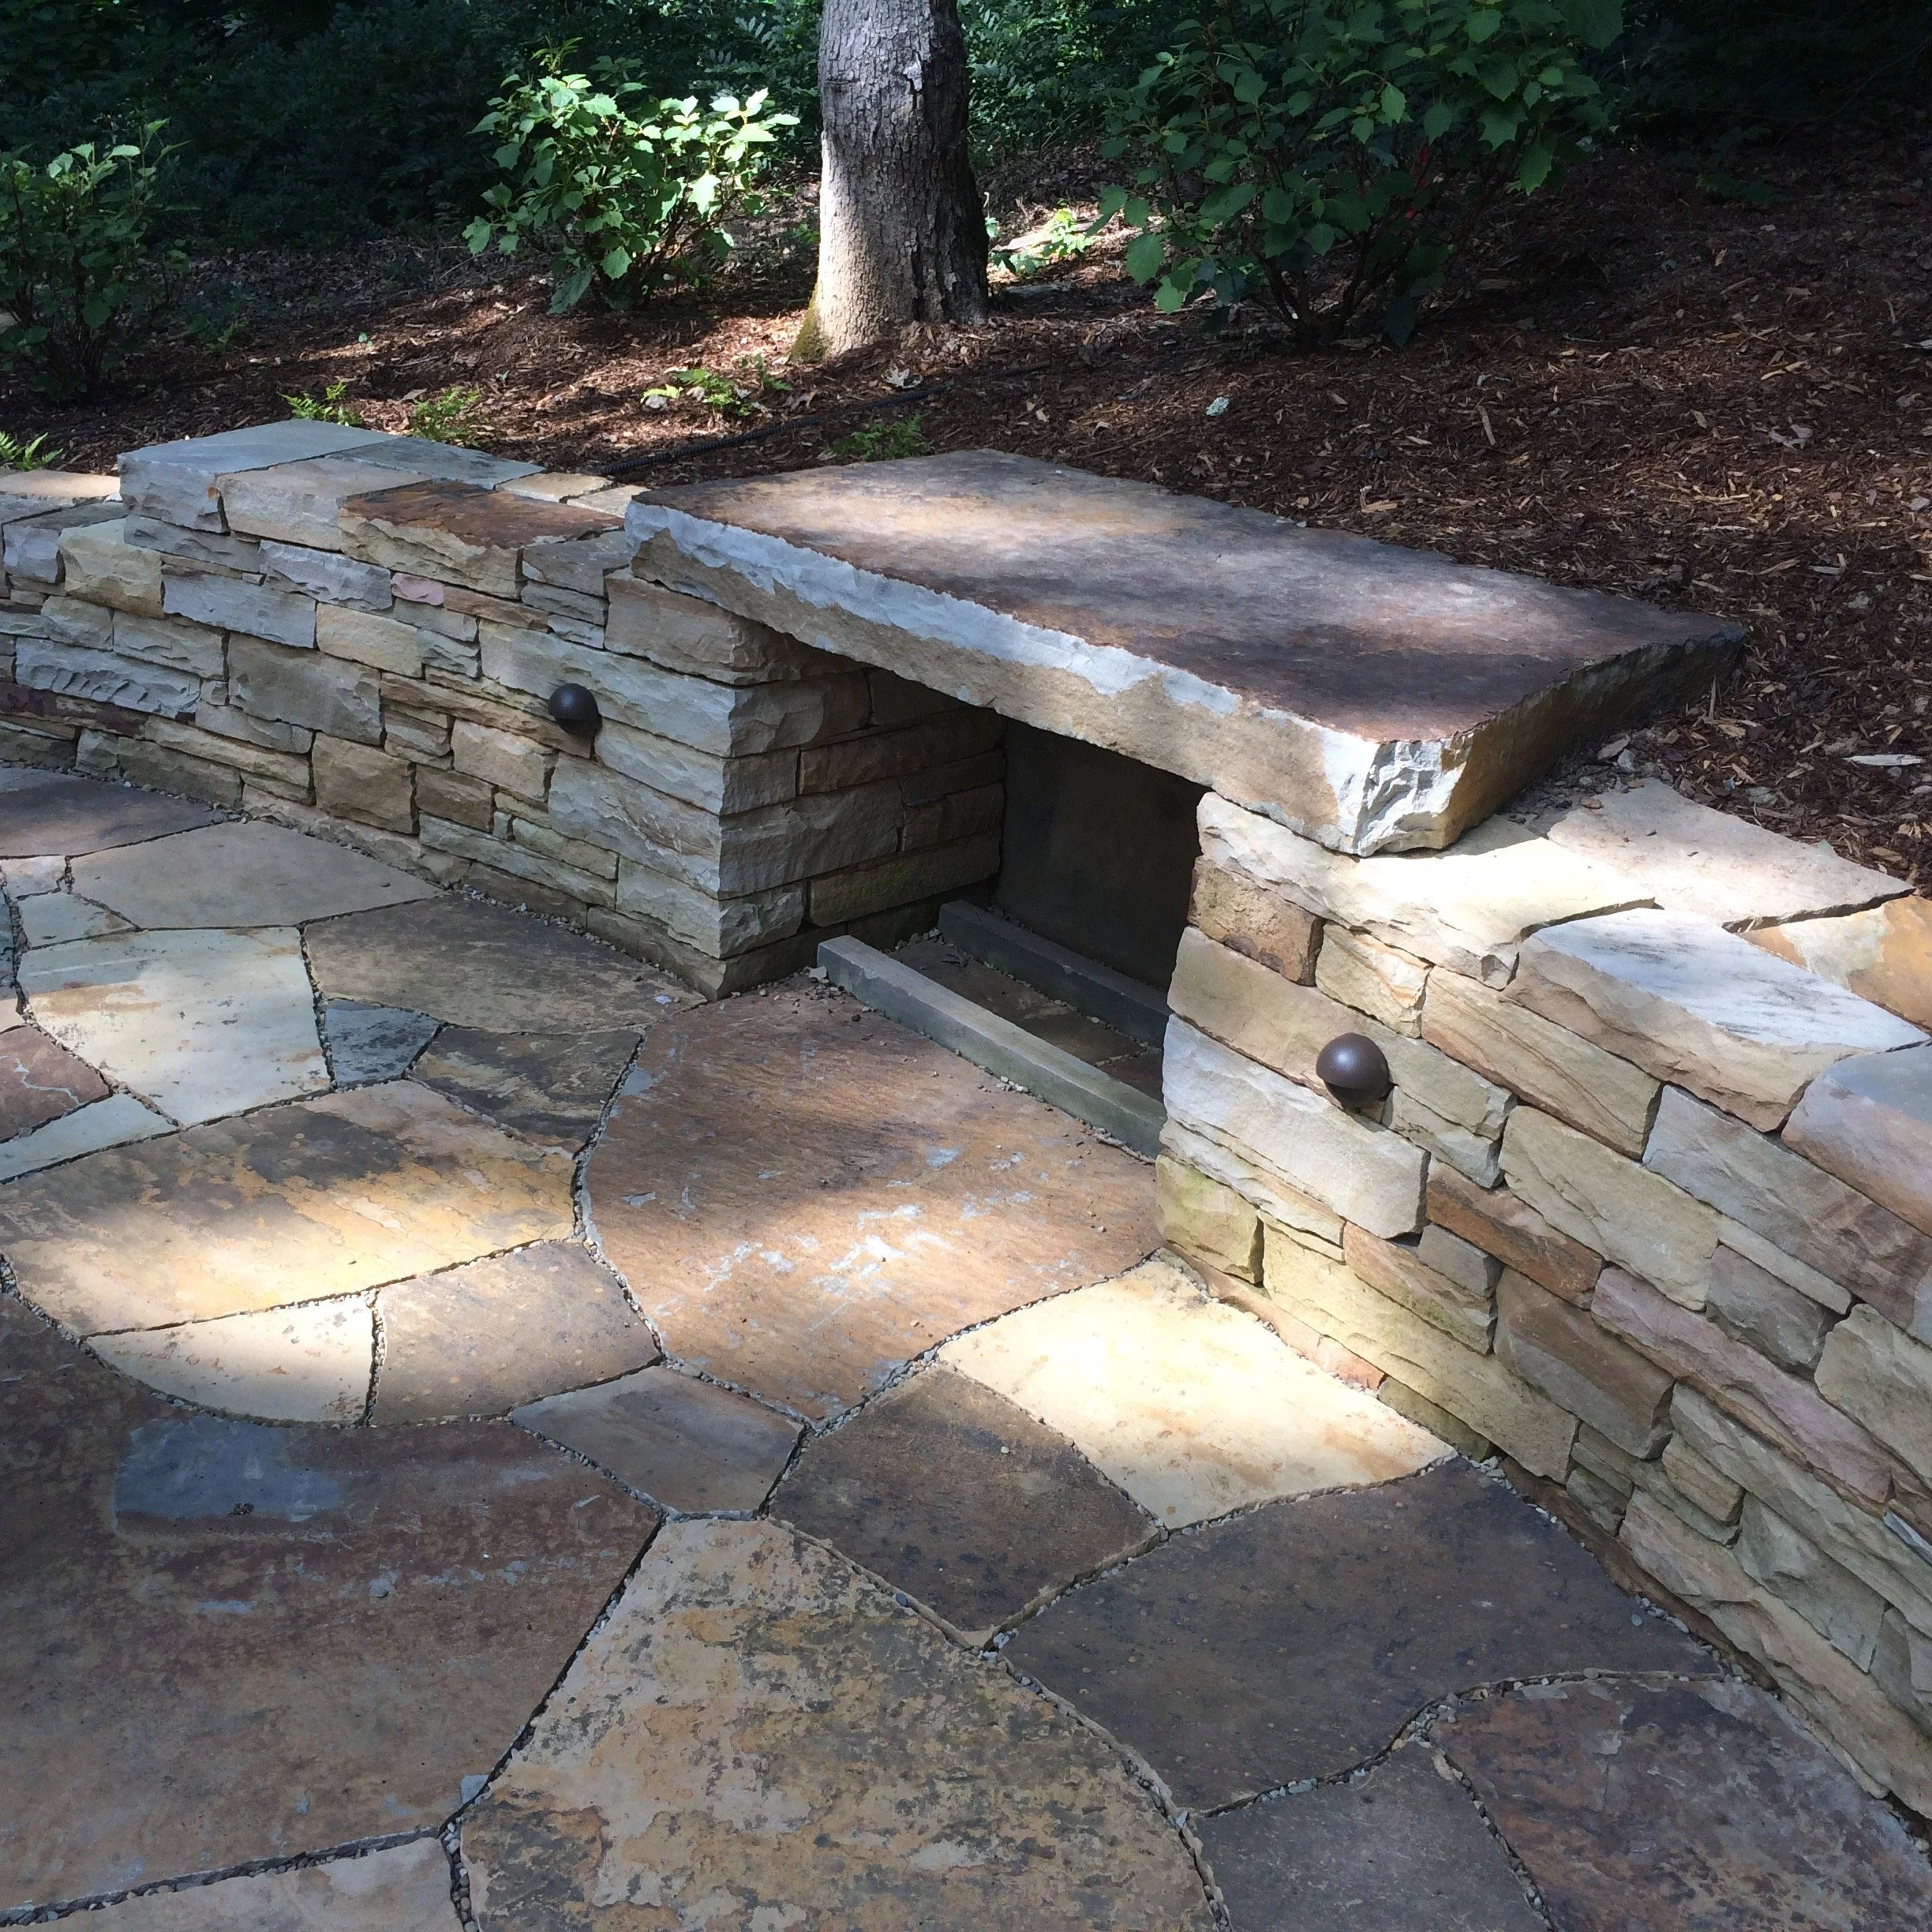
Memorial Mosaic Patio
Hammerhead Stoneworks built a stone memorial patio for the Ironwoods neighborhood in Chapel Hill, NC. The drystone patio sits in a clearing in the woods on communal land all the neighbors can use.
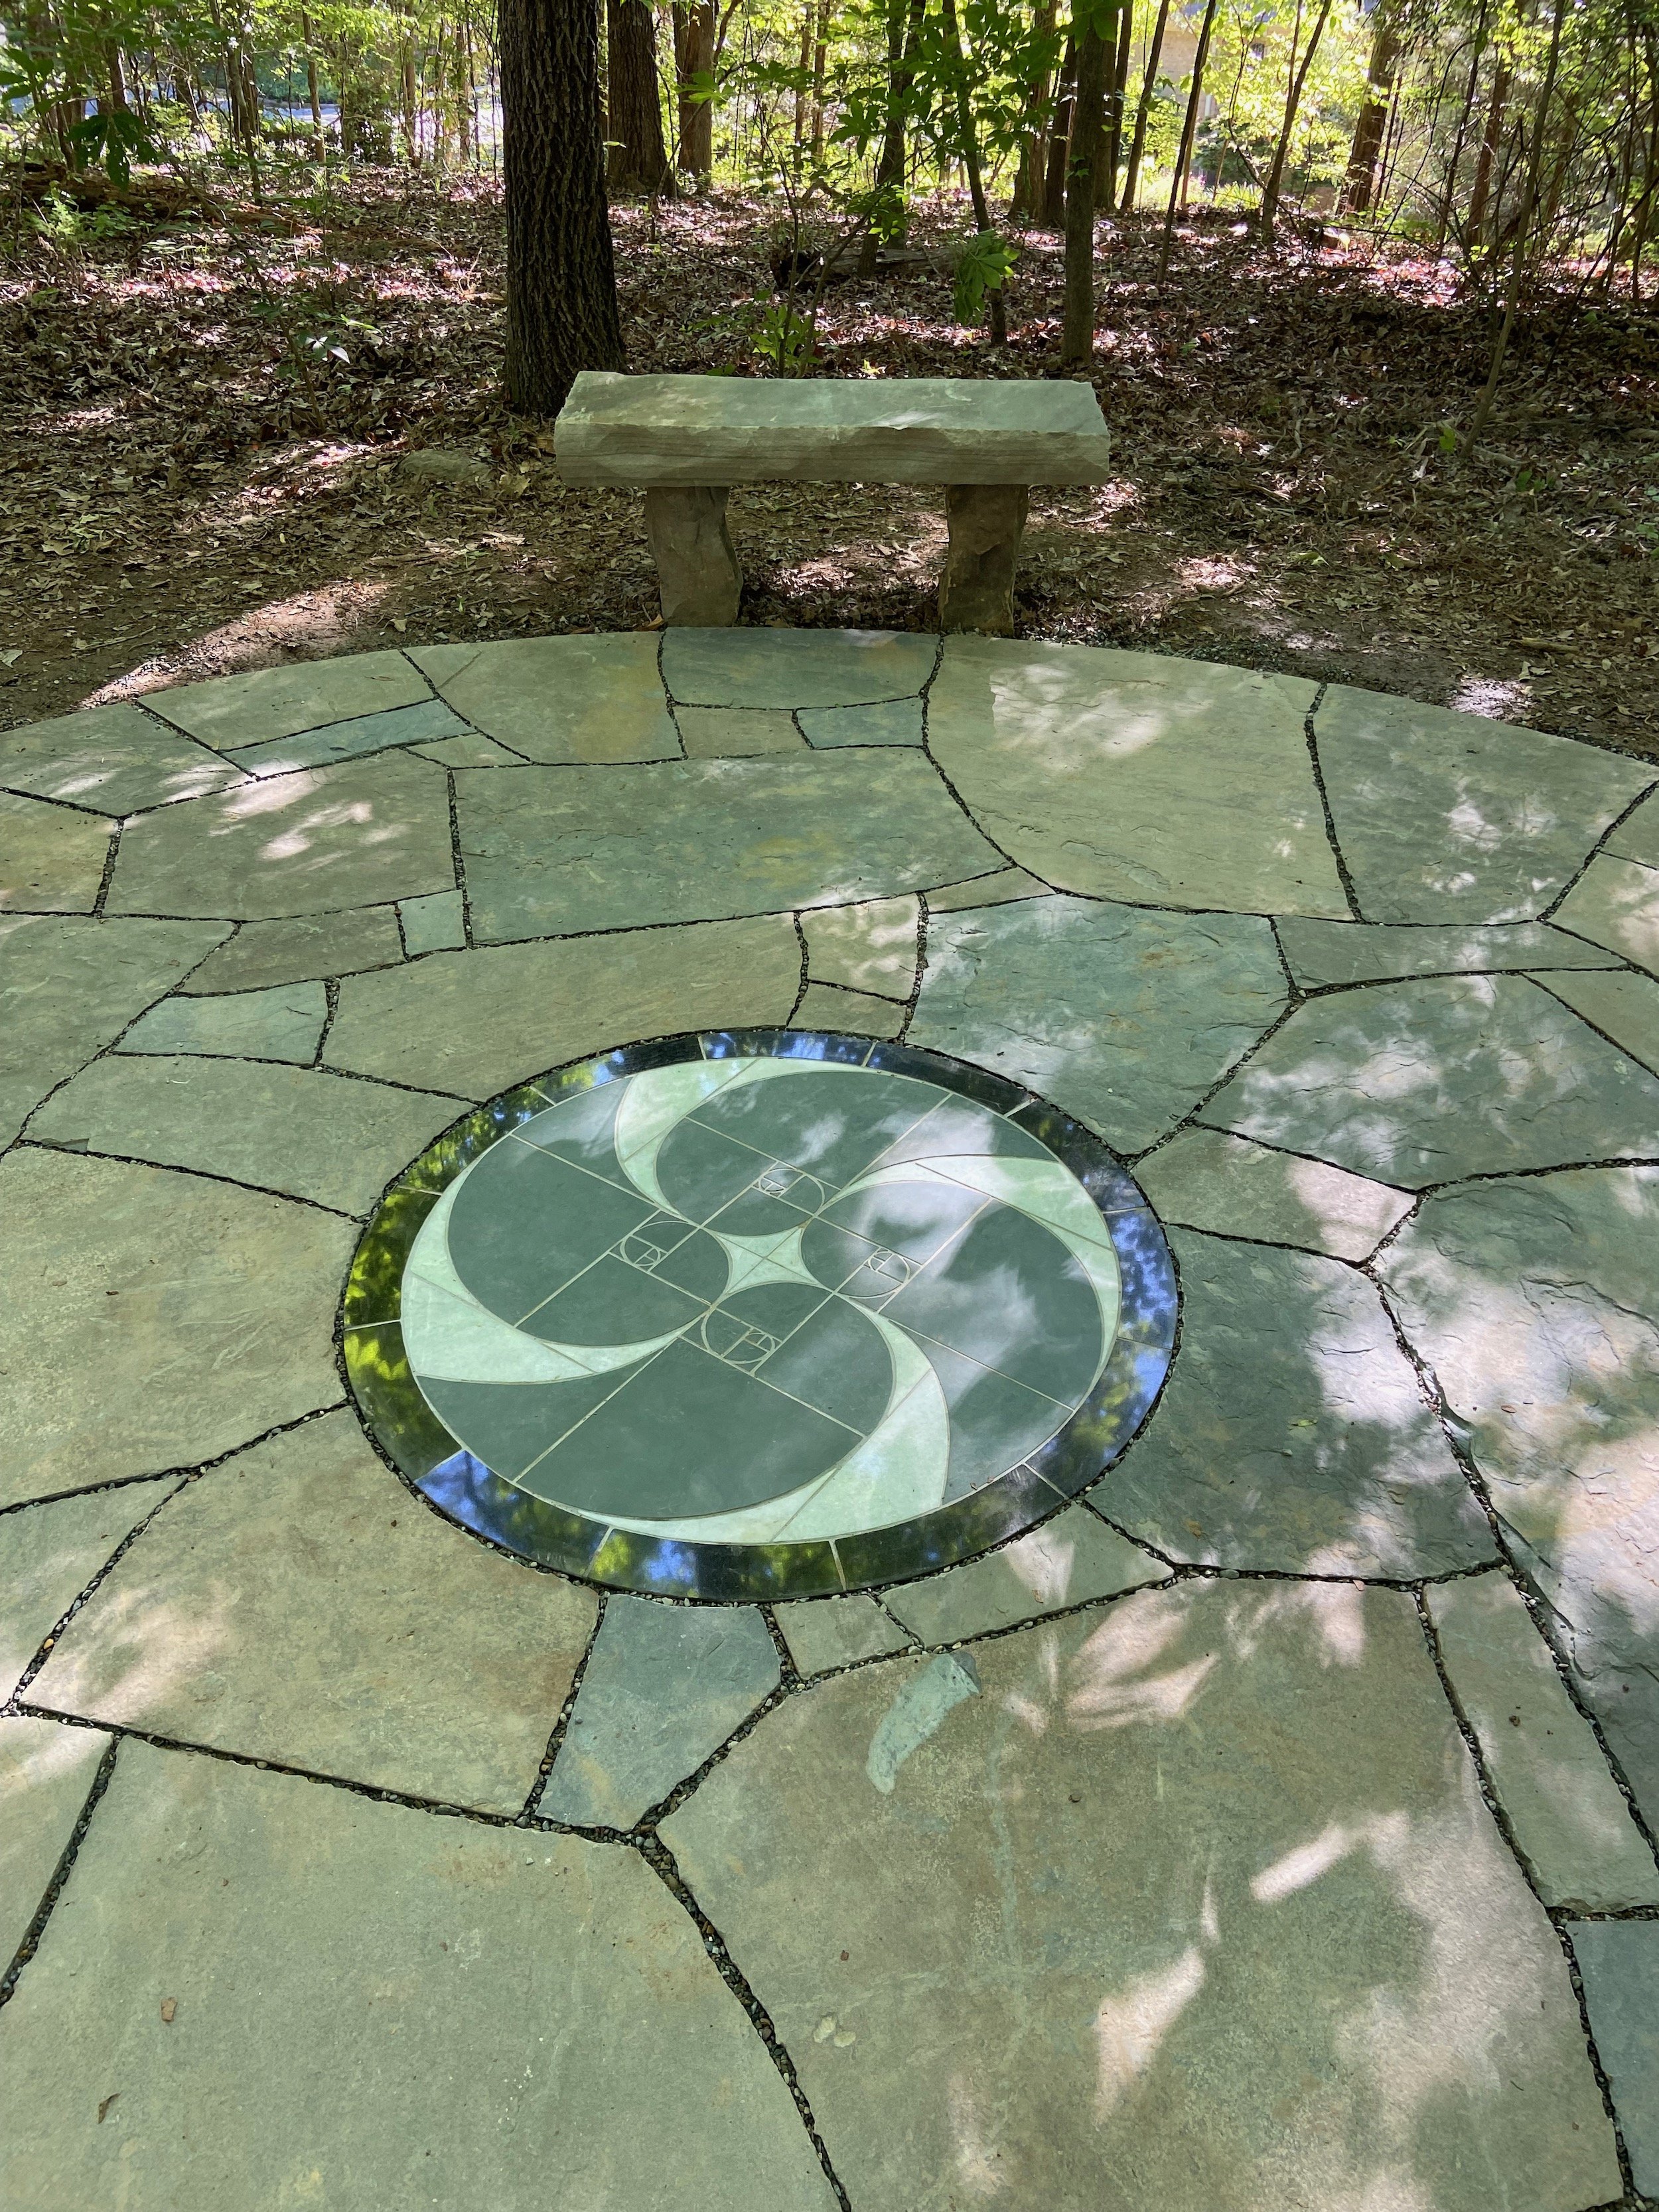
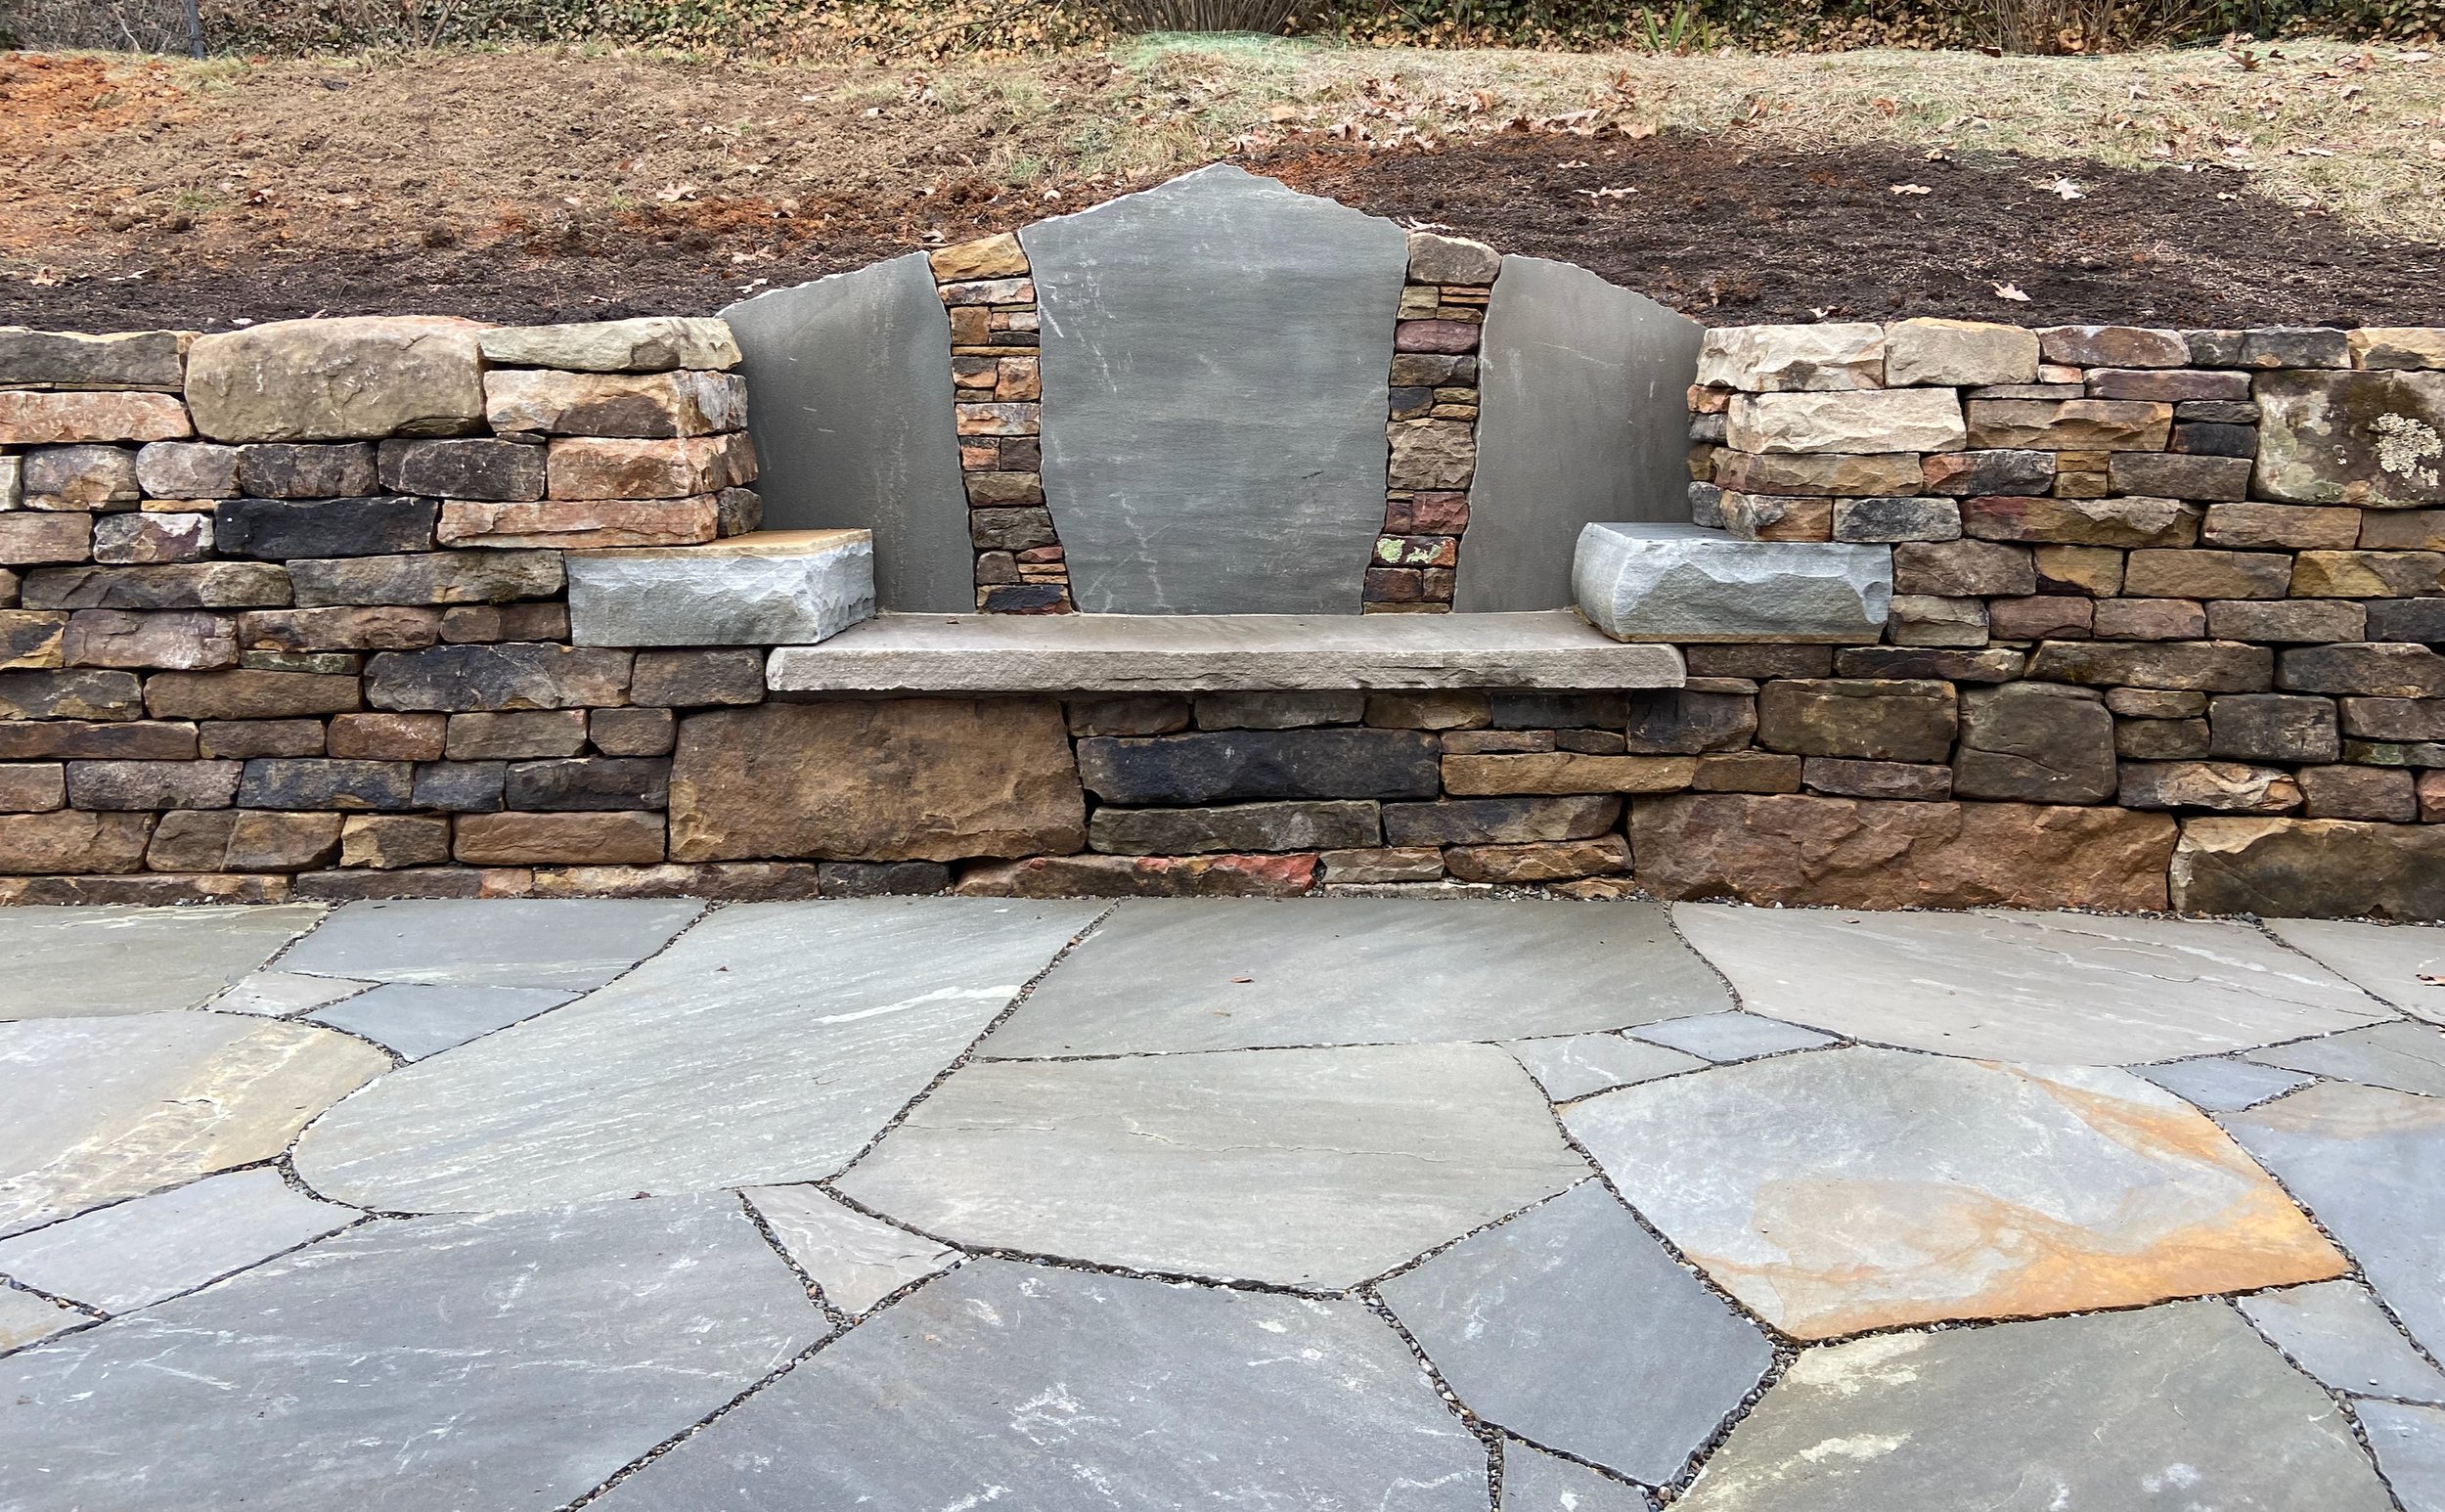
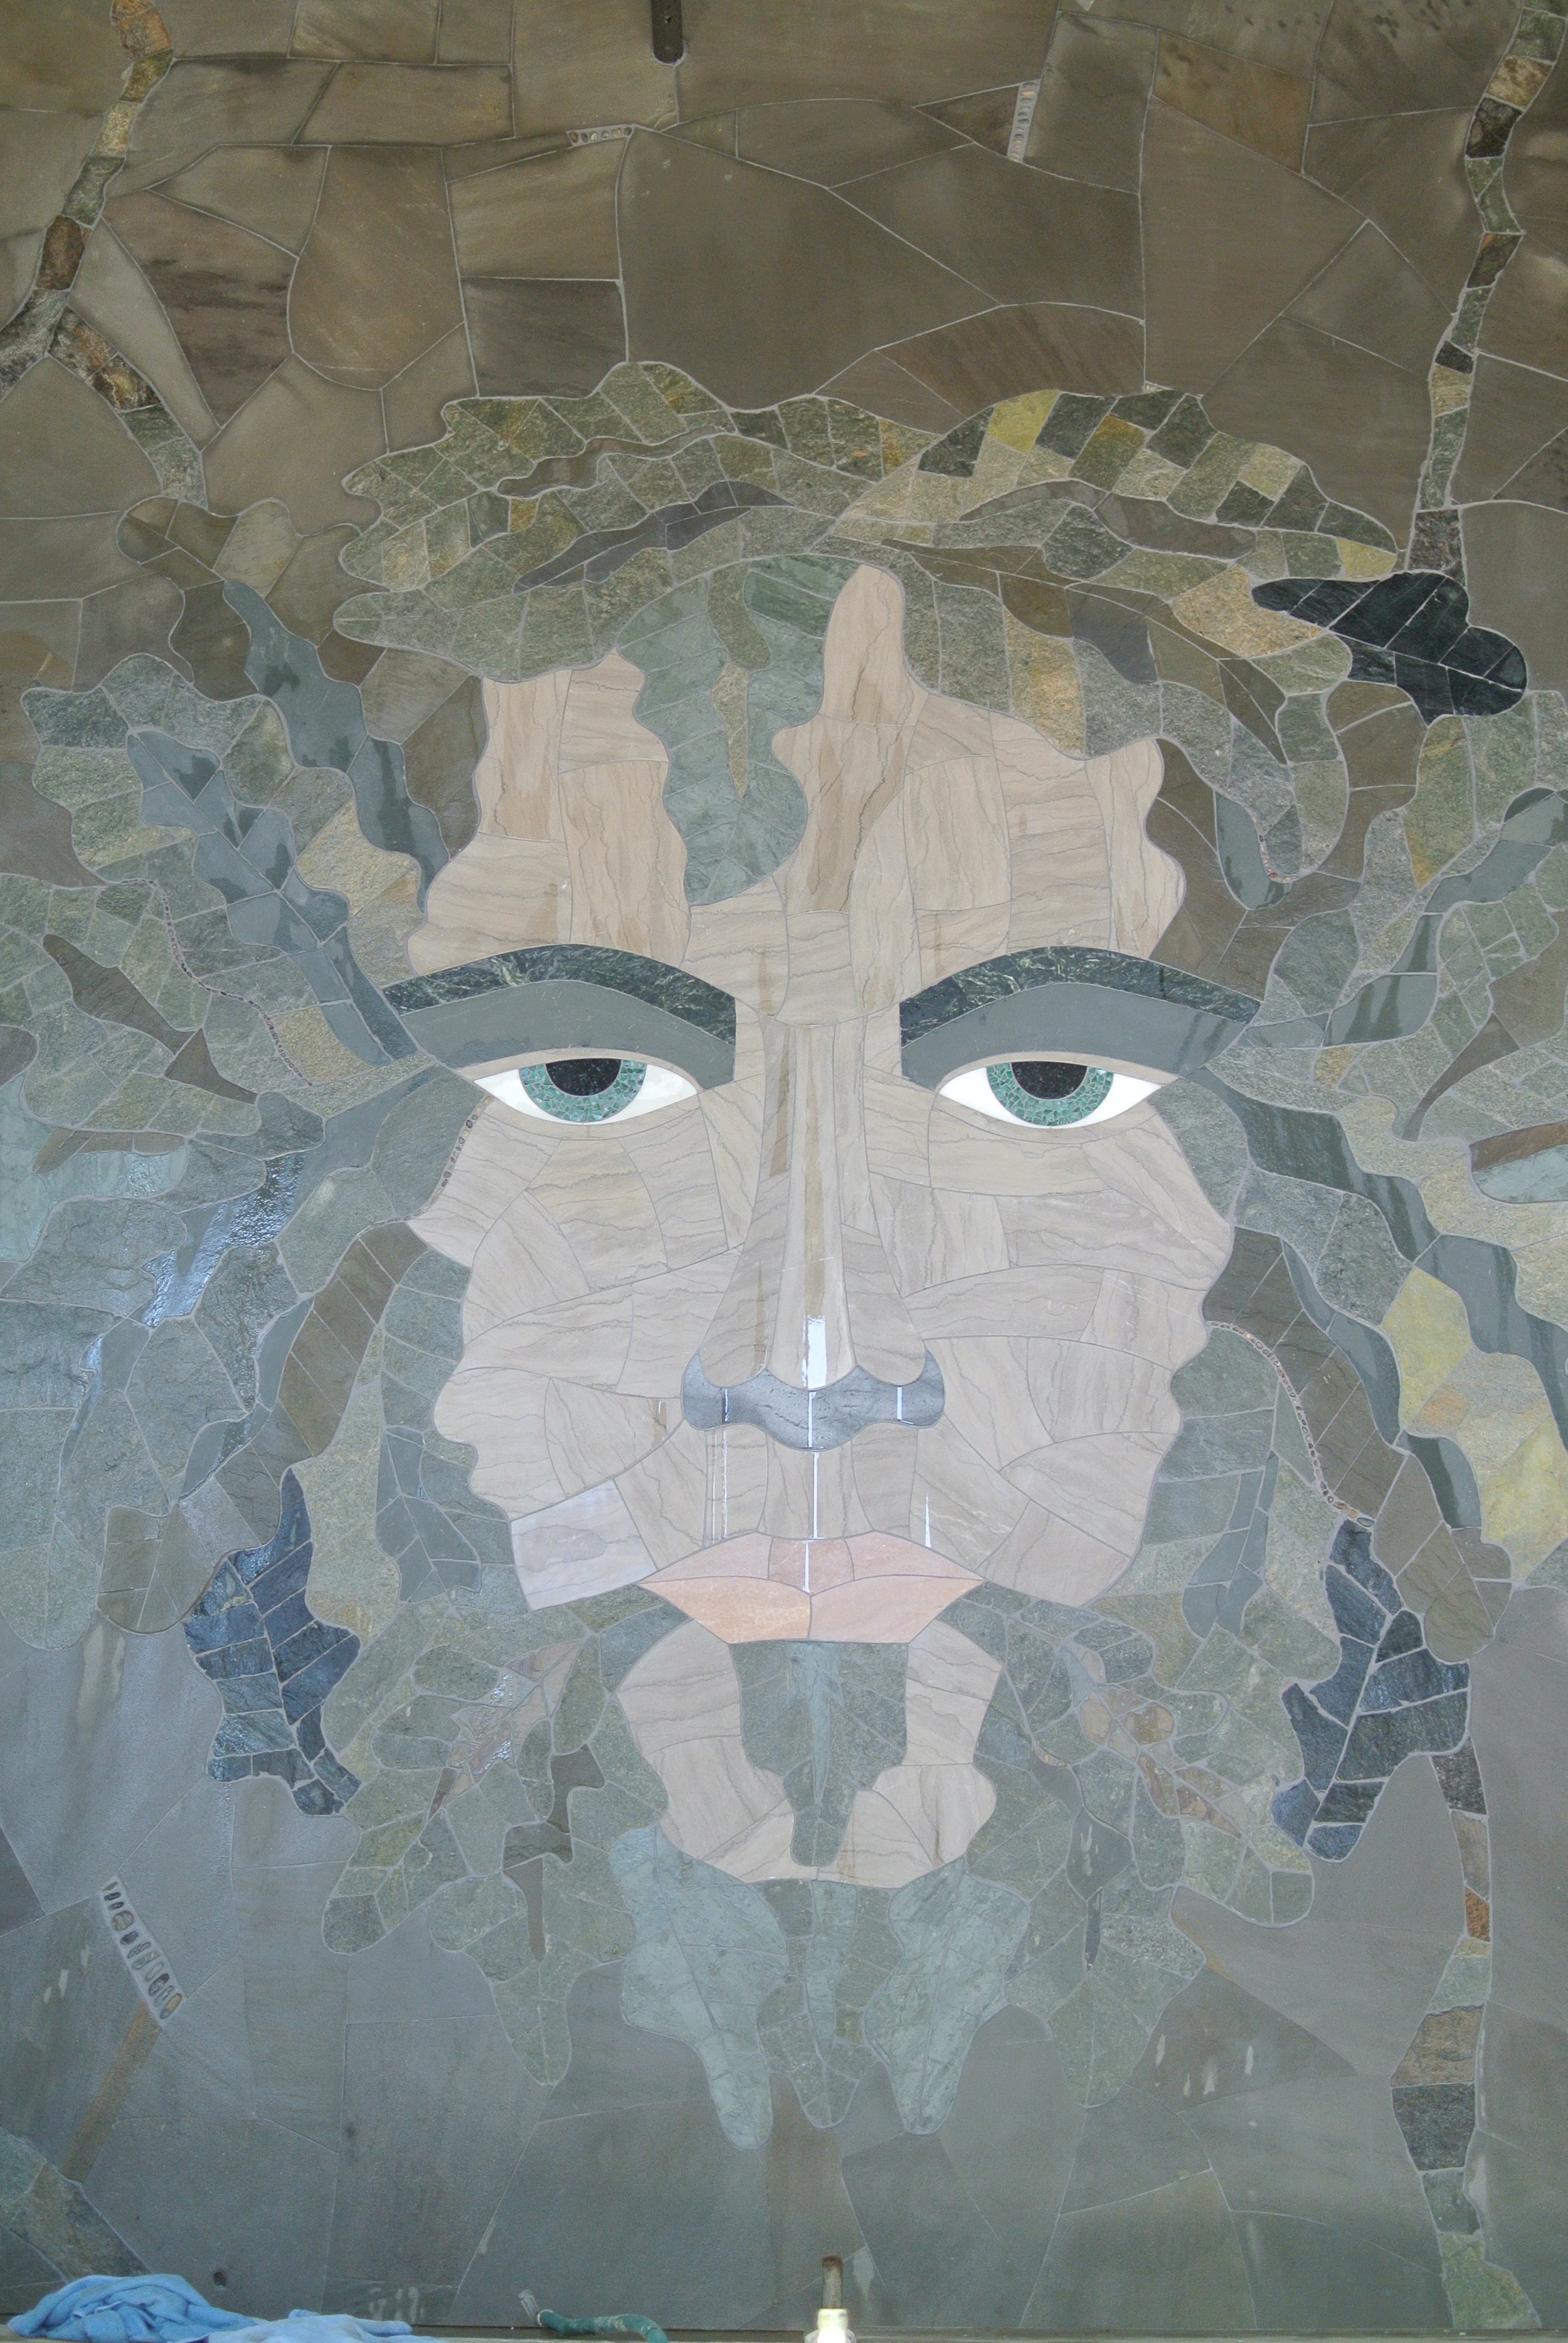
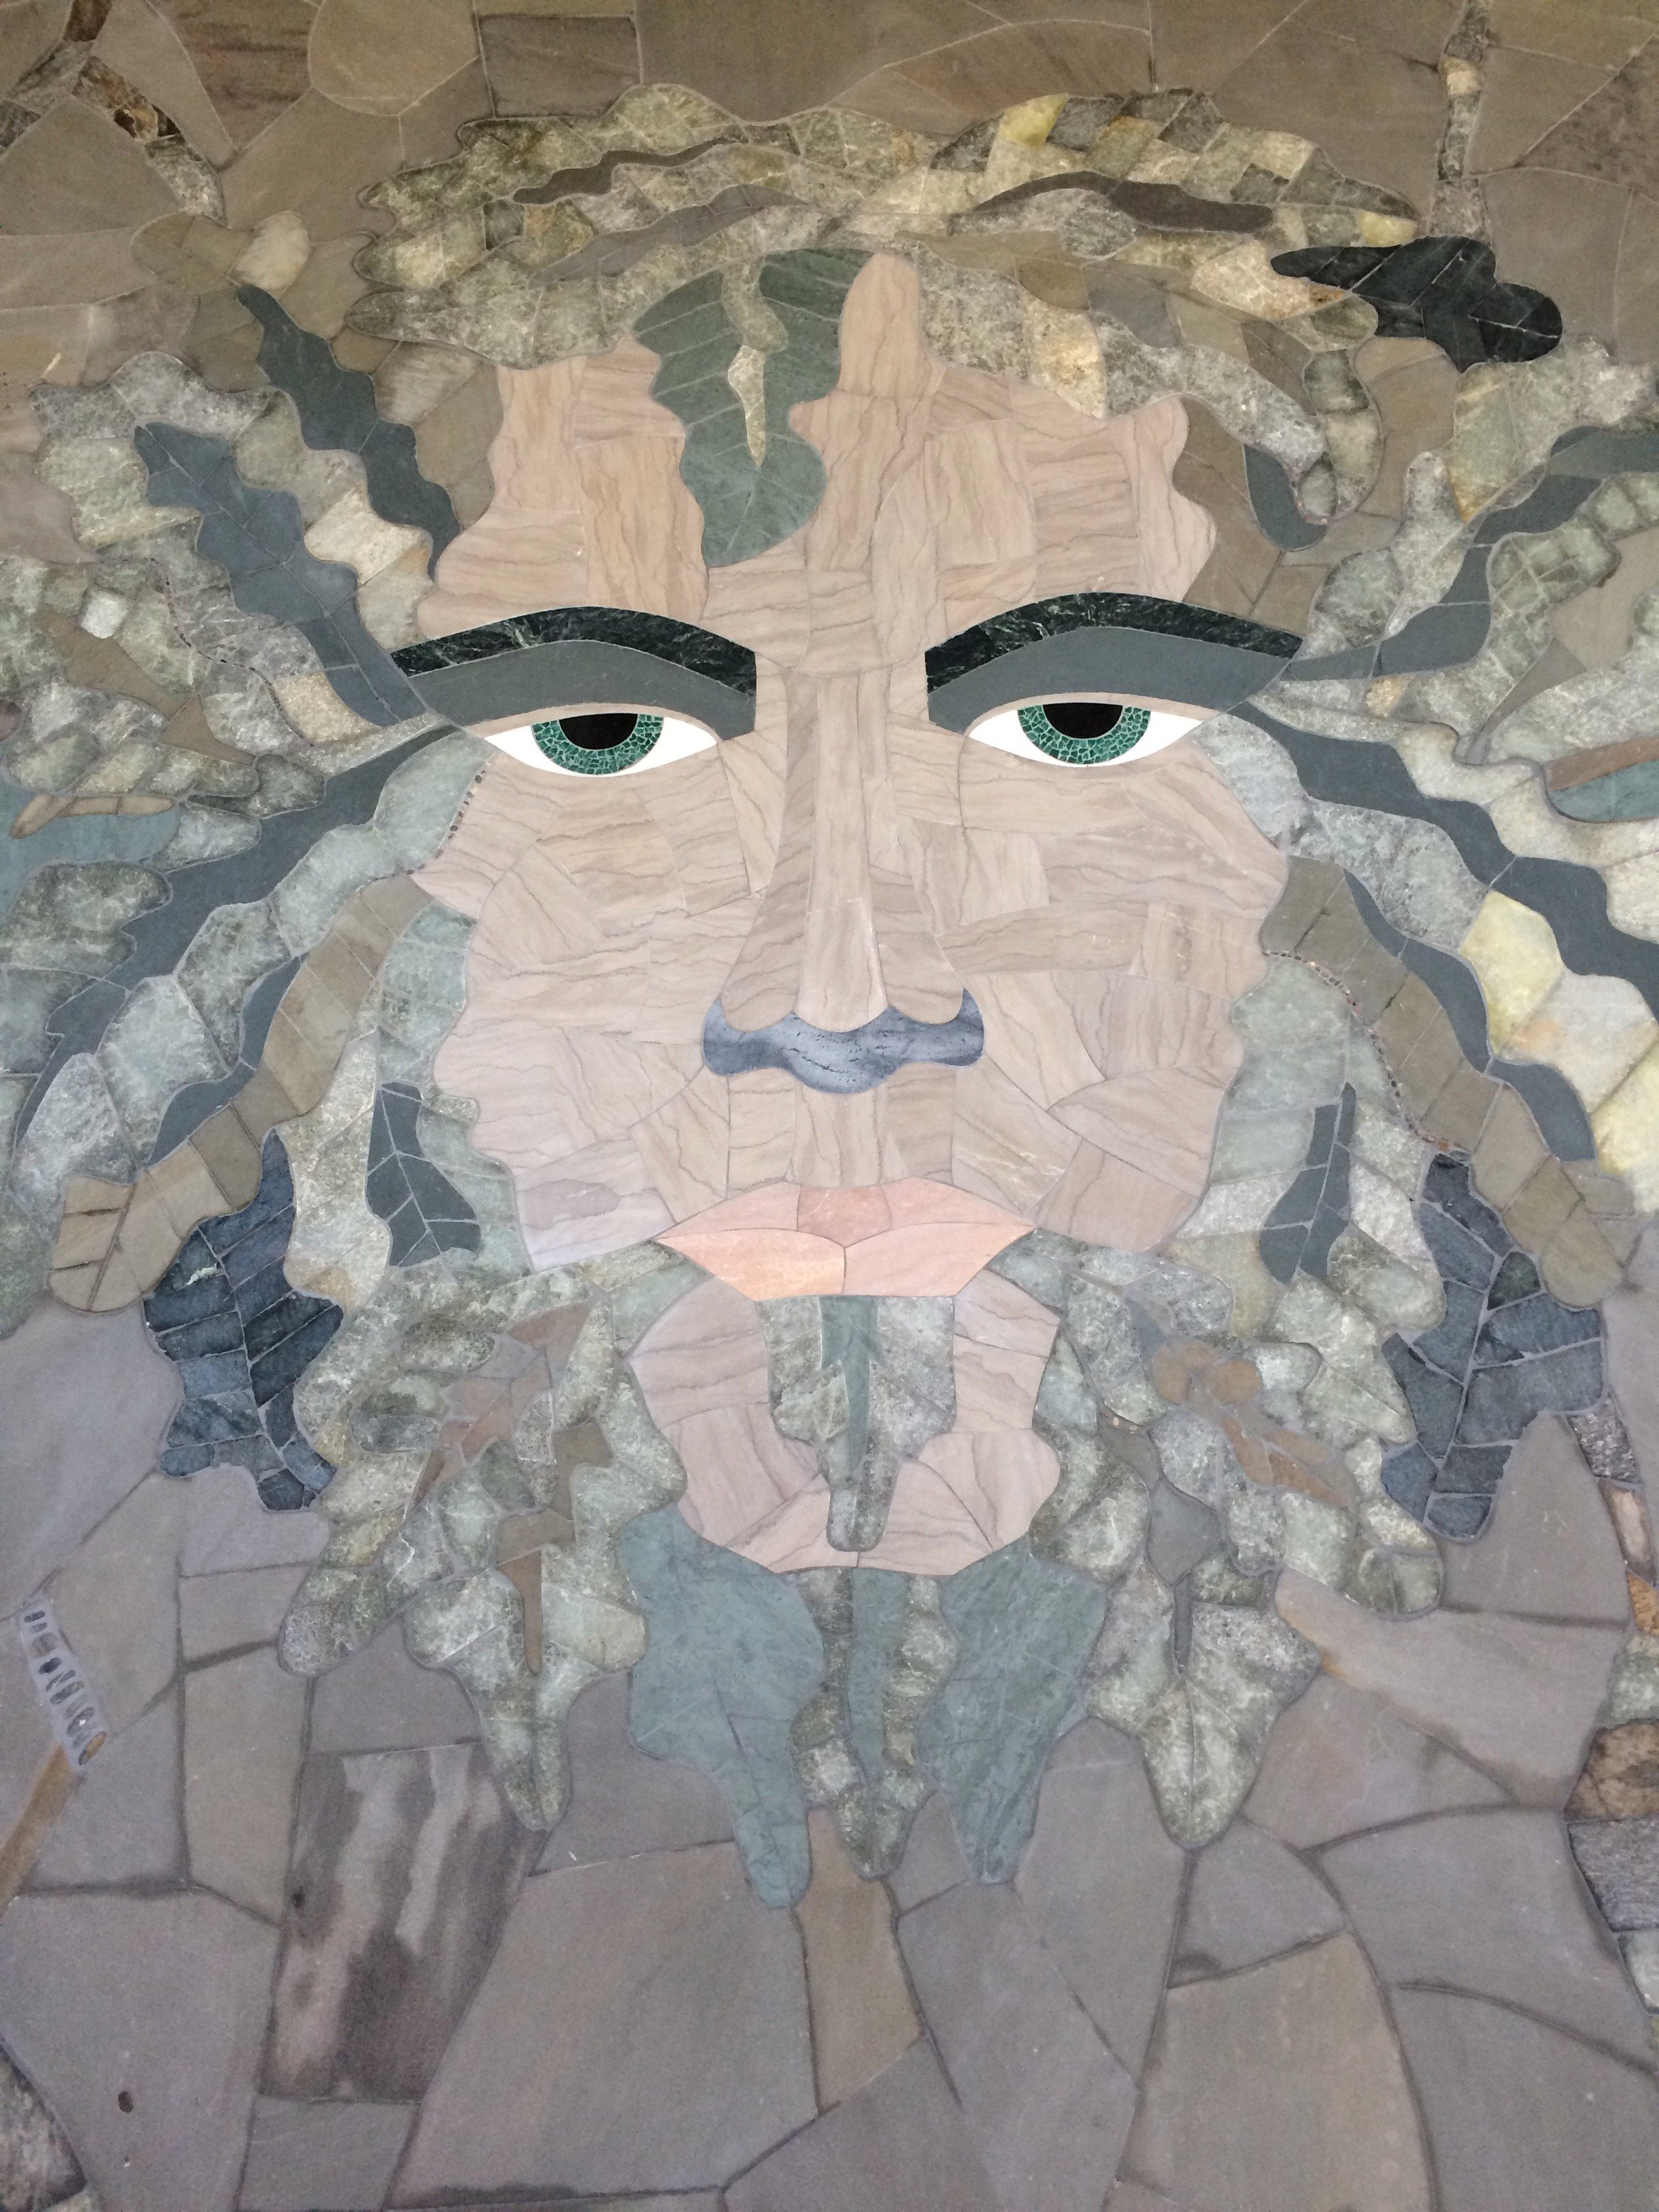
Hammerhead Stoneworks built a stone memorial mosaic patio for the Ironwoods neighborhood in Chapel Hill, NC. It honors the life of longtime resident Jim Kaiser. Commissioned by Jim’s family and the neighborhood Homeowners Association, the drystone patio sits in a clearing in the woods on community land everyone can use. While we were working there, a regular stream of residents (and their pups) wandered through the woodsy location.
The Memorial Mosaic Process
There were two major factors that we had to address to make this project a success: the design and the travel. Because this patio was intended as a memorial, the design phase was more involved than was typical. It also presented challenges because we are based in Asheville, but the project was sited in Chapel Hill.
Designing the stone project
Matthew Feldt of Ironwoods contacted me because of previous projects we had done together, including a neighborhood entry sign I built in collaboration with blacksmith Lynda Metcalfe. Matthew told me the neighborhood wanted to create a communal gathering space that celebrated the life of a long-time and well liked member of the community named Jim Kaiser. The HOA already had a site picked out and they knew that they wanted stone benches. Was I interested? Yes. Very much so. These are some of my favorite projects, where we are able to combine our structural stonework- in this case a patio and benches- with our detailed aesthetic work- a memorial mosaic.
Designing the memorial mosaic
This process was challenging because I did not know Jim personally and did not have a lot of access to his life story. I find that I do my best work, particularly with memorials, the better I know the subject. Little stories and life details are excellent jumping off points for creating a meaningful design.
I knew that Jim loved music and was an engineer. Good start, but I found all of my early sketches to be generic and clichéd. I want my memorial mosaics to be specific and connected to the subject in a meaningful way.
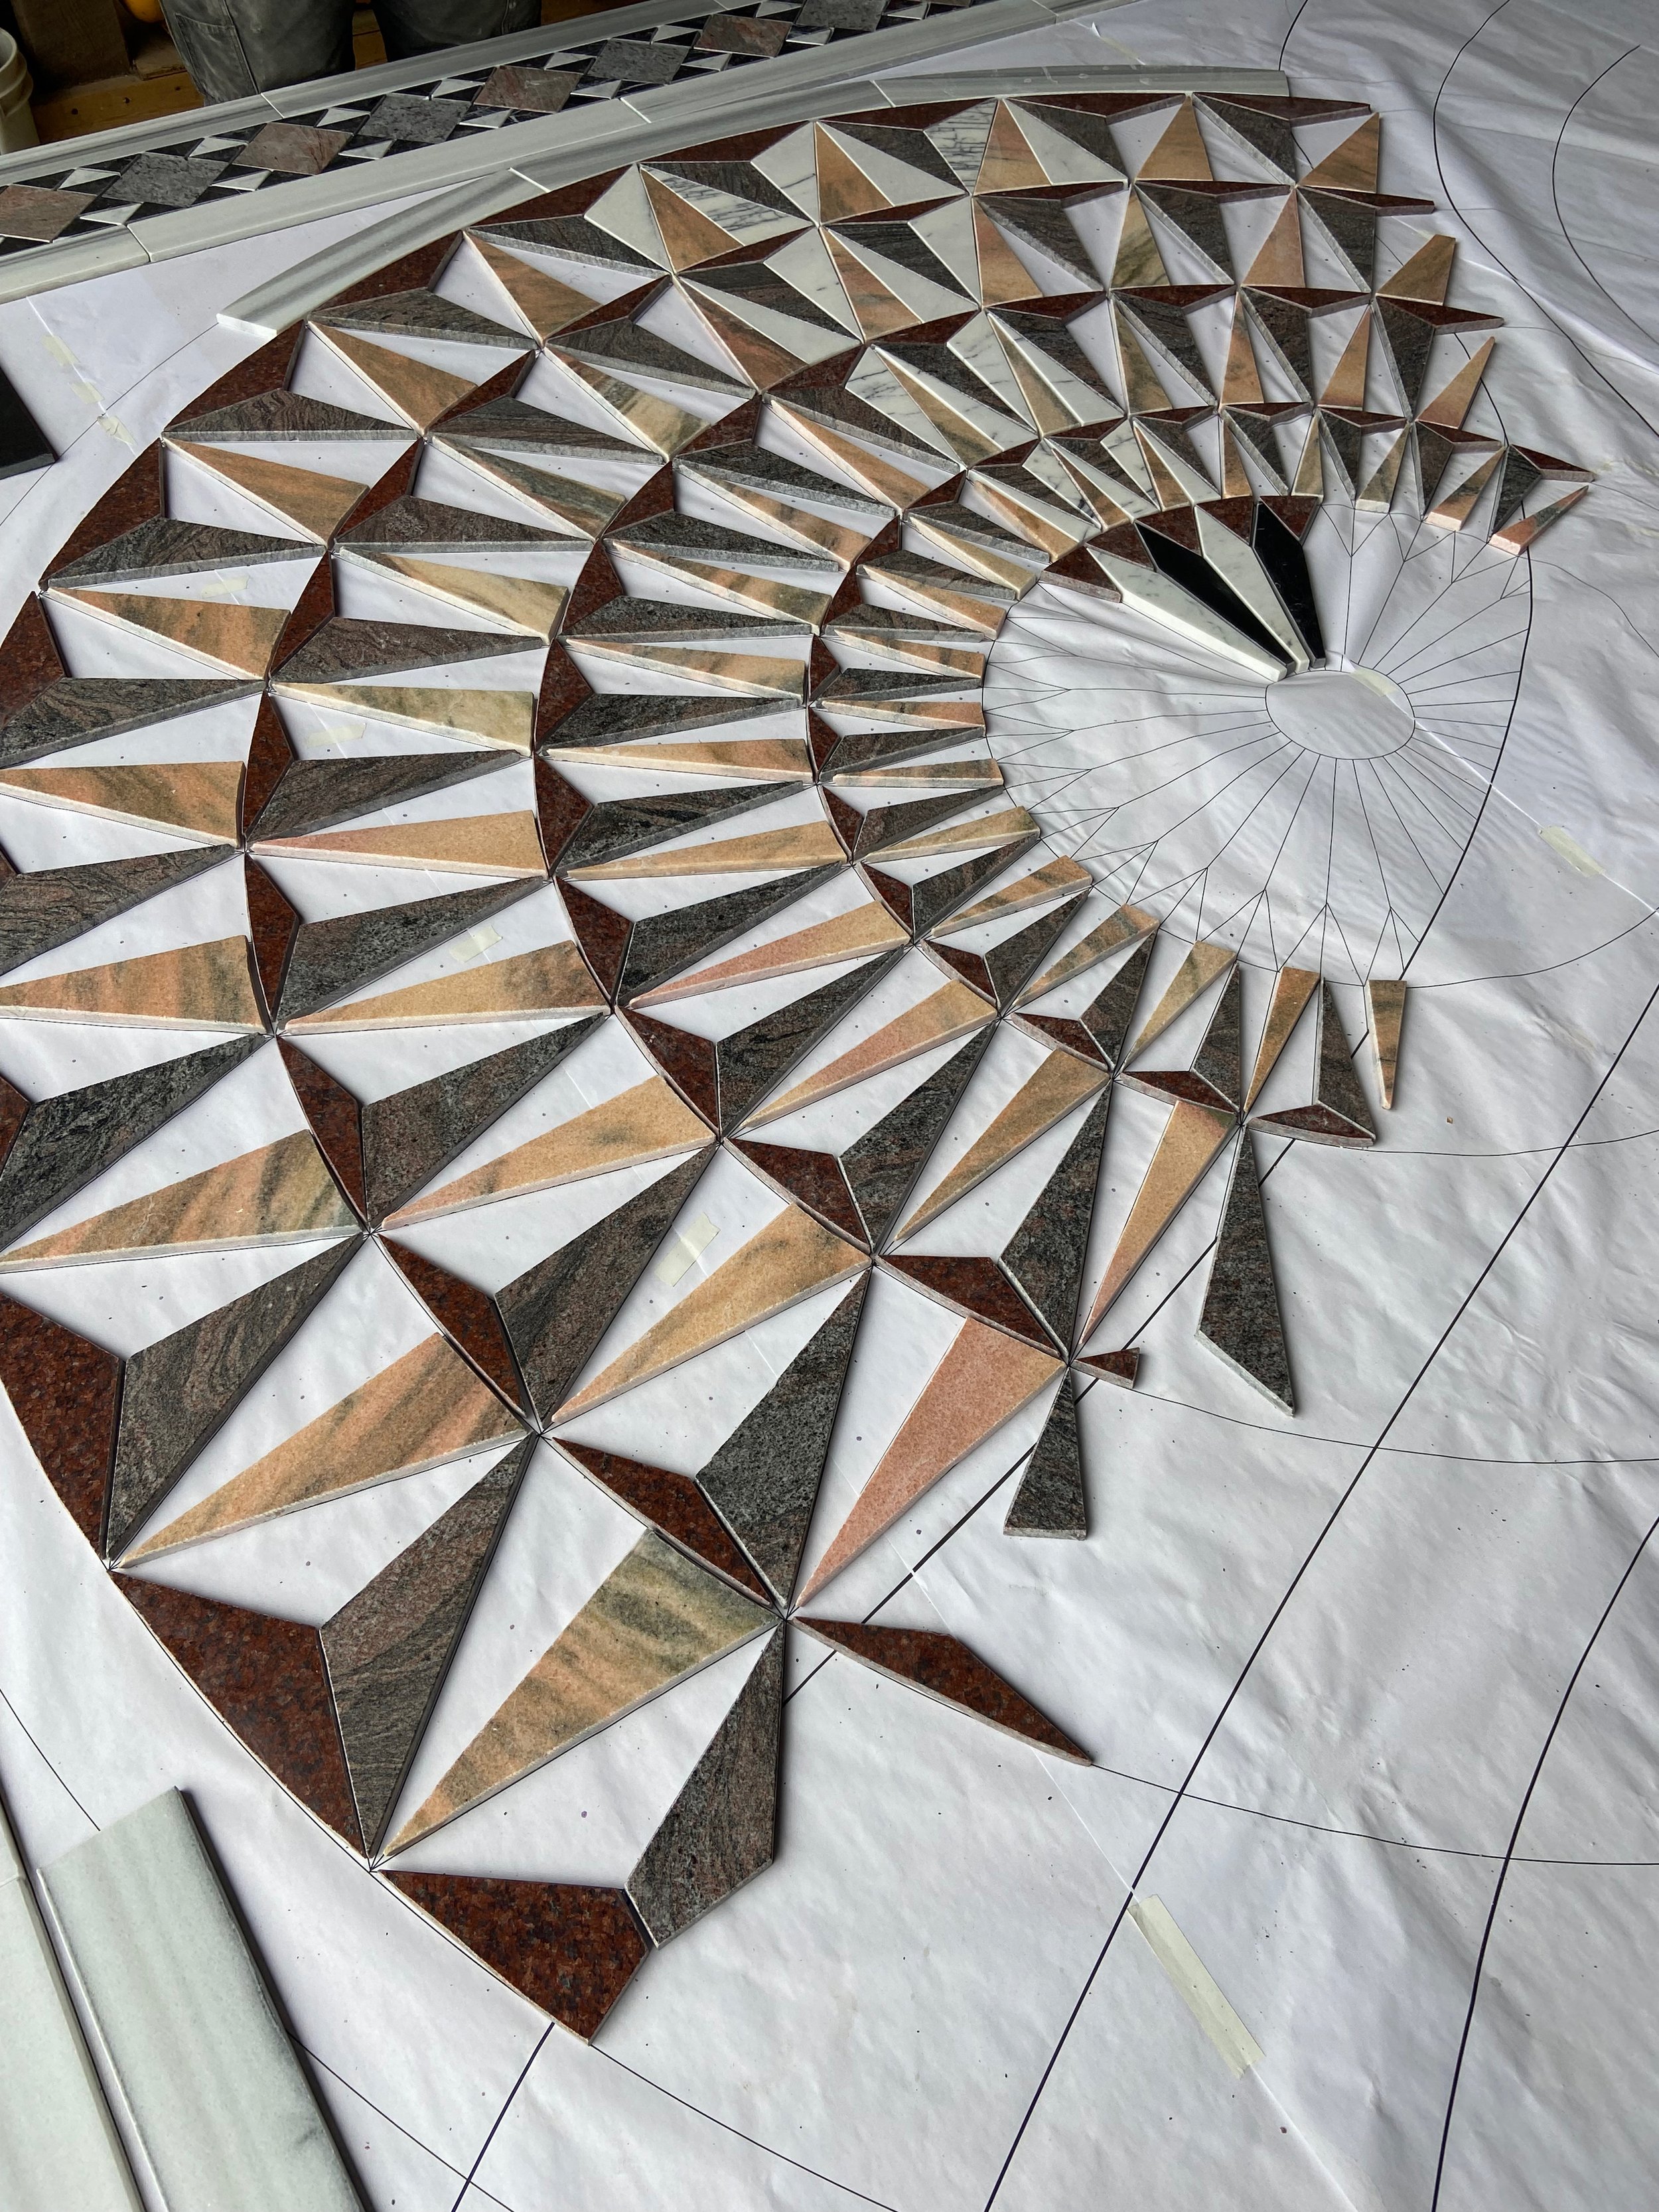
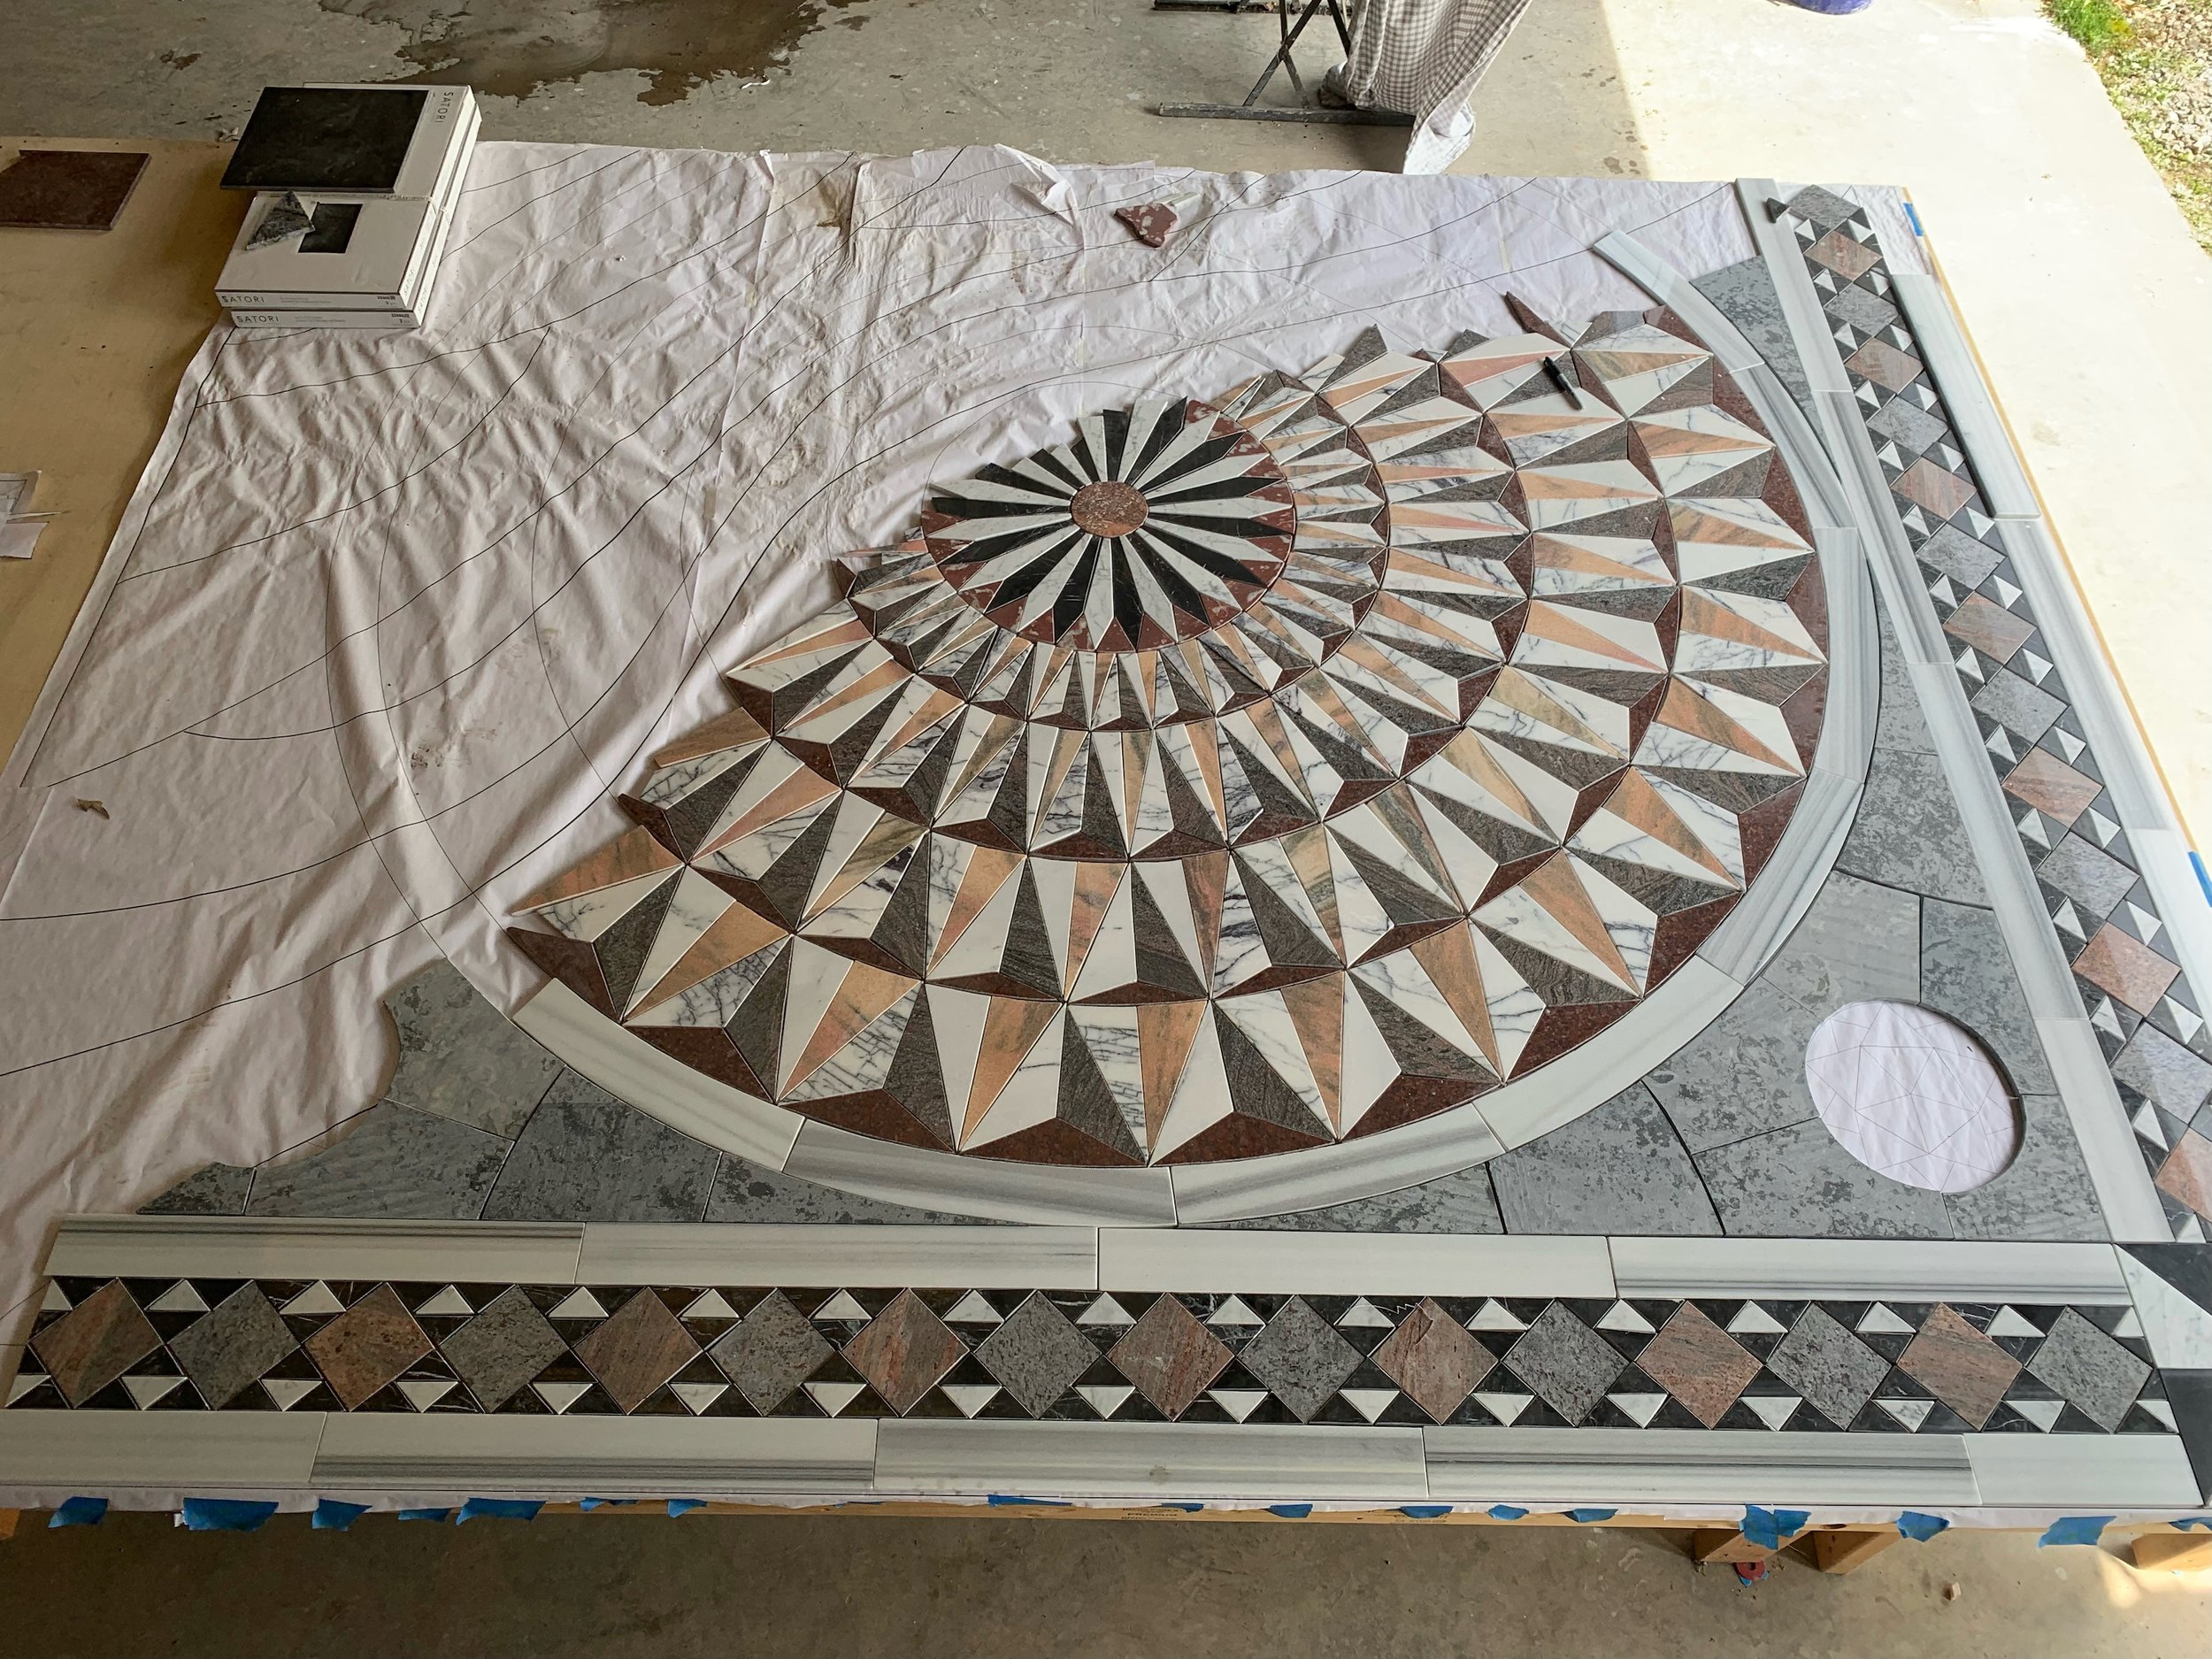
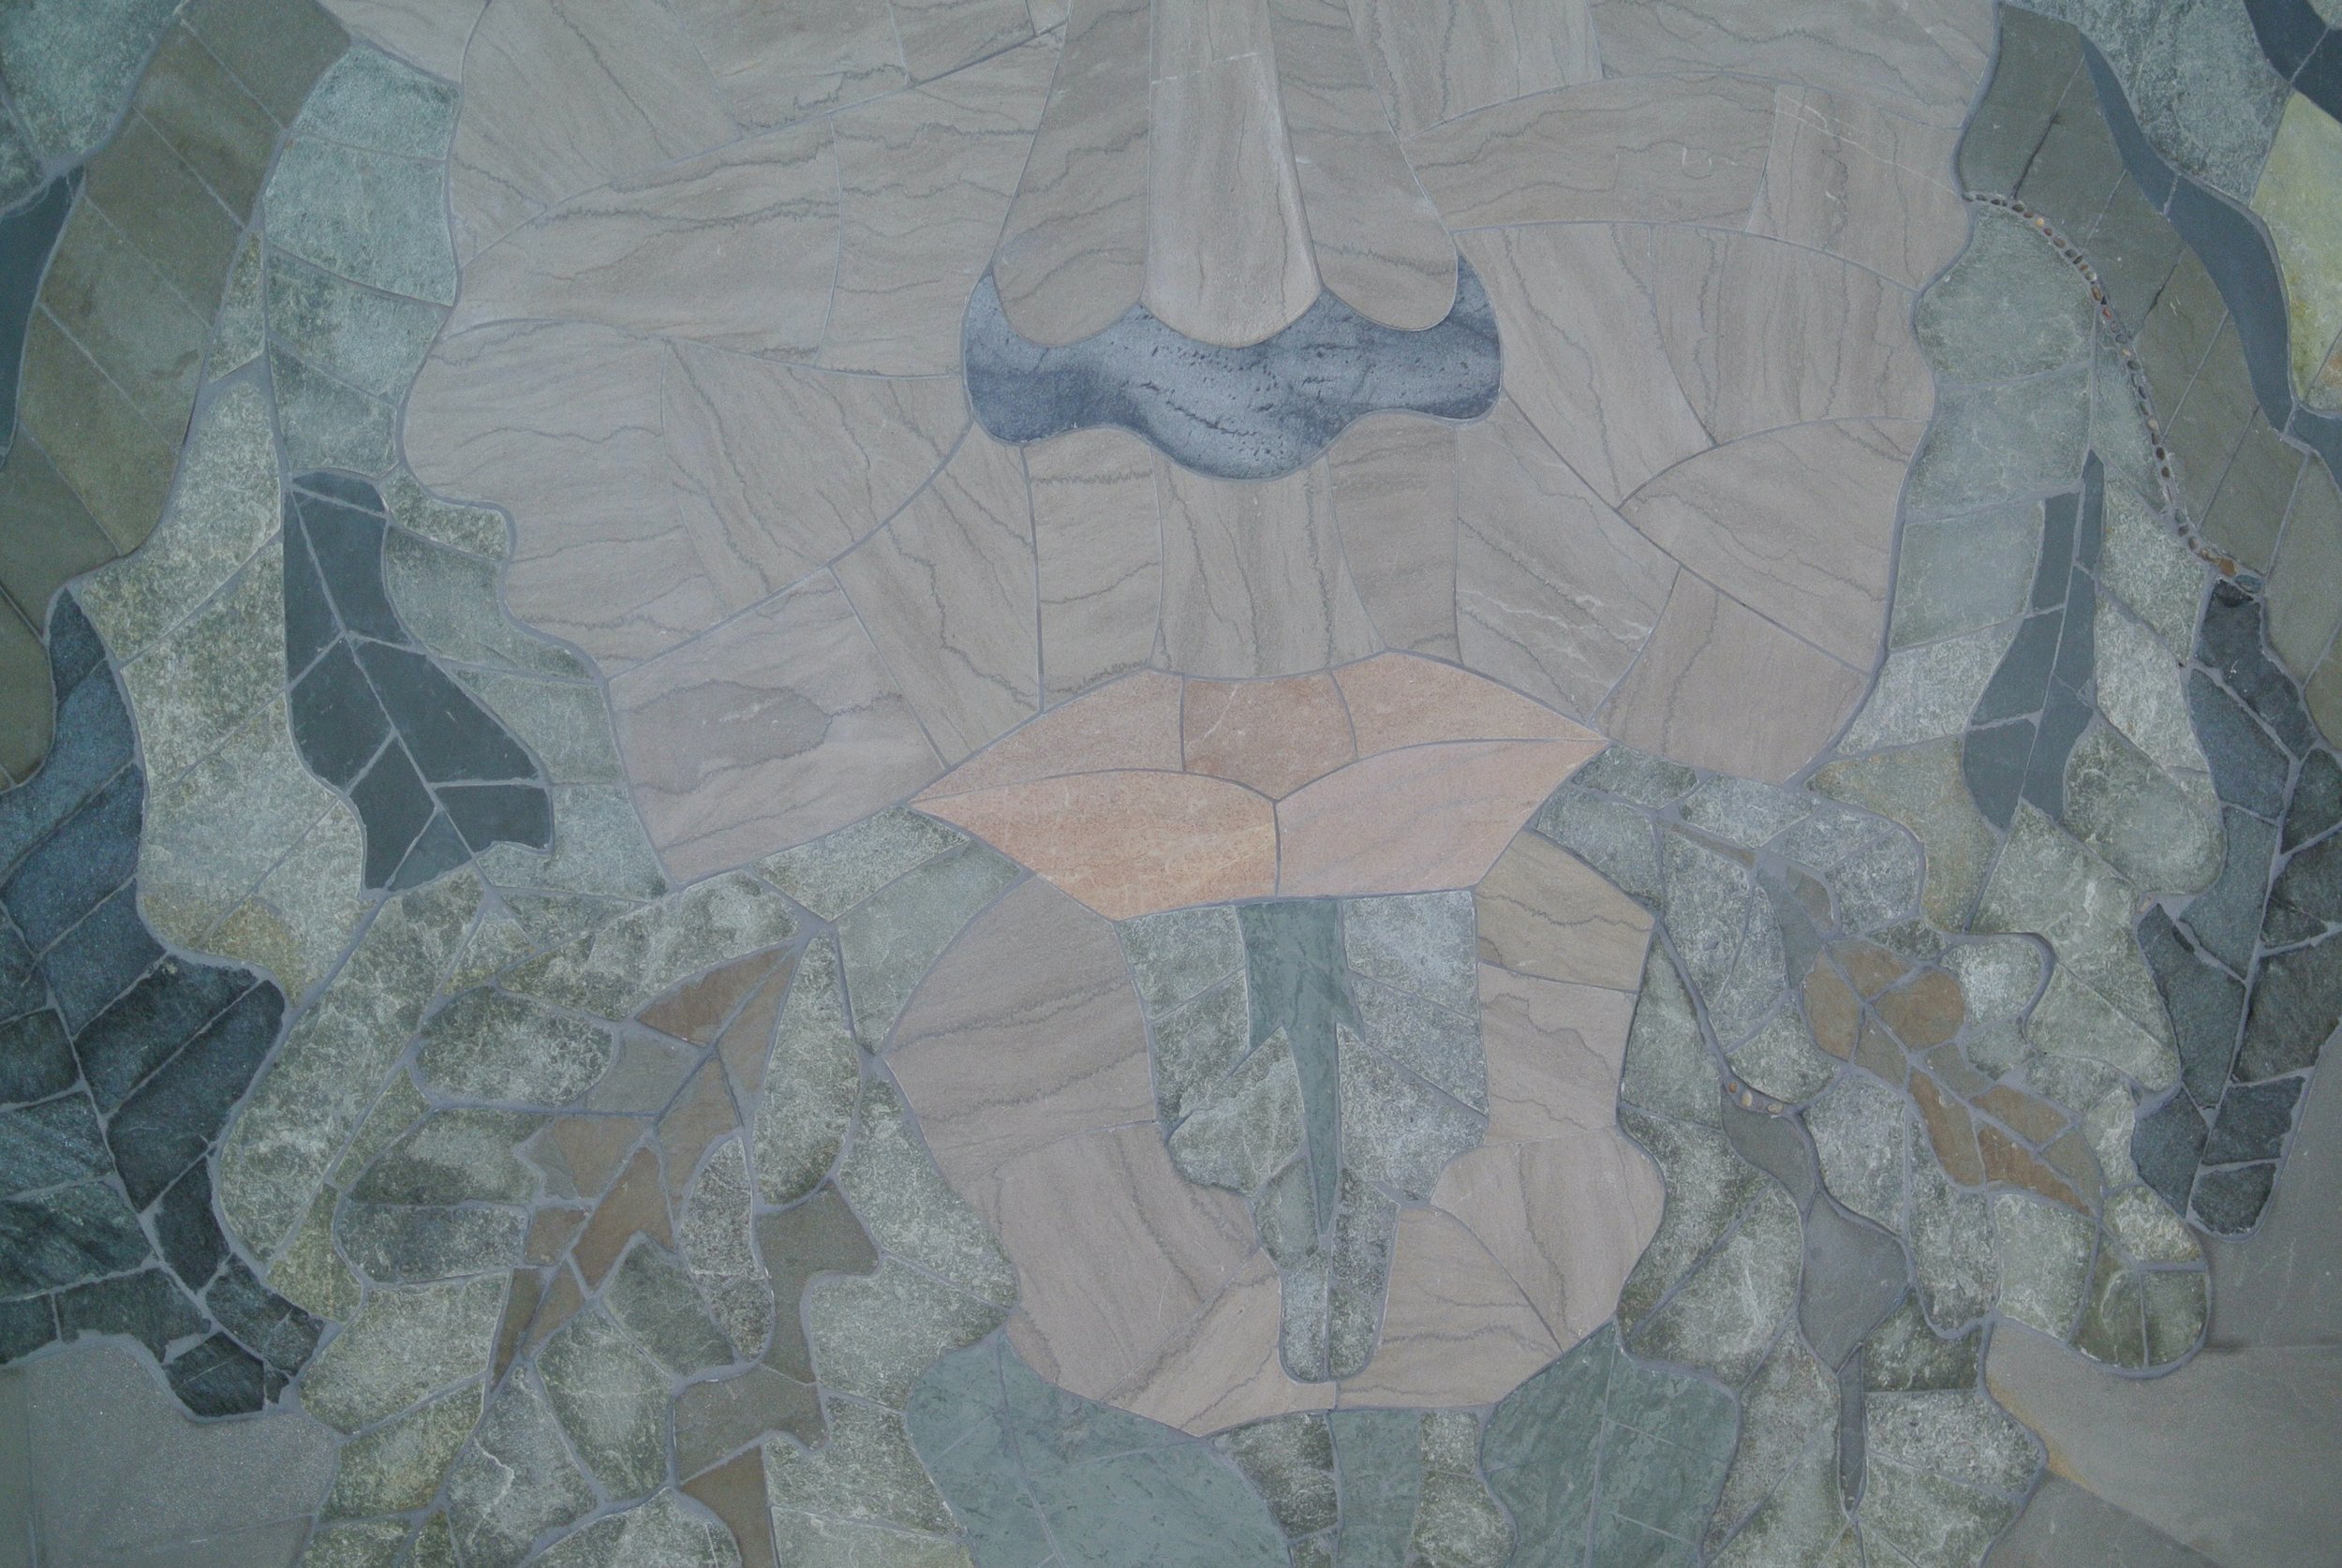
I was able to have a conversation over the phone with one of the Jim’s daughters. She told me about her Dad and I was able to put more pixels into my picture of him. She mentioned his lifelong fascination with mathematics and how he would play math games with her and her siblings. I talked about drawing Fibonacci sequences with my sons, and she connected to that idea. Capturing that love of mathematics and creativity through Fibonacci spirals became the guiding design principle of the memorial mosaic.
Designing a Fibonacci Sequence in Stone

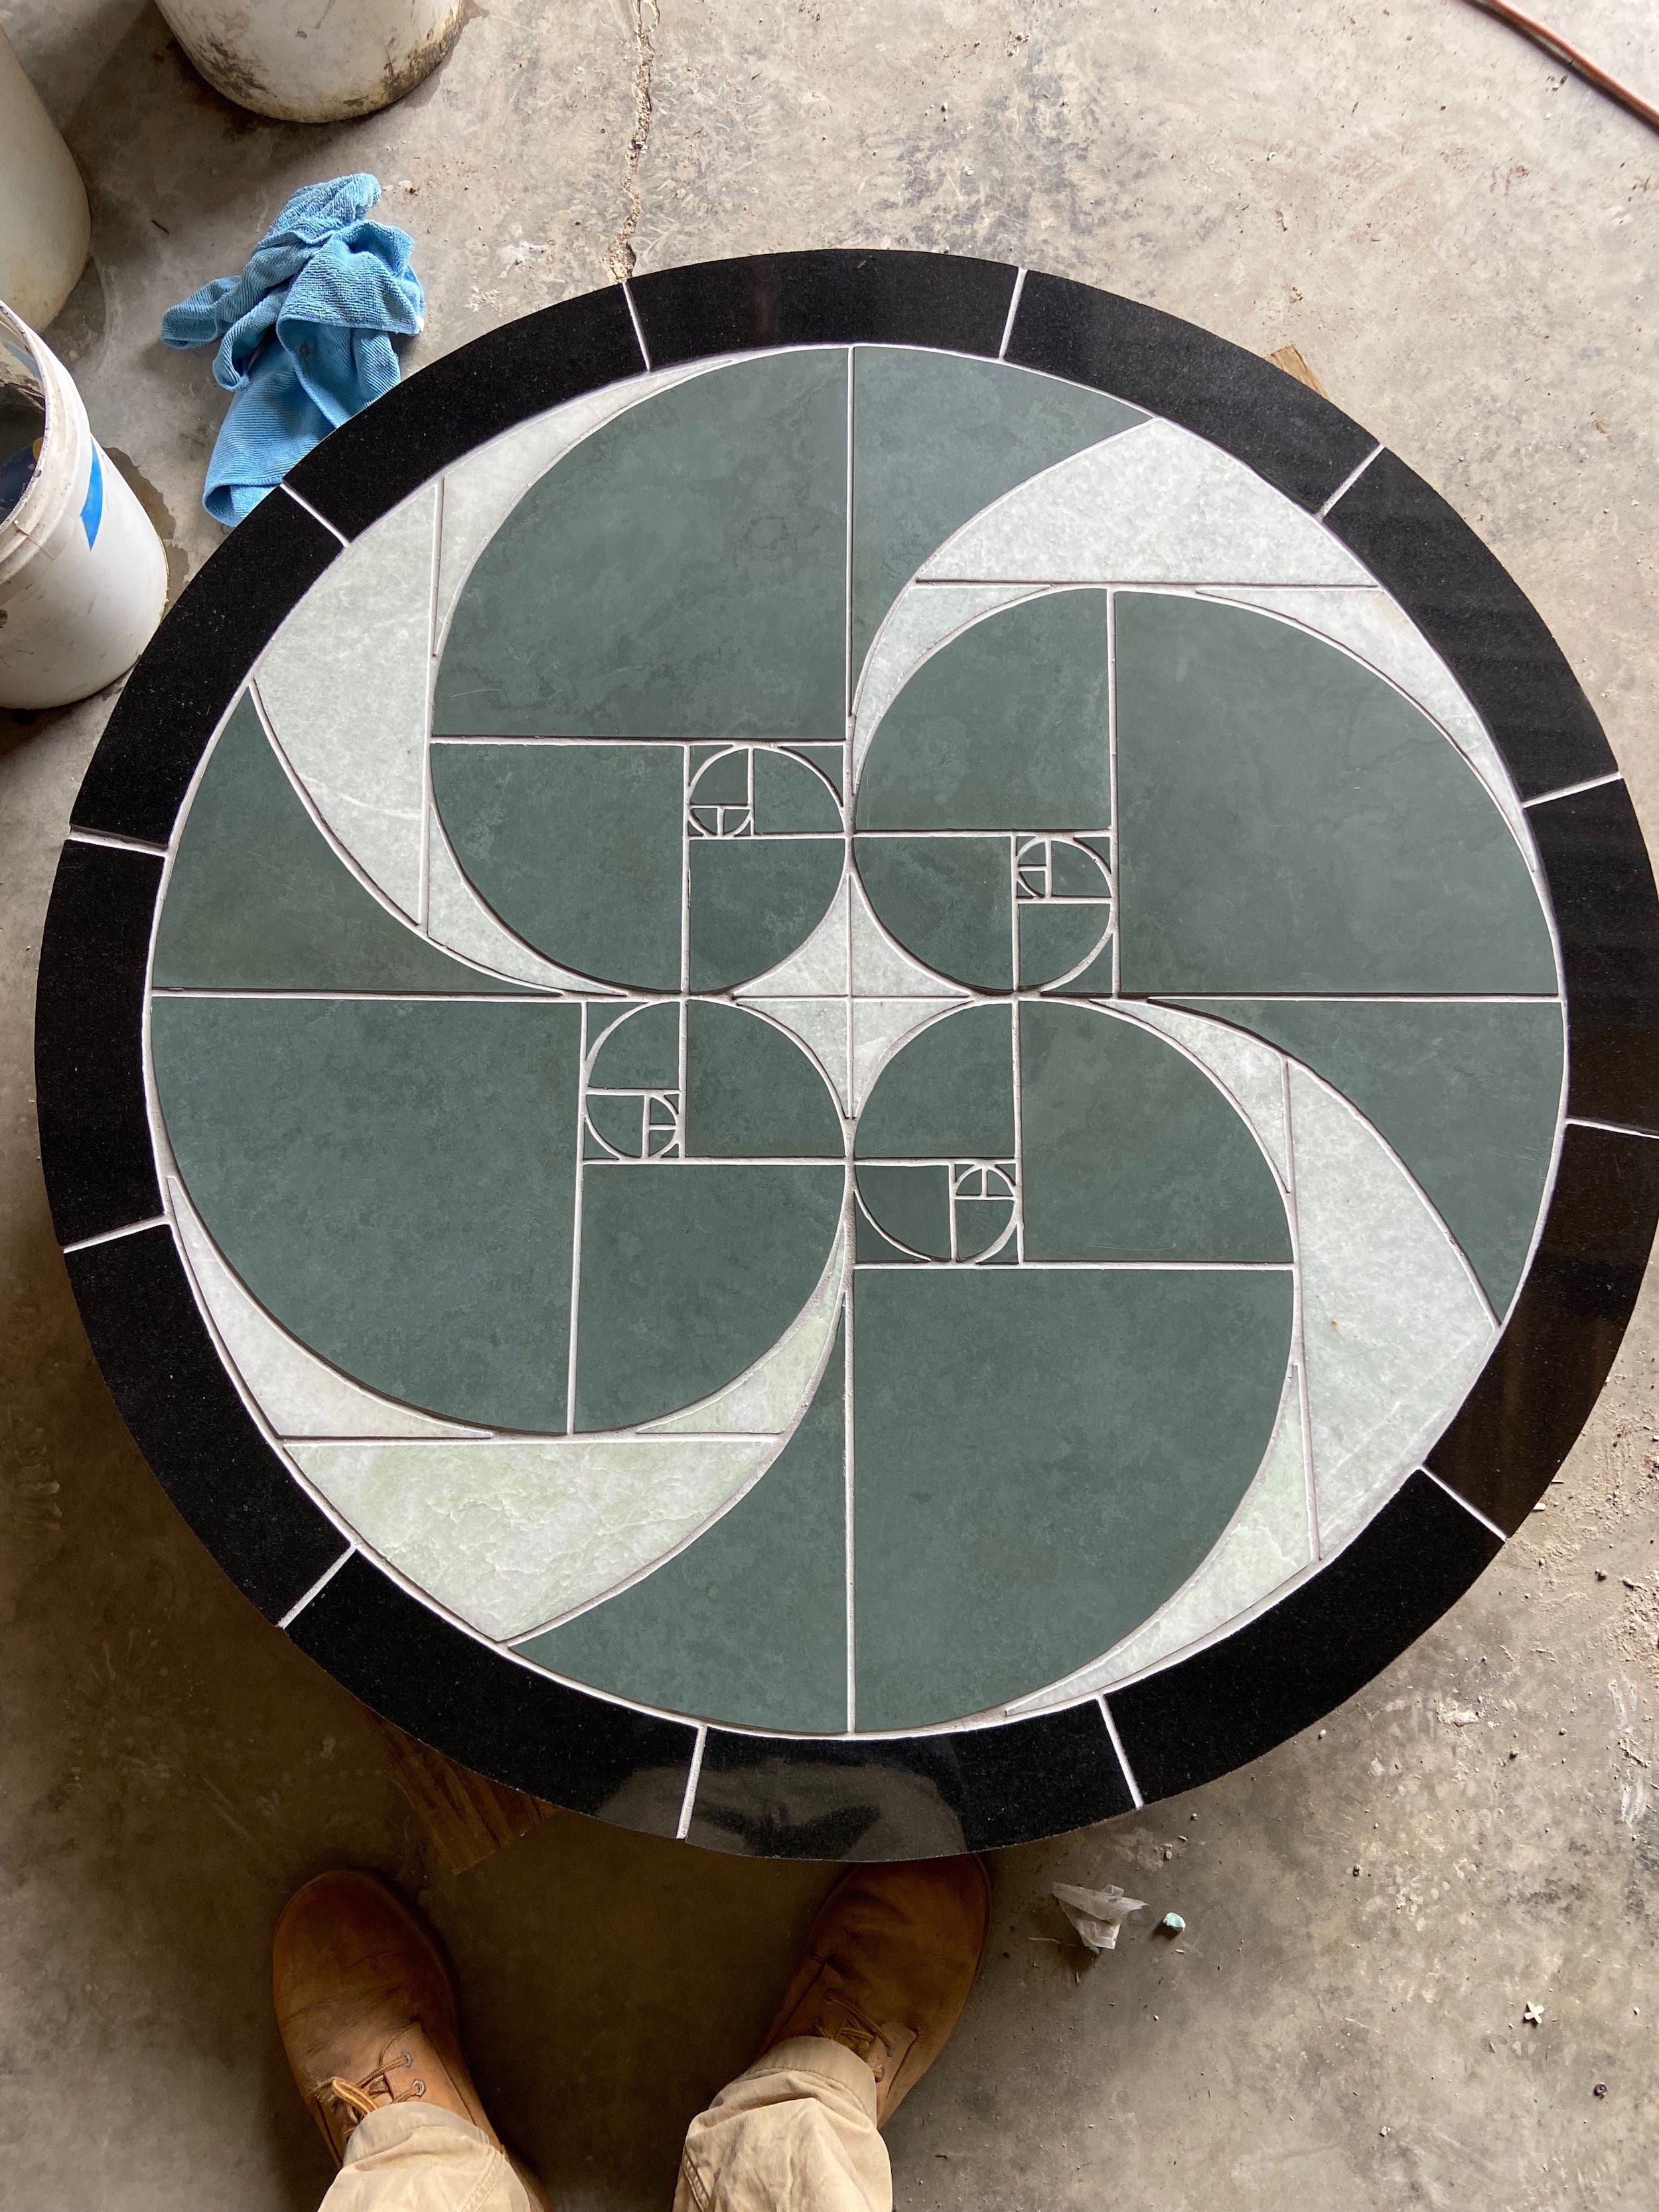
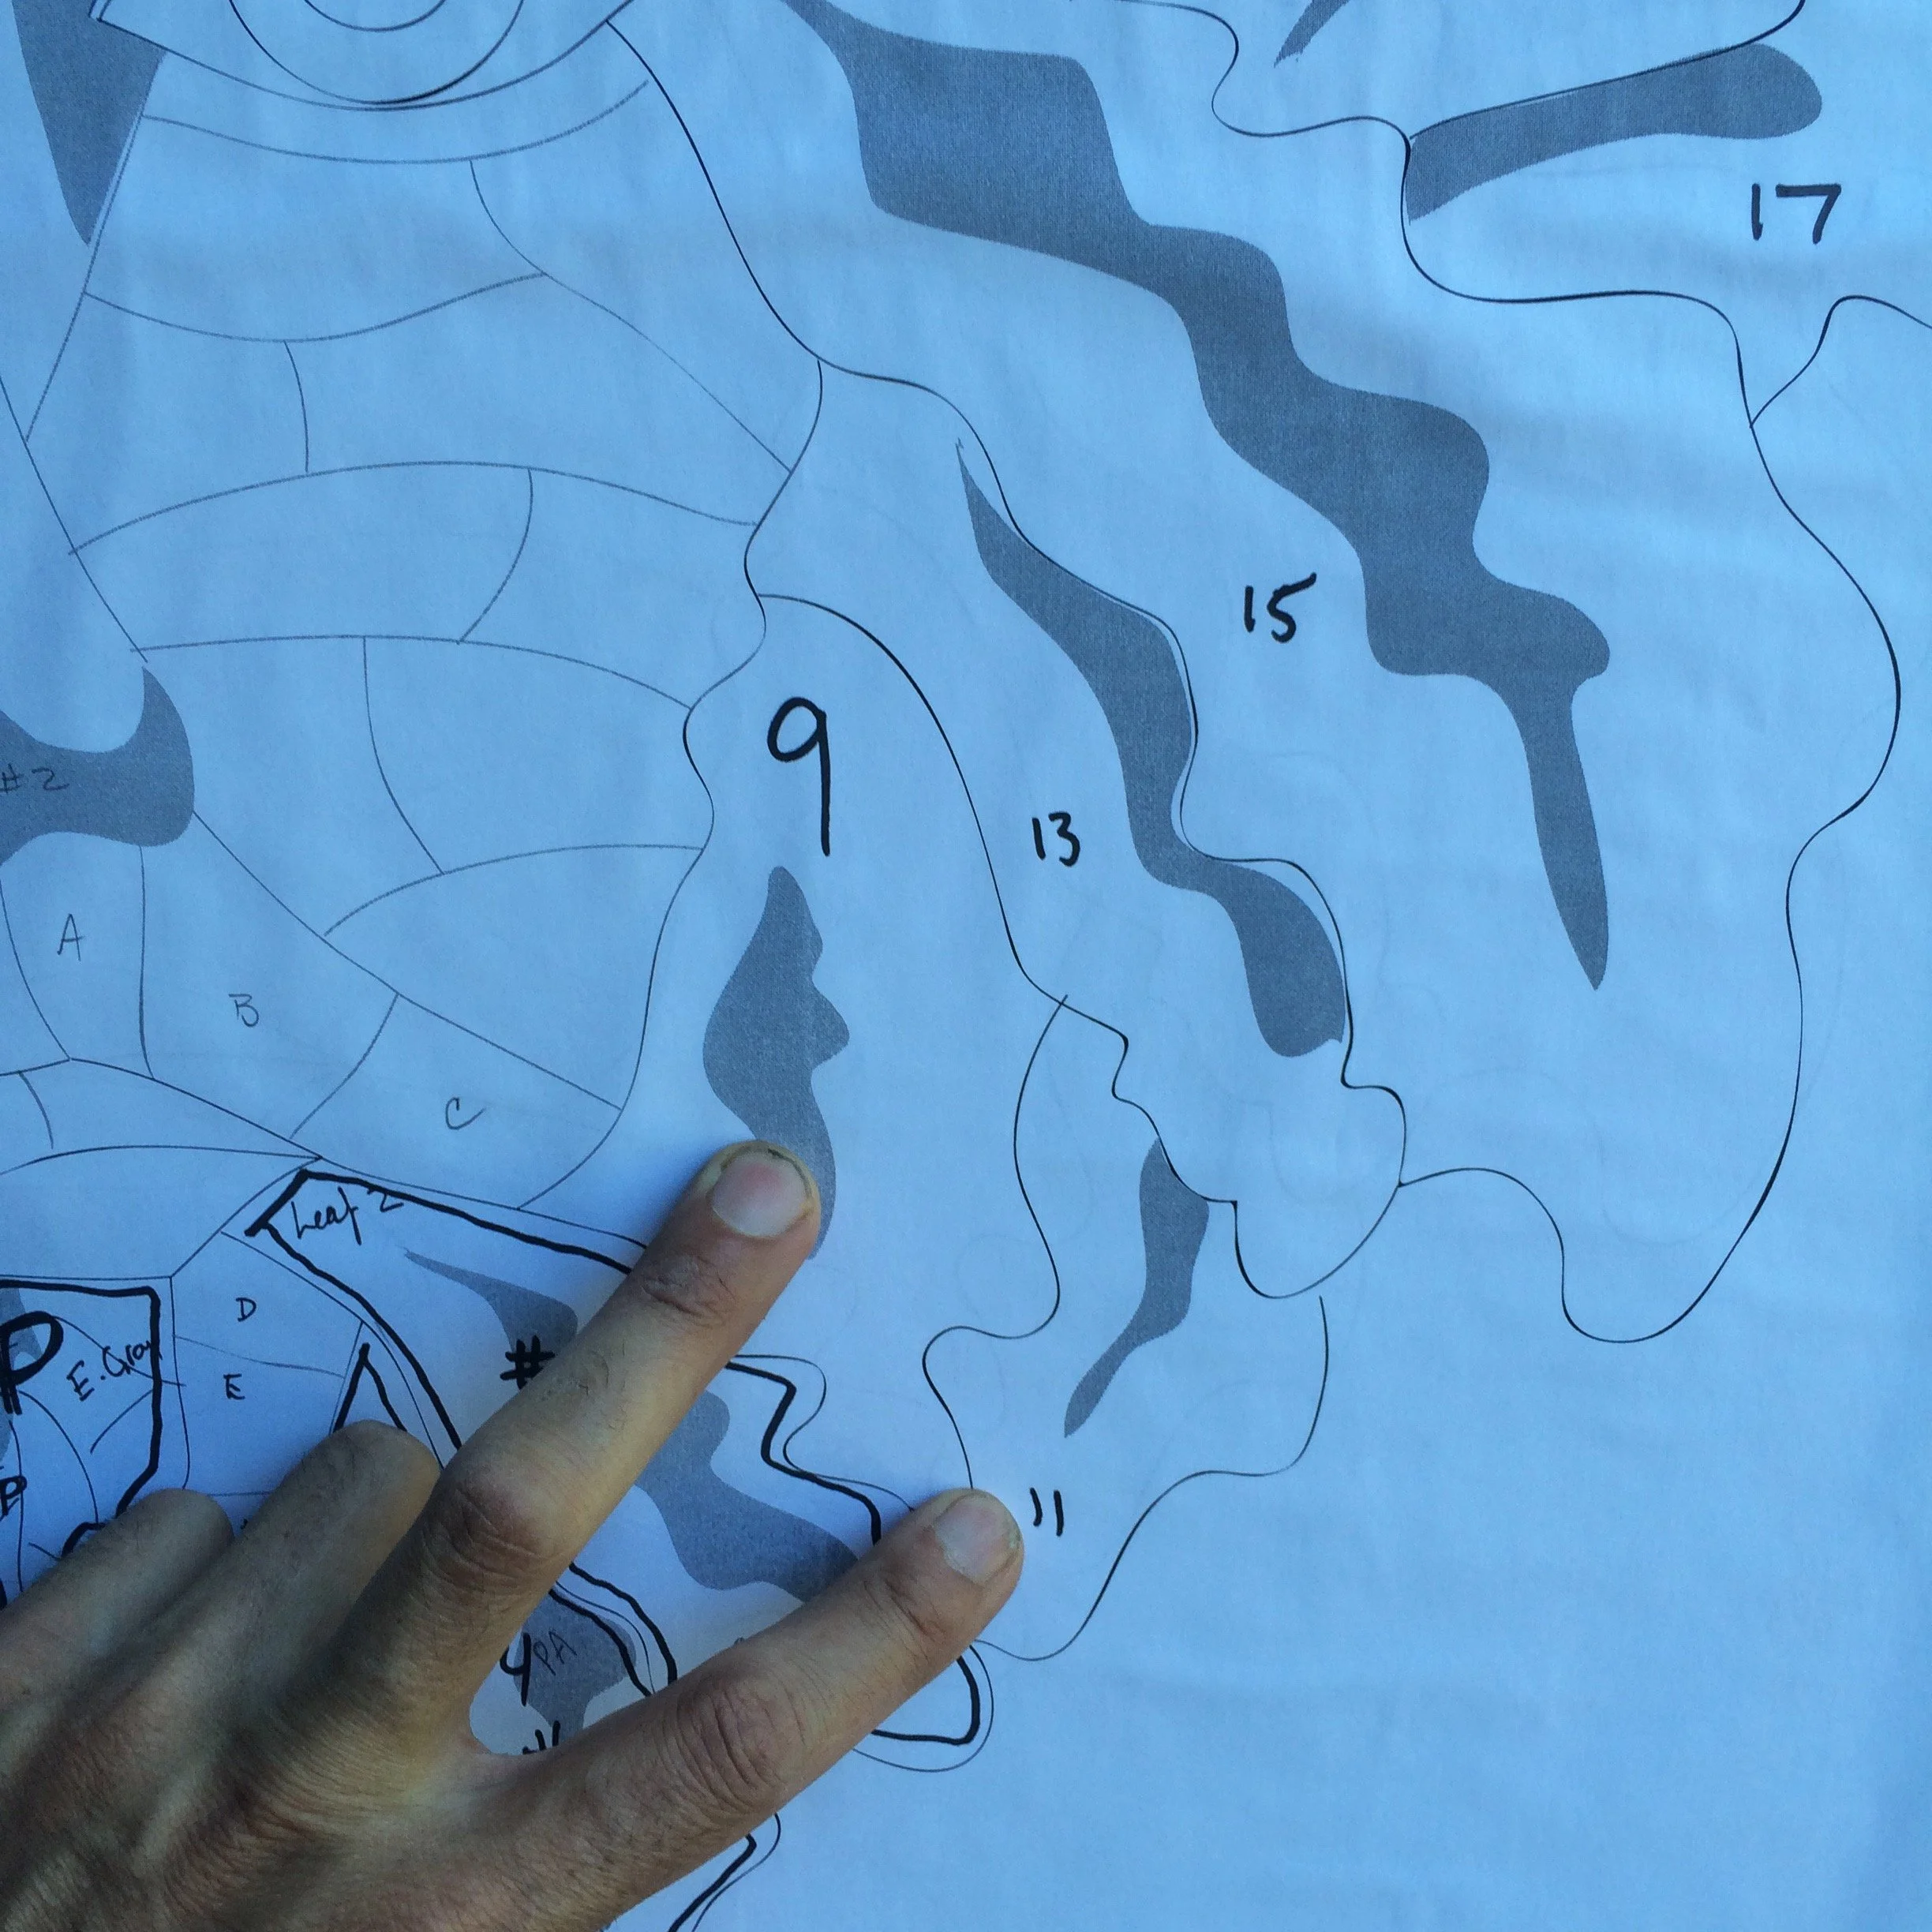
I draw my designs in Adobe Illustrator. I like the freehand capabilities, though it can be harder to get precise geometry. A Fibonacci sequence is a series of numbers that begins 1, 1. To find the next number, you add the previous two. So that 1, 1 sums up to become 2. The sequence therefore is 1, 1, 2, 3, 5, 8, 13, 21, and so on. Laid out on a grid, the sequence creates a series of boxes. Drawing a quarter circle in each box, as they get larger and larger, creates a spiral. This design is found throughout nature: fiddlehead ferns, nautilus shells, the spiraling seed patterns of a sunflower. It was important to scale the design so that it fit the space and was legible as a Fibonacci sequence.
Designing the patio
I like a circular design for a memorial mosaic. The patio is a self-contained unit. It is not adjacent to a house or otherwise responding to boundaries or parameters. A circular patio is more inclusive and unifying. With a central mosaic design, it becomes a mandala, representing the cycle of life. I like to work with circular designs as well because they have no top or bottom, no up or down. However you see it, it’s right.
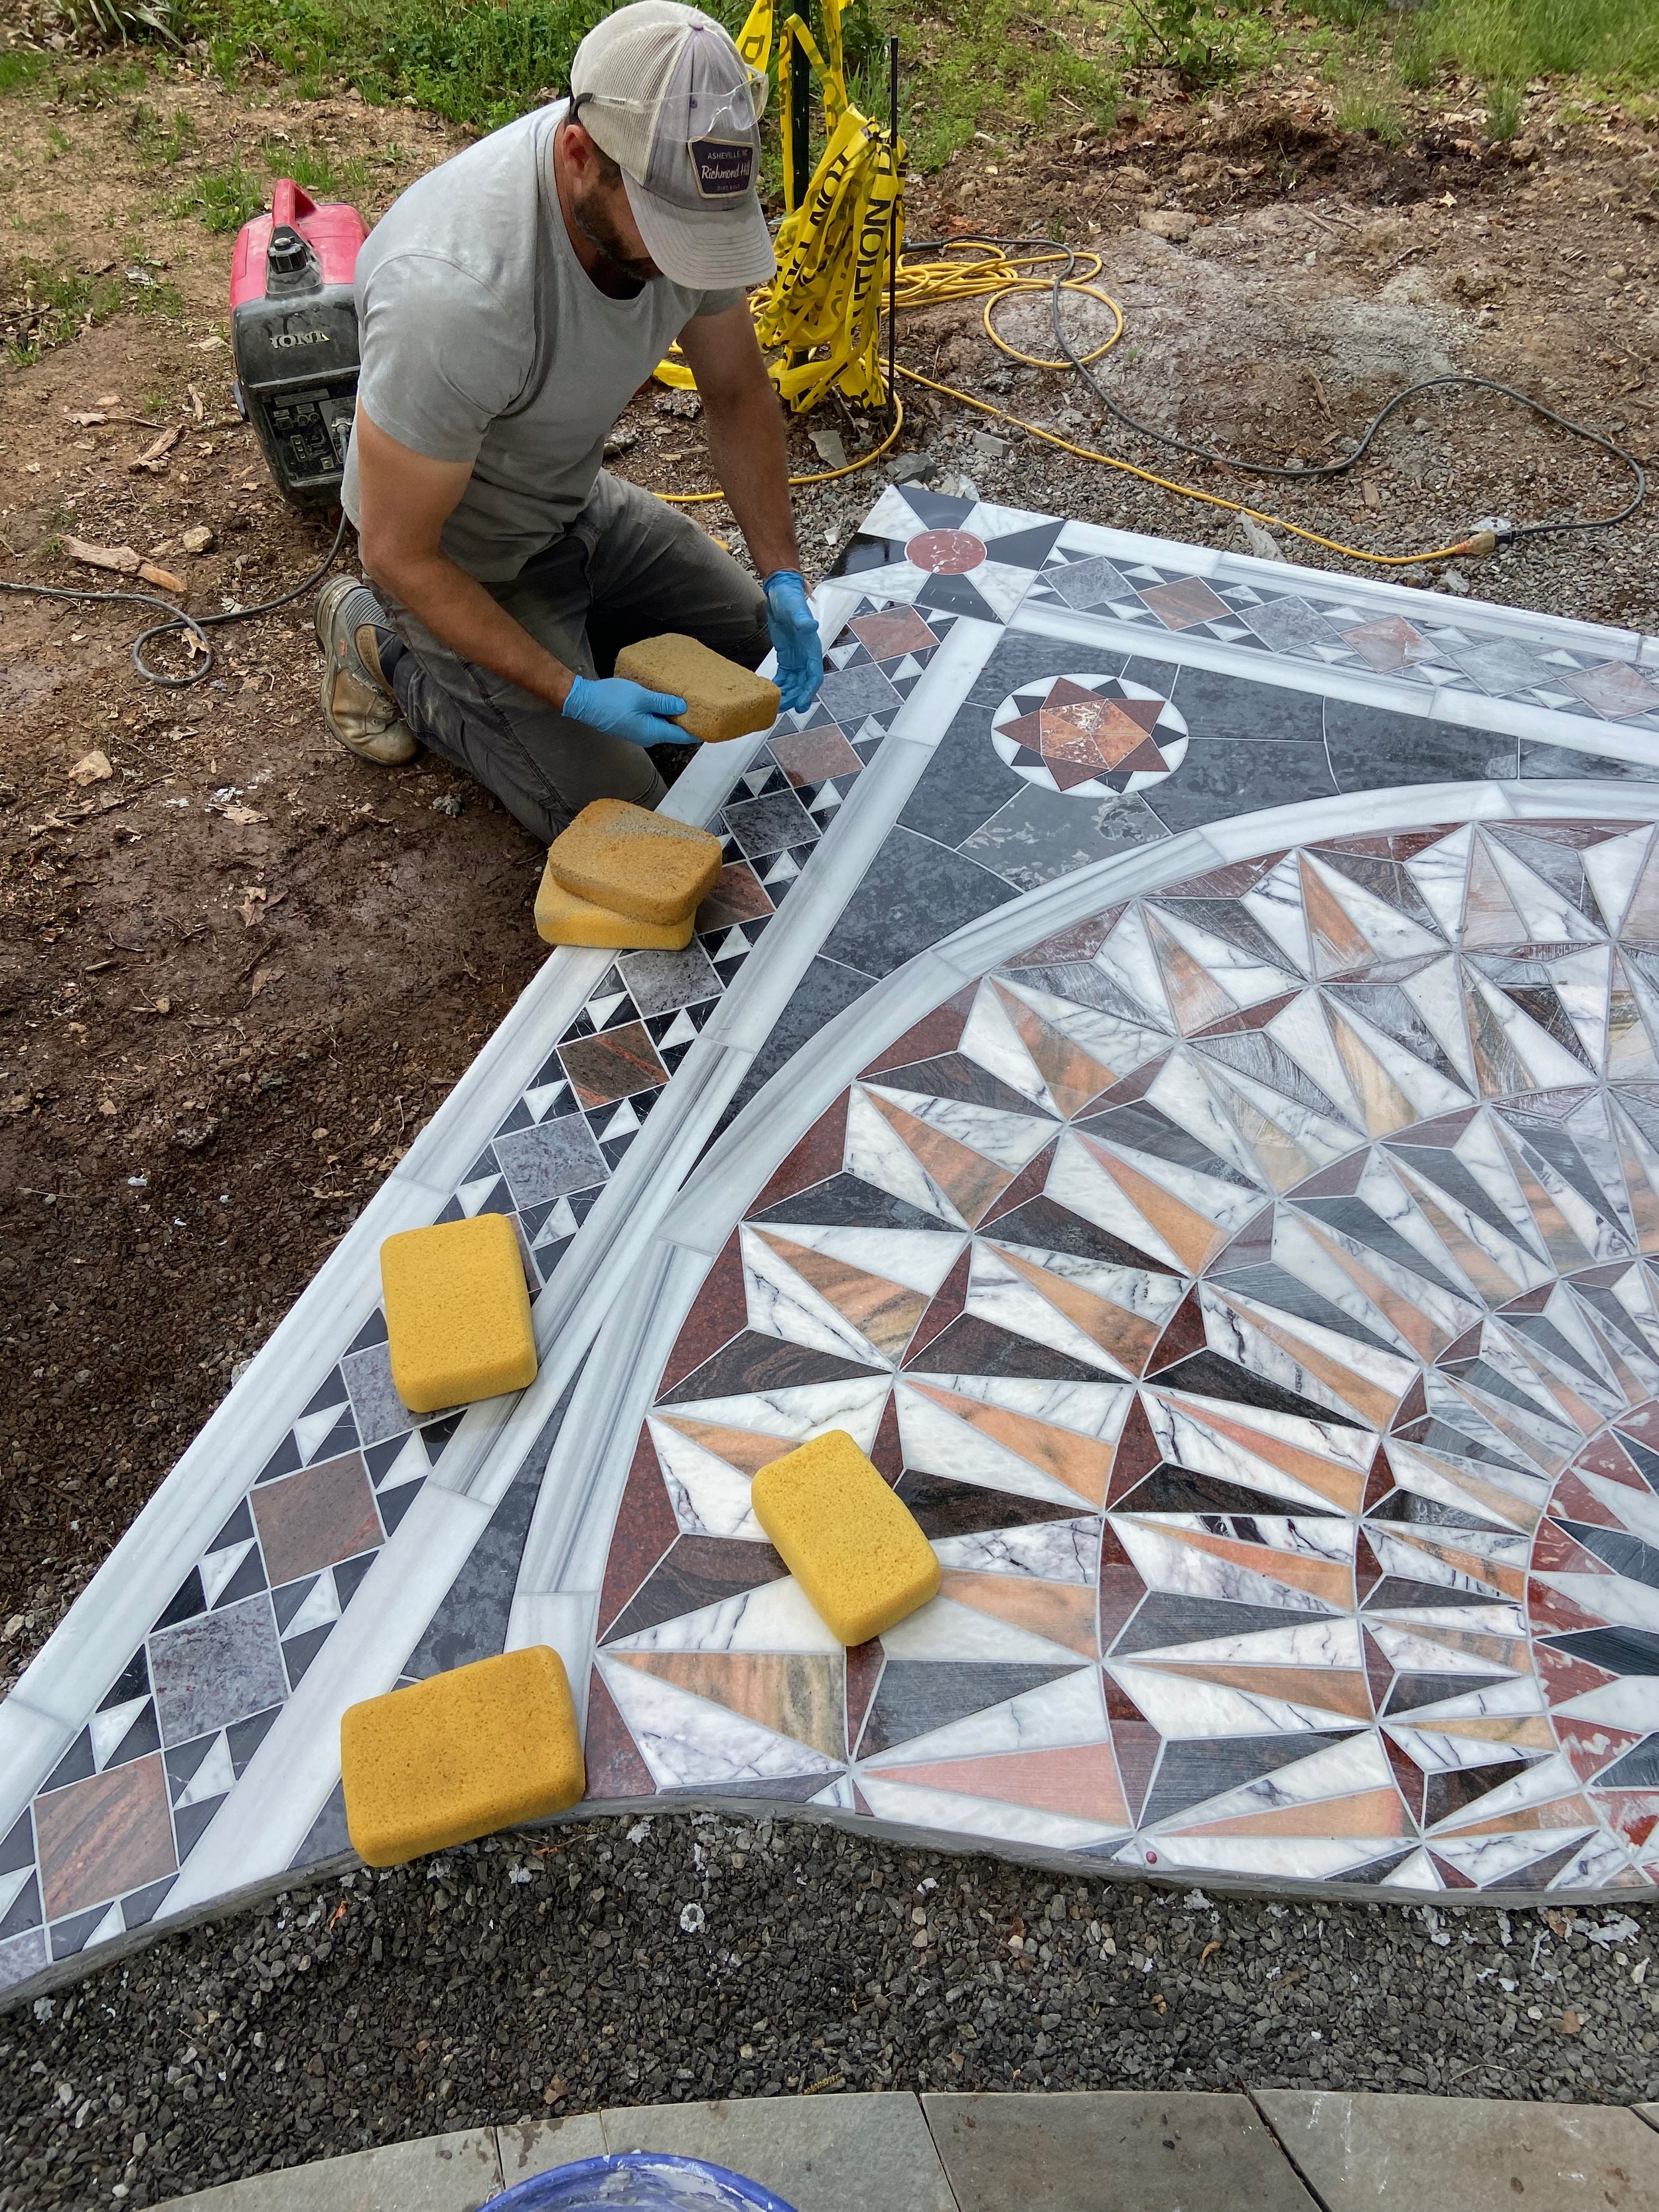
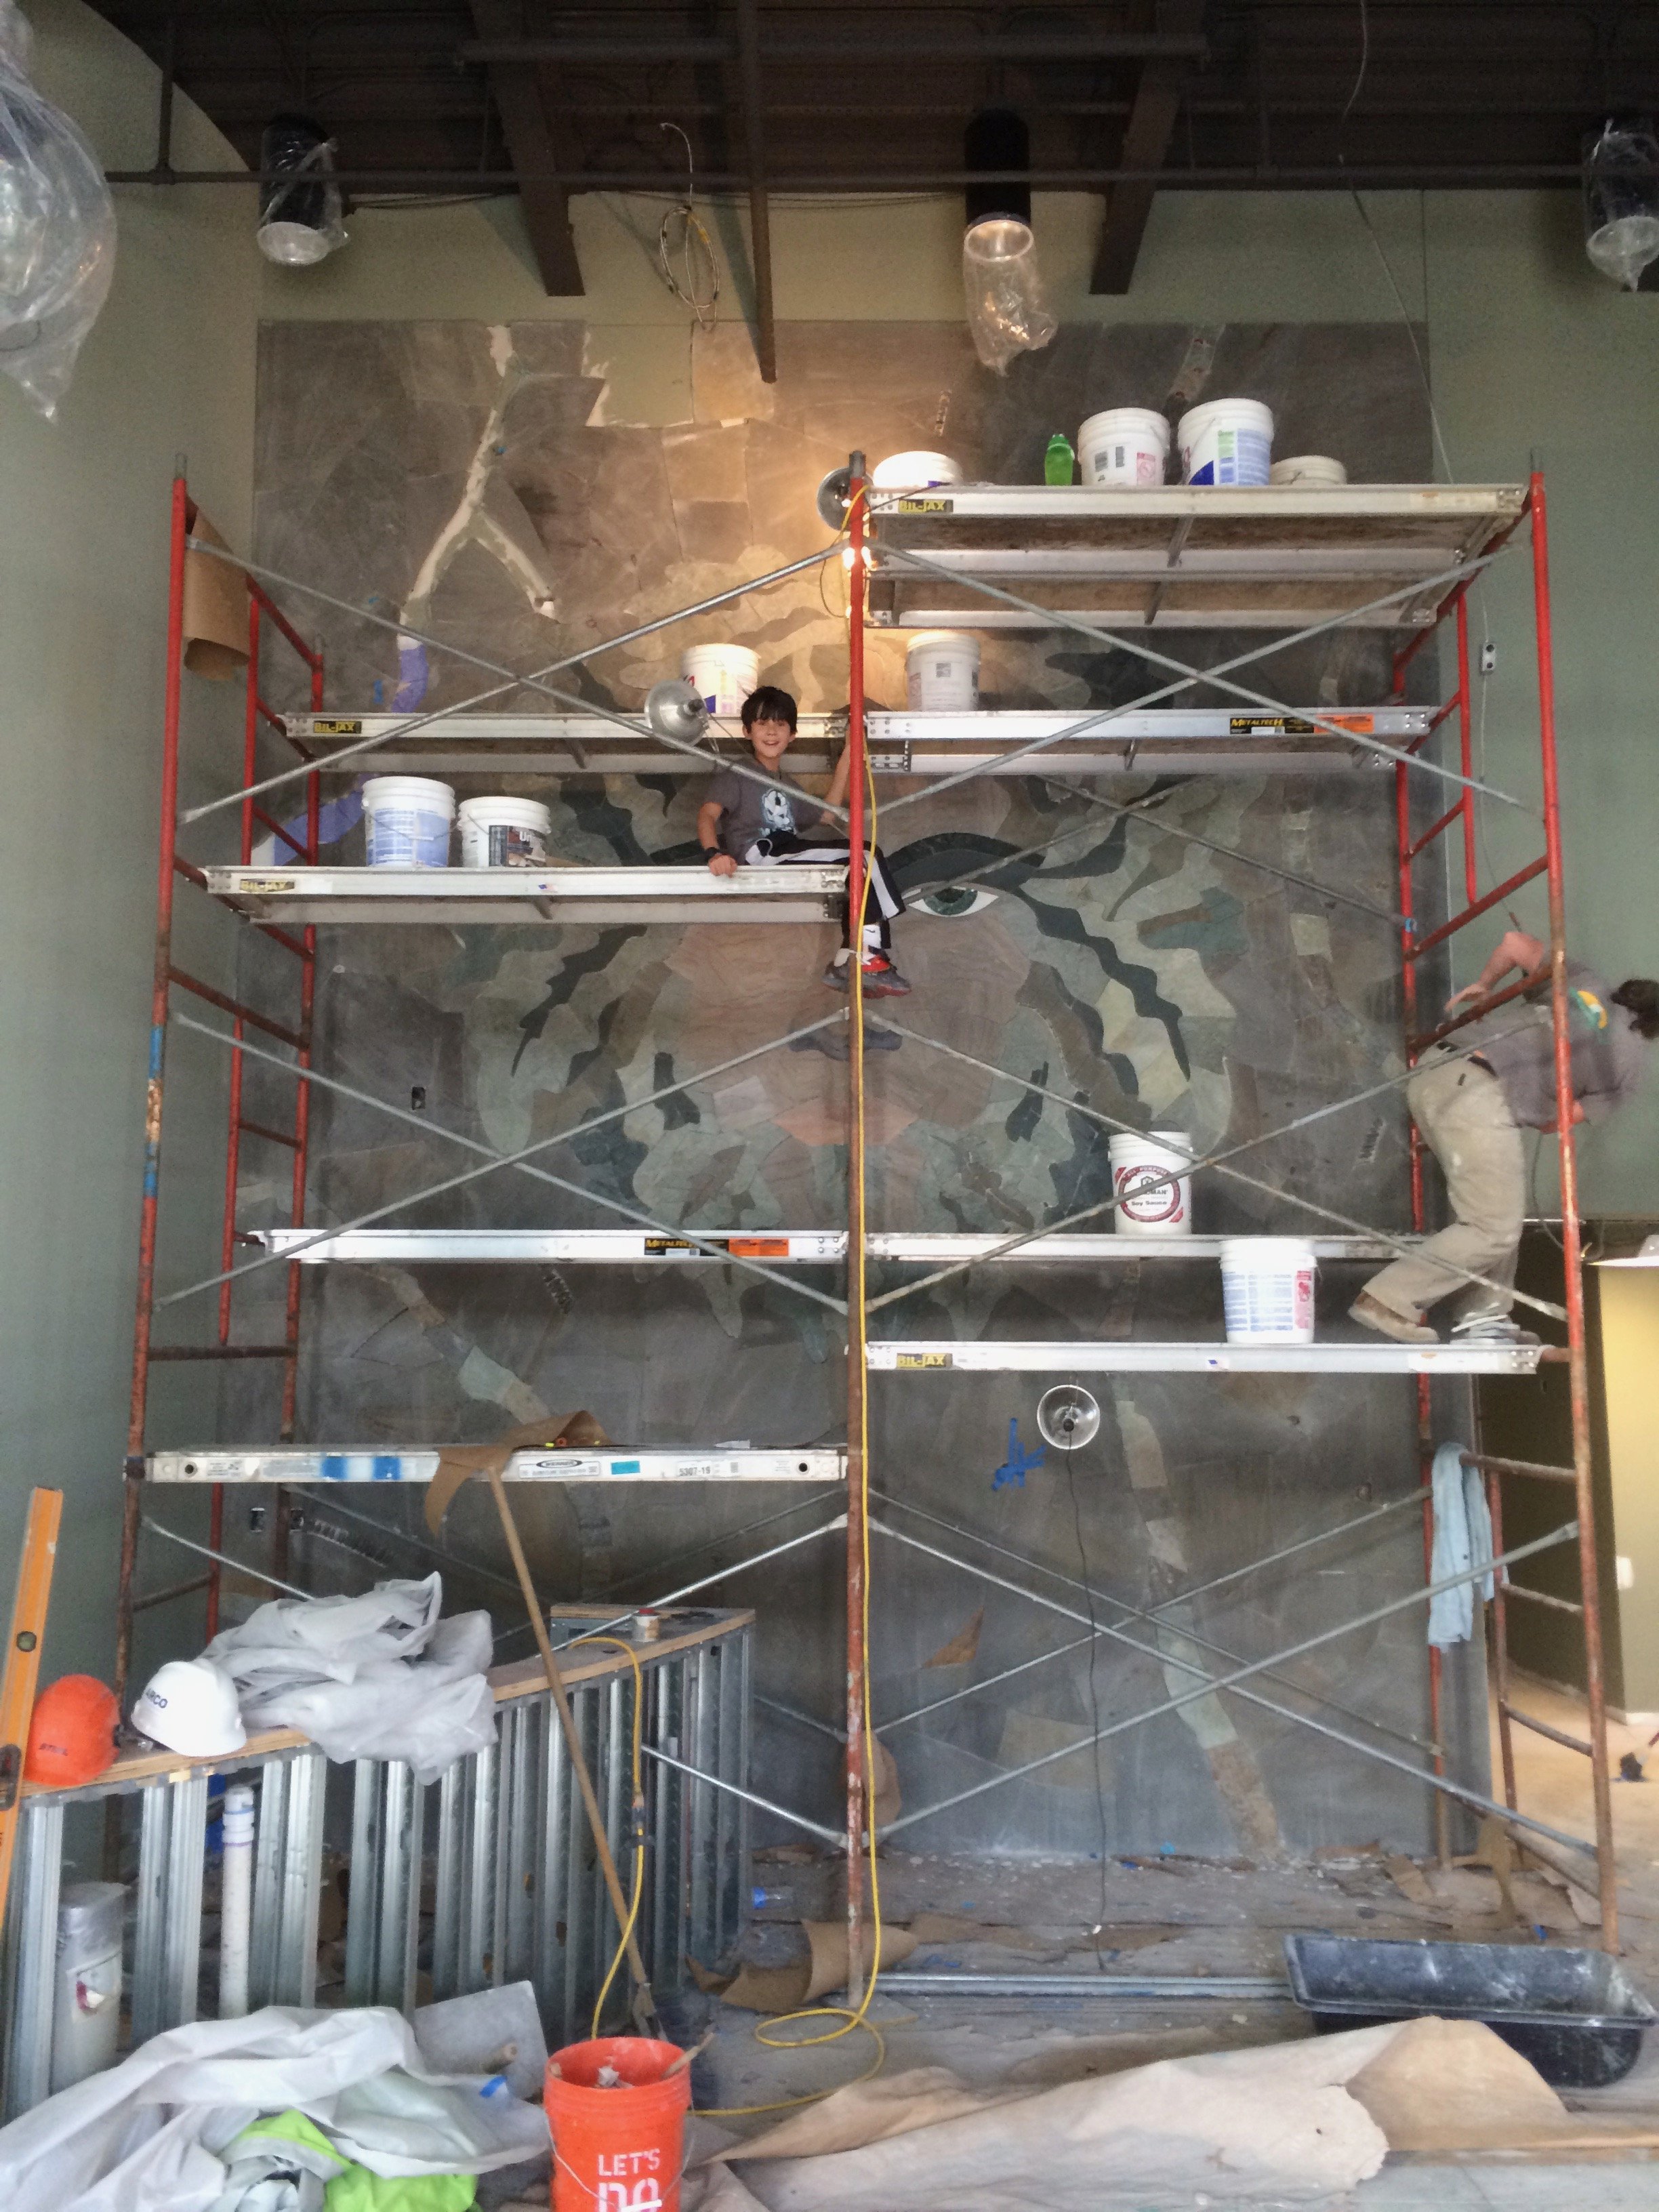
Fabricating the mosaic
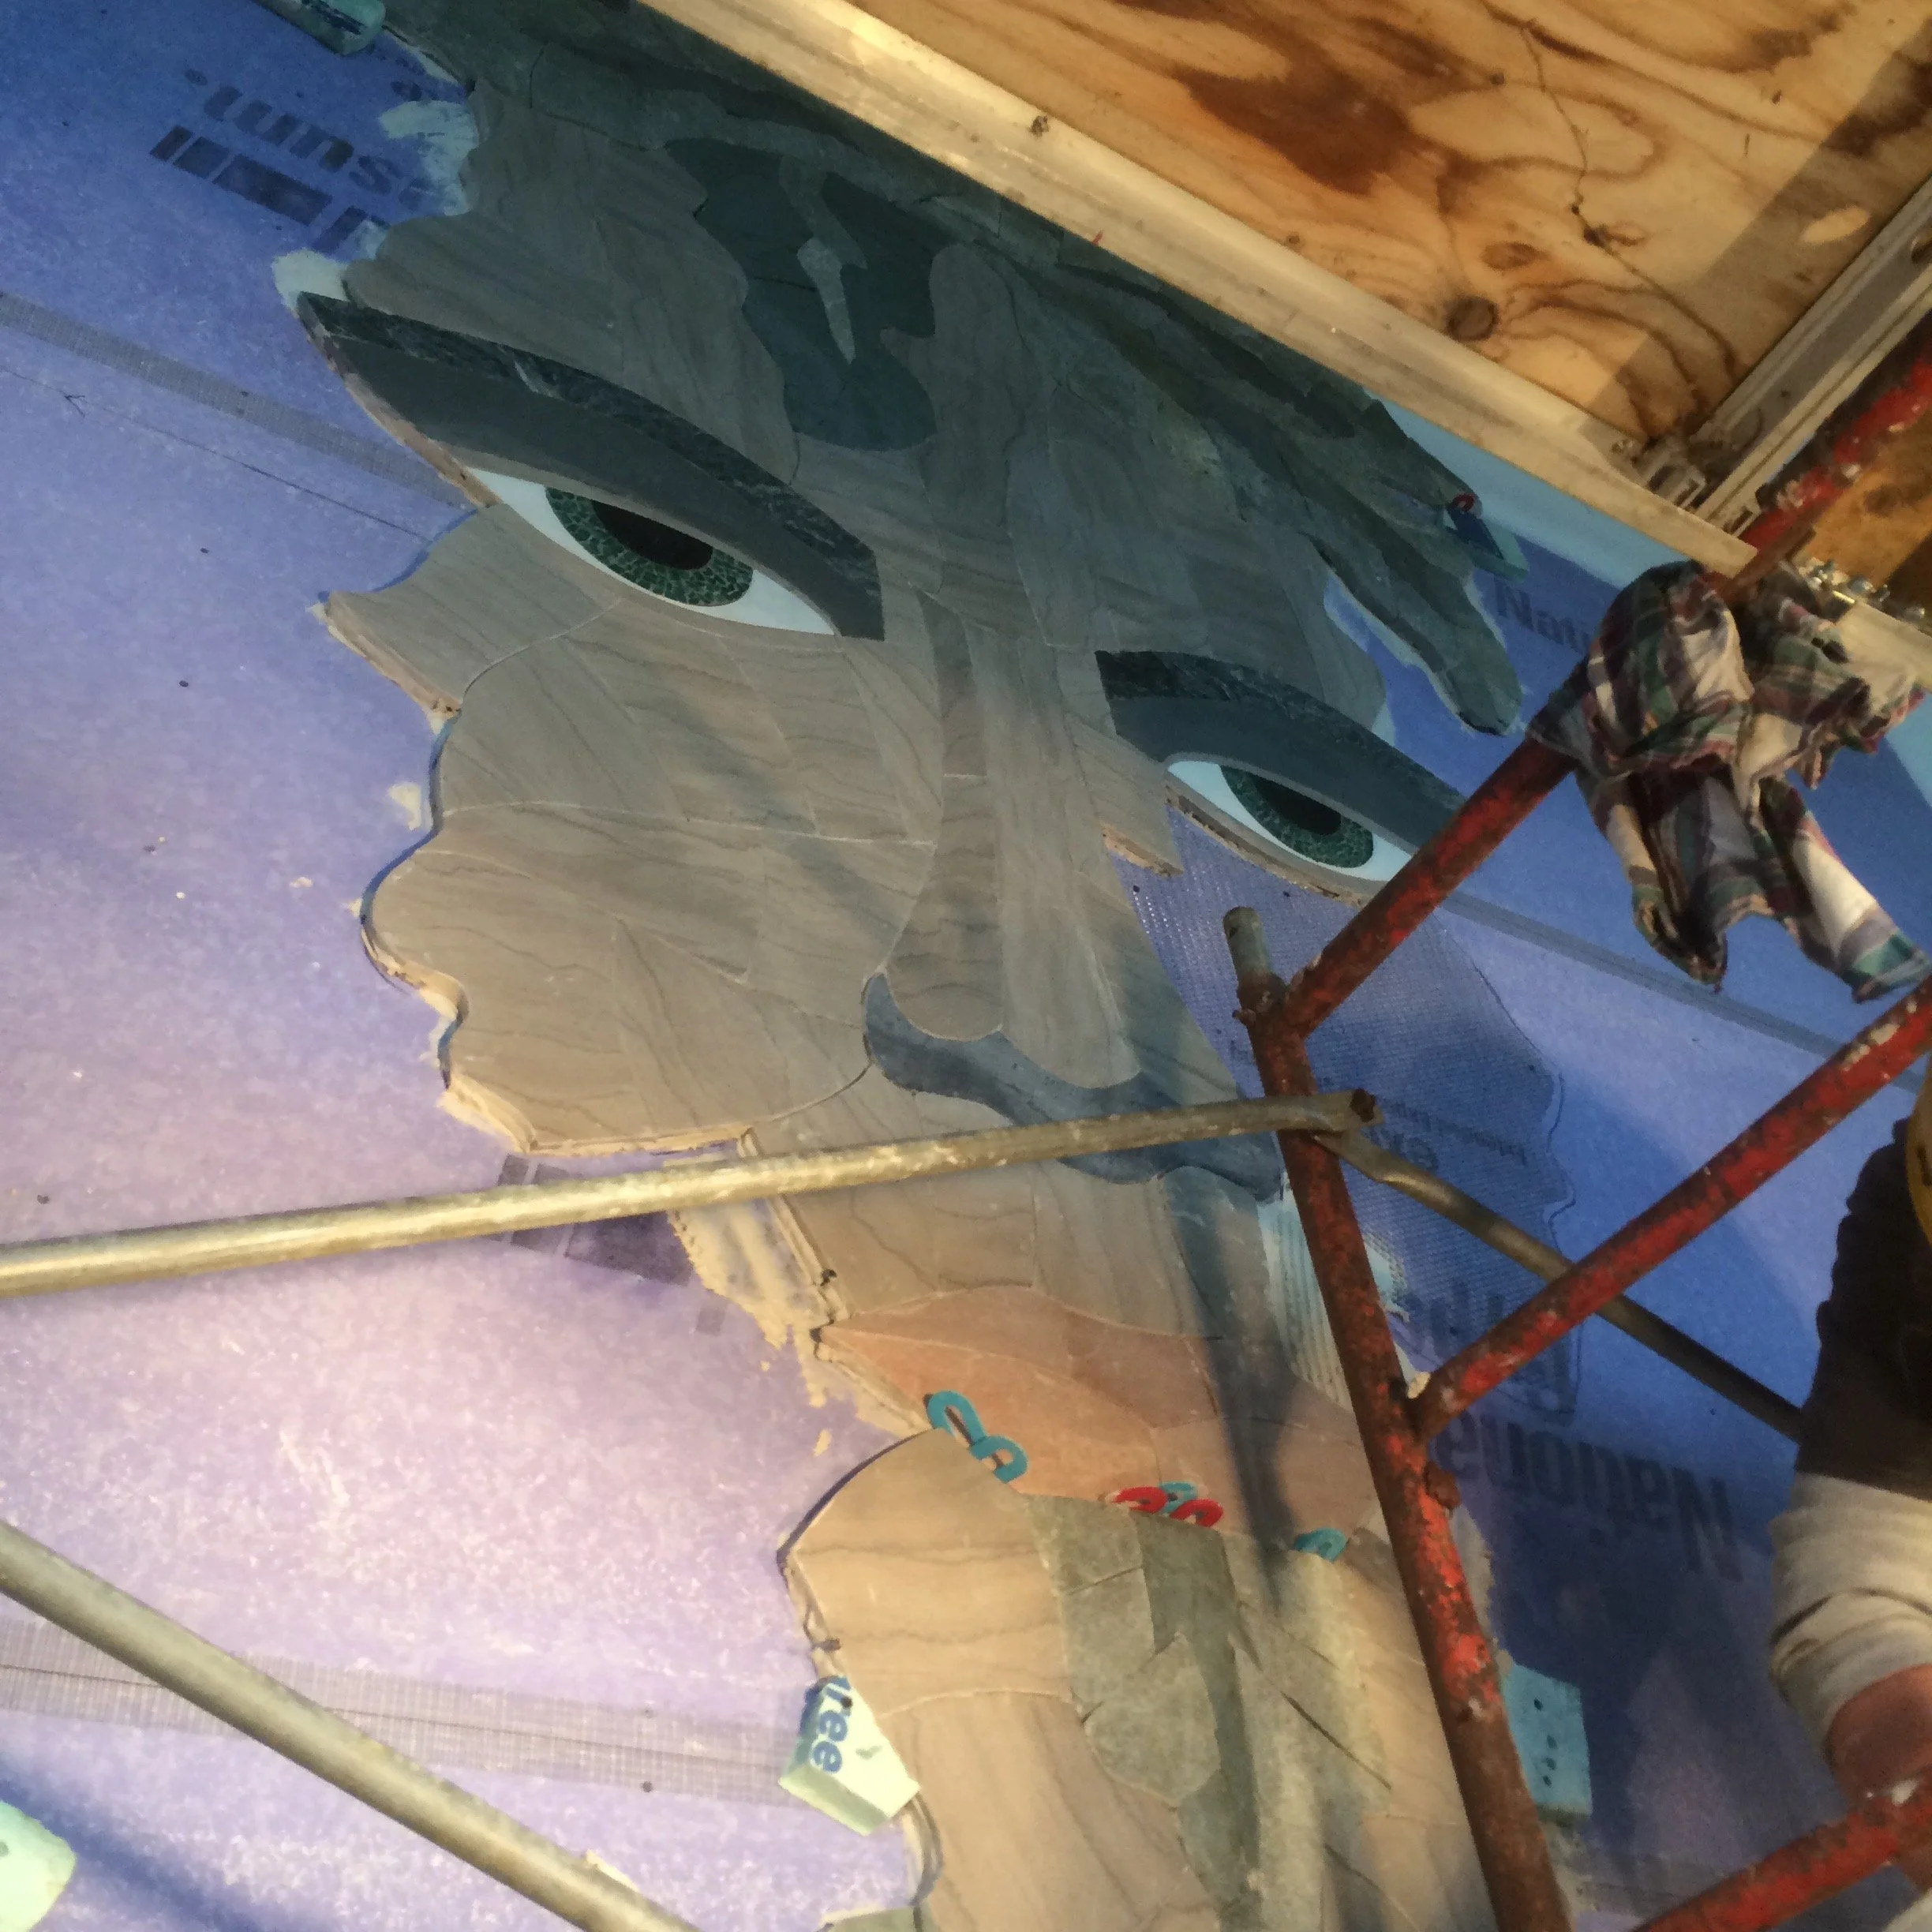
We built the Fibonacci mosaic in our Asheville shop. Hammerhead artist-mason Jonathan Frederick did the majority of the stone cutting work on this particular mosaic. This style of mosaic is called opus sectile, and is comprised of larger pieces, cut into specific shapes. We cut our mosaics on tile saws. The fine points on the lighter stones were most challenging to cut.
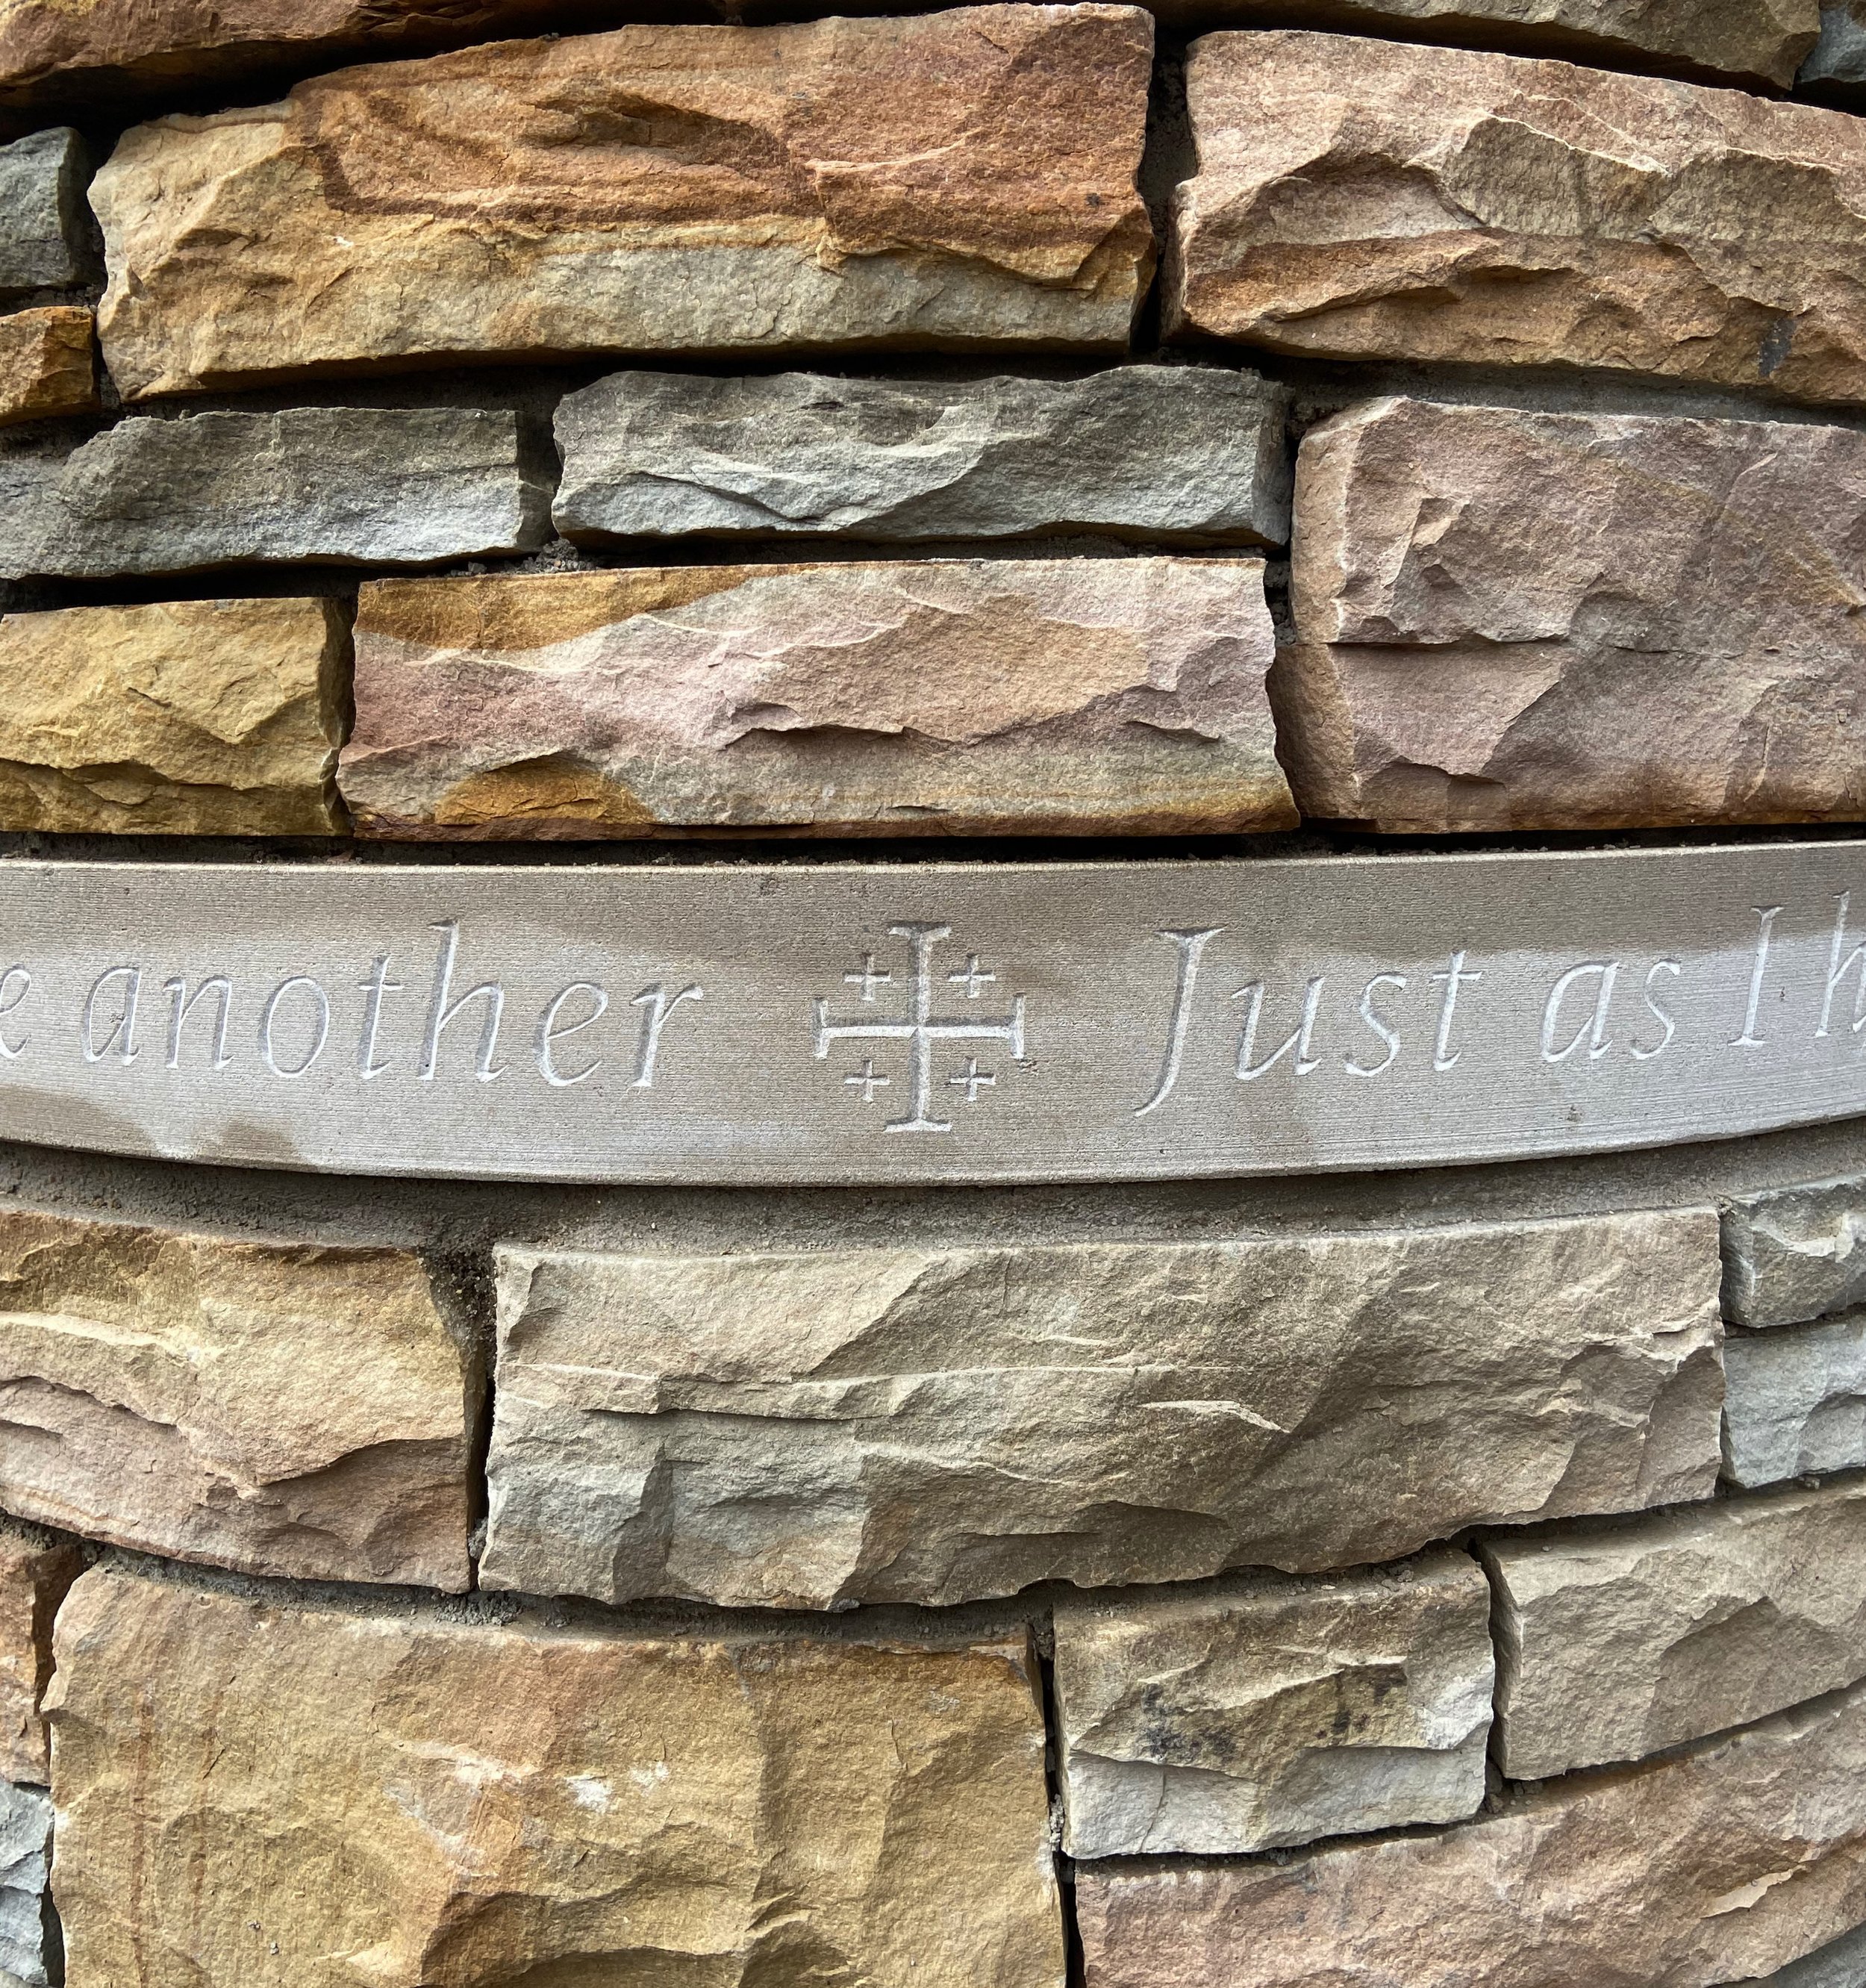
The mosaic is made of three different types of stone tiles. The dark green Fibonacci pieces are Jade slate. The light green background stones are Ming green marble. The outer black band is made of absolute granite. These tiles are installed on a 2 inch thick, concrete disk that is made of high psi concrete and wire re-mesh. Once the mosaic memorial was completed, we were ready to travel

Traveling for stonework projects
Hammerhead Stoneworks is based in Asheville, North Carolina, but we travel for projects across the region. We have installed school mosaics in Virginia, public art in Florida, and patios in Atlanta. The logistical challenges of doing stonework so far from home are primarily in site planning and finding the right supplies.
Assessing the stonework site
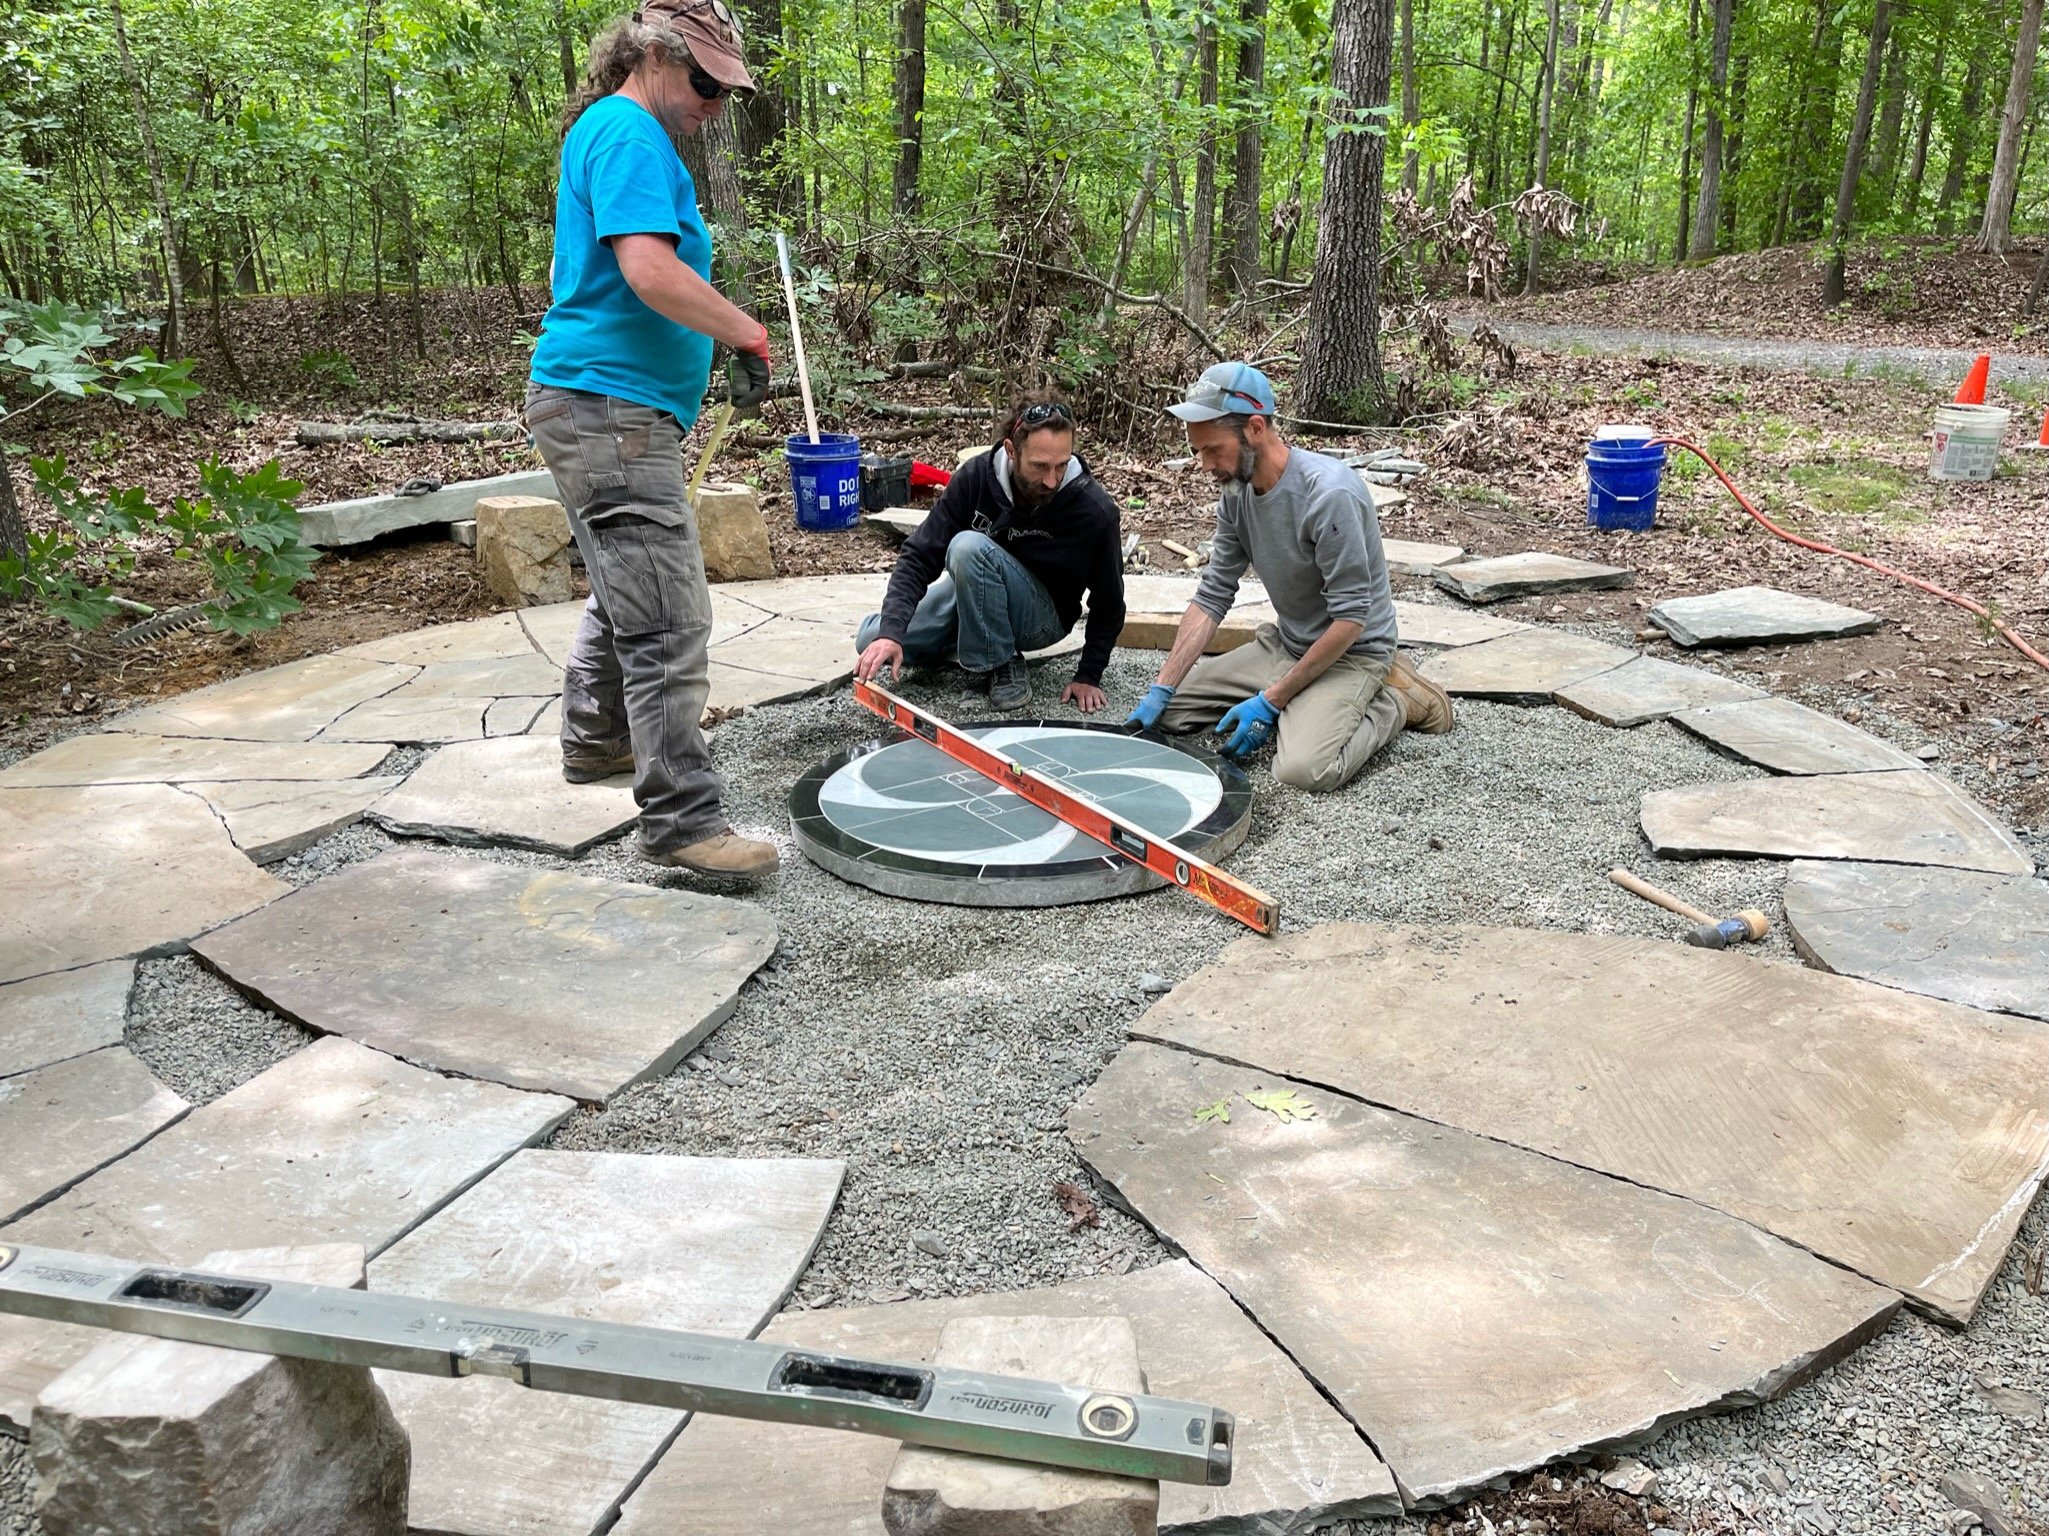
It is important to assess the site of proposed stonework in person. Modern technology makes it easier to share information, images, and even videos of a construction site. Even so, there are so many details that can only be seen and understood in person. A few weeks before we were scheduled to install the patio and mosaic, I visited Chapel Hill. While I was there, I explored the project site with Matthew, my HOA contact. Using a can of spray paint, we marked out on the ground where the patio and benches would be. Marking the patio in advance like this also gave the neighborhood a chance to see the scale of the project and get a feel for how we would transform the space. While visiting the site, I determined where to have our stone delivered, how to bring our supplies in (the project was in the woods after all) and all the other little details that smoothed the way for the construction process.
Finding stone for out of town jobs
These days it’s easy to find a big box hardware store just about anywhere. Sourcing natural stone can be a bit more challenging. Most communities have a stone yard somewhere, but inventory can vary dramatically. Do they have the particular stone I’m looking for? Is it good quality? Is there enough to see the project through? While in Chapel Hill, I visited Scott Stone in neighboring Mebane. Territory Manager Nathan Newlin was incredibly helpful, showing me through their whole yard and helped me tag the stone I needed. I found several pallets of excellent quality Pennsylvania full color and three gray sandstone slabs to serve as bench tops. Nathan was especially helpful in setting up a delivery, so the stone would be there when we were ready to get started. They even sent over a few bags on concrete, carefully wrapped in plastic to withstand the weather. Scott Stone was instrumental in making this happen. I appreciate how they helped us, even though we had never worked together before.
Bring what you need
We made a lot of lists before we left Asheville. We brought every tool we guessed we might need- and some we didn’t need at all. We brought the bench bases, which we had already prepared. We had our power carrier- a tracked wheelbarrow- to bring the stone and gravel into the site. We even brought decorative gravel, to be swept into the joints when the patio was done.
Luckily, the mosaic was already in Chapel Hill; I brought it with me when I went to assess the site. There was no room for it on either of the trucks!
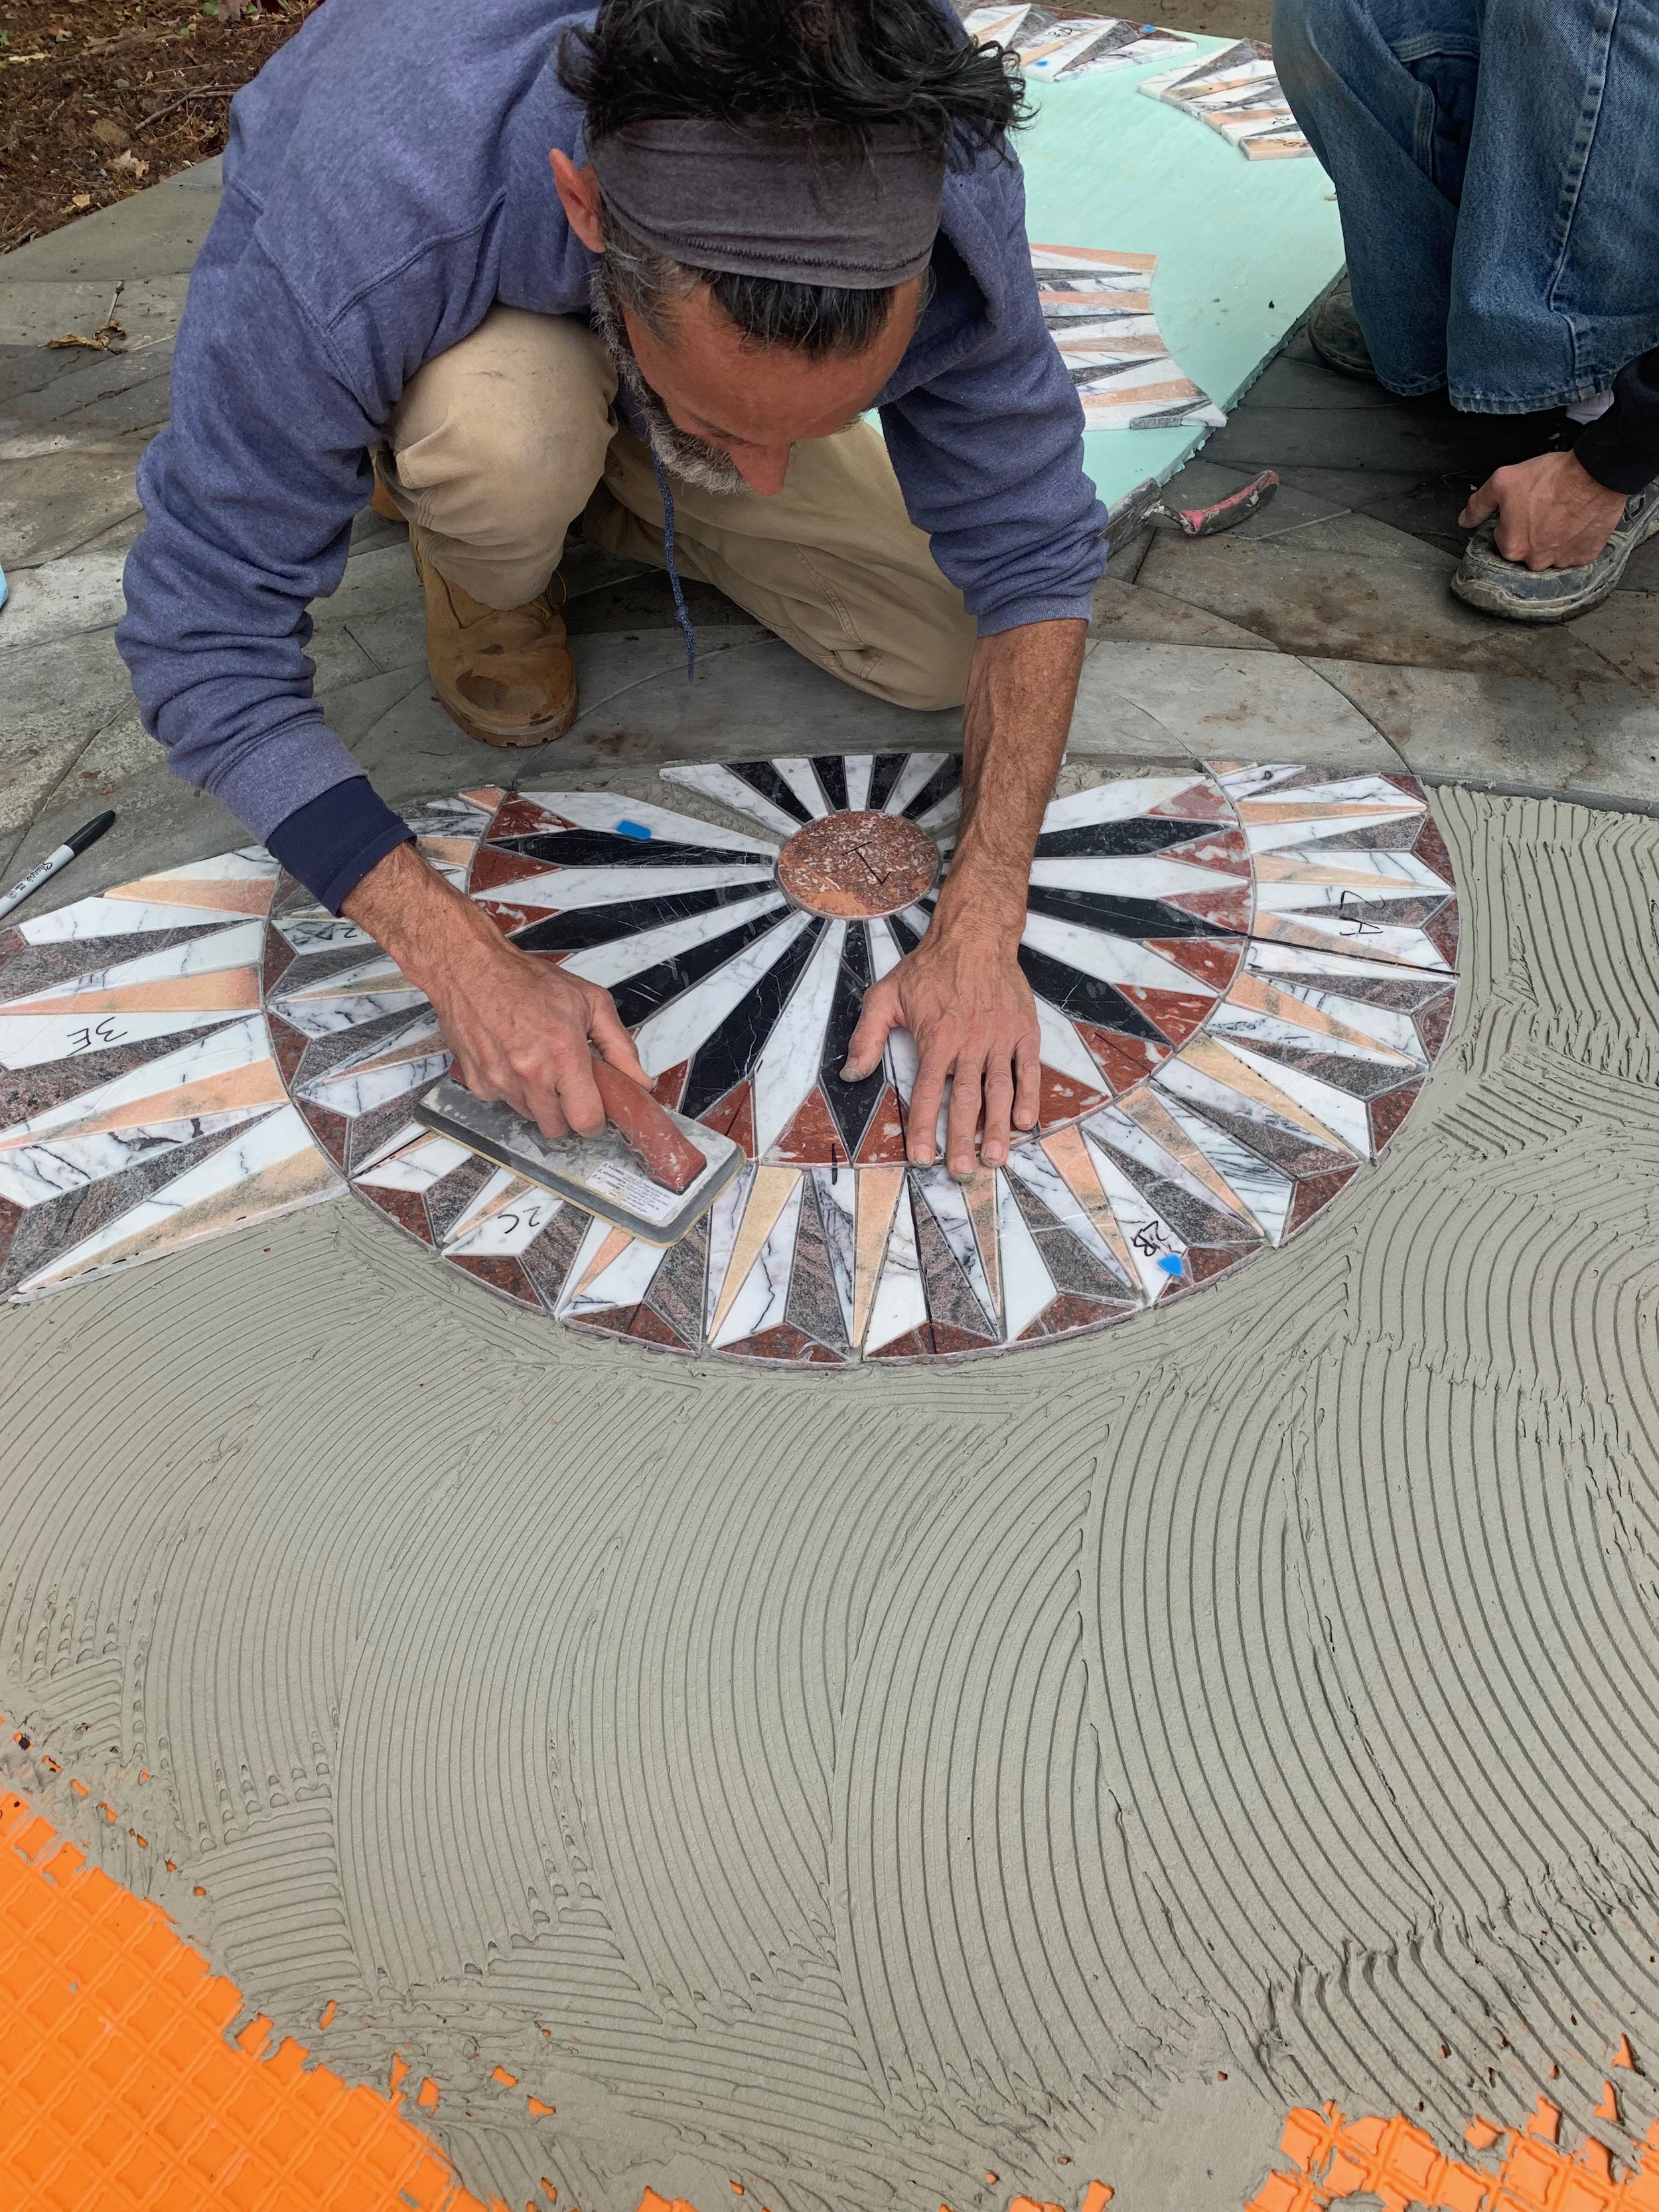
Installing the patio
The patio installation went very smoothly. As two of the crew built the patio, the other two set the benches, digging in the bases and anchoring them in concrete. Once the entire perimeter of the patio was set, we installed the mosaic, making sure to center it carefully.
Working out of town
I’m a homebody, but I like the occasional work trips. I enjoy the intense focus, the challenge of logistics, and the camaraderie. This trip we stayed in a VRBO and got to dine well in Chapel Hill and Carrboro. We found a classic hardware store too, Fitch Lumber & Hardware, with a most excellent hammer-themed logo, because of course, we forgot something. And after a trip like this, it’s always great to get back to the mountains.
The Finished Memorial Mosaic Patio

We installed this mosaic in early May 2023. Shortly thereafter, it was dedicated and the HOA used the patio for its monthly meeting. It’s very satisfying to create works of art like this, that can engage and be useful to an entire neighborhood. And I hope that this memorial mosaic helps to keep the spirit of Jim Kaiser on people’s minds as they enjoy the space.
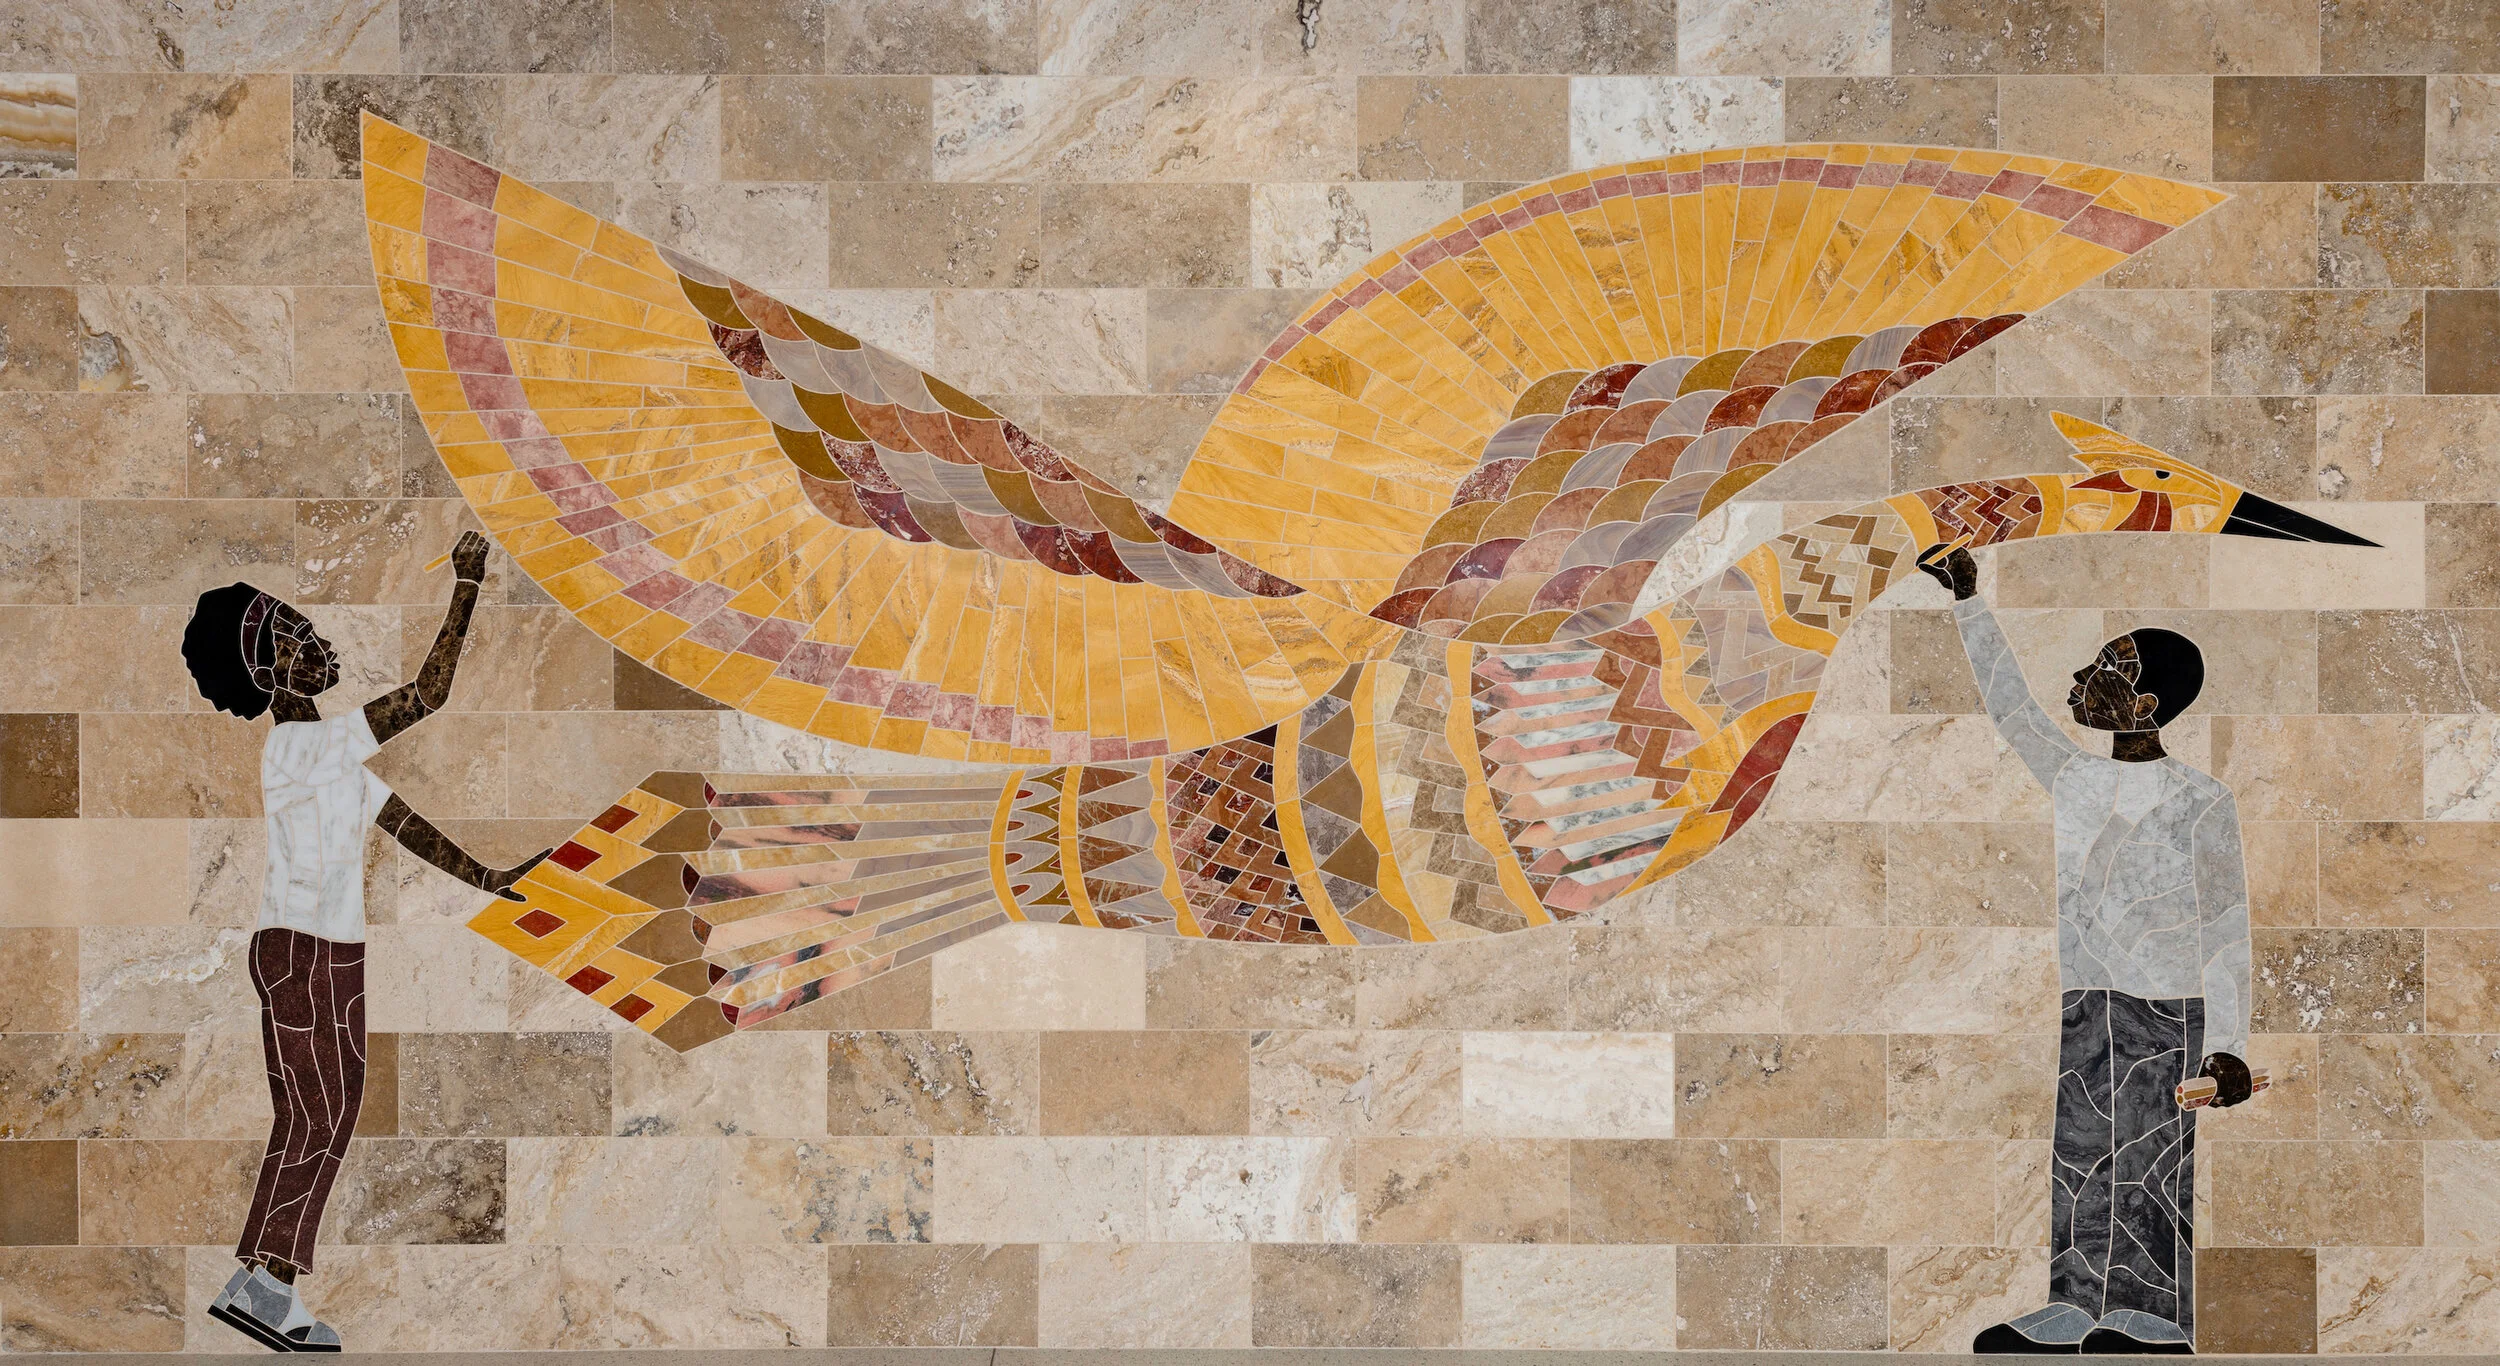
Neptune Rising
“Neptune Rising” is a mosaic floor installation in the sculpture garden at the University of North Carolina at Asheville. Adjacent to Owen Hall, this mosaic tells the story of rising sea levels as a result of climate change, and the significant impact it is having on the rich cultural history of Venice, Italy. The artwork comments on humankind’s impact on the environment and its impact on us. We fabricated this piece in our Asheville shop and installed it on site in May 2023.
“Neptune Rising” is a mosaic installation in the sculpture garden at the University of North Carolina at Asheville. Adjacent to Owen Hall, this mosaic tells the story of rising sea levels as a result of climate change, and the significant impact it is having on the rich cultural history of Venice, Italy. The artwork comments on humankind’s impact on the environment and its impact on us.
The detailed Venetian part of the mosaic includes stones sourced from Horizon Tile & Stone, Artistic Tile, and Tennessee Marble Company. The rising tide of water is made of Pennsylvania bluestone sourced from French Broad Stone & Supply. We fabricated this piece in our Asheville shop and installed on site in May 2023.


Connecting to the Design
I visited Venice in 1999. I had only recently started working with stone, building the drystone walls and patios that still comprise the bulk of my professional work. The floors of Venice, particularly Basilica San Marco, were unlike anything I had ever seen before. I still consider them to be the most beautiful and mesmerizing works of stone art in the world. They inspired my work and spurred my creative pursuits in mosaic and opus sectile. The mosaic section of this design is based on the actual floor of Basilica San Marco.
Throughout my travels in Italy, I was fascinated by the layers of history. Literal layers, of stucco over brick over stucco over stone. The modern peels away to reveal the past. Likewise the present slowly buried the past. Neptune Rising speaks to both processes: the unveiling and the burying.
Inspiration

Basilica San Marco was built in Venice almost 1000 years ago. The Basilica is a wonderland of stone. The floors, walls, and fixtures are adorned with all types of marble, porphyry, serpentine, and semi-precious stones from around the world. Some of its original floors still survive, a testament to the quality and creativity of the artisans of the time. Venice was an affluent state, an important seat of commerce and culture in the world at the time. The construction was ornate and embellished and pushed the technical and creative limits of the builders. Even now, such floors are challenging to build.
Venice was built in a marsh on soft ground, barely above sea level. As that soft earth subsides, compressed by the city above, and as ocean levels rise, Venice is slowly sinking back into the Earth. Flooding is frequent and disrupts daily life as well as the tourist economy that supports the city.
“Neptune Rising” tells the story of the sea encroaching and reclaiming Venice. It’s about climate and change, cultural history, and natural forces.
The mosaic is a 10’ x 10’ square and will serve as a patio for students and visitors to the University. Immediately adjacent to the concrete sidewalk, it is ADA compliant and offer people a place to rest, to gather, and to enjoy the sculpture garden.
See more of the gallery on the Project page.

Triskelion Table
We created the triskelion table for a regular patron in Asheville, North Carolina. This mosaic is purely decorative, a celebration of my client's fascination with- and affection for- the triskelion symbol. To him it is purely aesthetic; he has loved the icon for years and had an idea to have it in stone.


The triskelion symbol - three armored legs wearing spurs - is the centerpiece of the Isle of Man flag and has its origins in Celtic artwork. A similar pattern of three spirals appears at Newgrange, an Irish tomb that is over 5000 years old. The three spirals are thought to symbolize birth, death, and rebirth.


The table top is natural surface Tennessee Gray sandstone. The mosaic inlay is polished stone tiles: white marble and gold travertine. The table top is set on a single stone post, that is anchored to a concrete footing. Steel bracing supports the table top- so it cannot tip or rotate- and anchors the post to the footer. This steel is unobtrusive and does not disrupt the look of the final artwork.

I enjoy the hyper focus on mosaic work, and that was true on this project. Cutting the recessed pocket into the table top was the most challenging and therefore rewarding/fraught part of the process. The spurs were very complicated patterns to cut into stone. I always enjoy the place where engineering and art intersect, like making this table bombproof and beautiful.
Completed, it now sits on his private residence in North Asheville.

Designing with Stone
When designing with stone, I like to think about my horizontal and my vertical surfaces as discrete elements. I prefer to use one material (or mixture) for all the vertical surfaces and a different material for all the horizontal surfaces.
Generally, the vertical surfaces are stone walls, step risers, veneers, fireplace faces, and columns. The horizontal surfaces include patios and paths, step treads, column caps, seating caps or bench tops, and in the case of a fireplace, the mantle and the hearth. I find that organizing the materials in this way gives a clear visual theme throughout a project.
This is not a hard and fast rule, but a general guide. When I deviate from this guideline, it is because I have a compelling reason to do so: a specific client request, an unimaginably cool specimen stone, an unexpected effect. Sometimes there’s existing stonework on a property or home that I want to match or reference in my part of the project. In these cases, I may introduce additional elements. No matter what, I favor a cohesive design sense, where all the work belongs together, looks intended and thought out.
In this context, a mixture of stones can be considered as a material. I love a kitchen sink wall. It’s just that whatever mixture is selected, should be used throughout the whole scope of the project. My rule of thumb is that most materials can be mixed together in a wall, but they should be mixed from the very beginning through to the end. It’s important to have enough of each material for the mixture available. It shows up when you run out halfway through.
Theme- Hooper’s Creek verticals wall/Pennsylvania horizontals
The vertical elements: the wall and the step risers, employ Hooper’s Creek, a native gneiss. The horizontal elements: the step treads and flagstone landings, are made of Pennsylvania stone. This is a favorite combination for me. We use some of the Pennsylvania stone in the wall. It adds some color and texture; variation to the overall piece and helps to tie the theme together visually.
Variation- Tennessee fieldstone vertical/ Gray Tennessee horizontal
This wall is made of Tennessee fieldstone. The flagstone patio, slab steps (not pictured), arms rests, and bench are all made of Gray Tennessee sandstone. I broke with the theme on the seat back. That vertical element employs large pieces of gray Tennessee sandstone with narrow stacks of the same fieldstone found in the walls. The strong visual interest of an unexpected design element contributed to the decision to break my own guidelines.

Mosaics in the Landscape
Hammerhead has created three mosaics nestled in the landscape at a home in North Asheville. From a Garden Guardian to two inlay mosaics on patio and stairs, large and steep steps, this landscaping project with custom natural stone is completely unique.
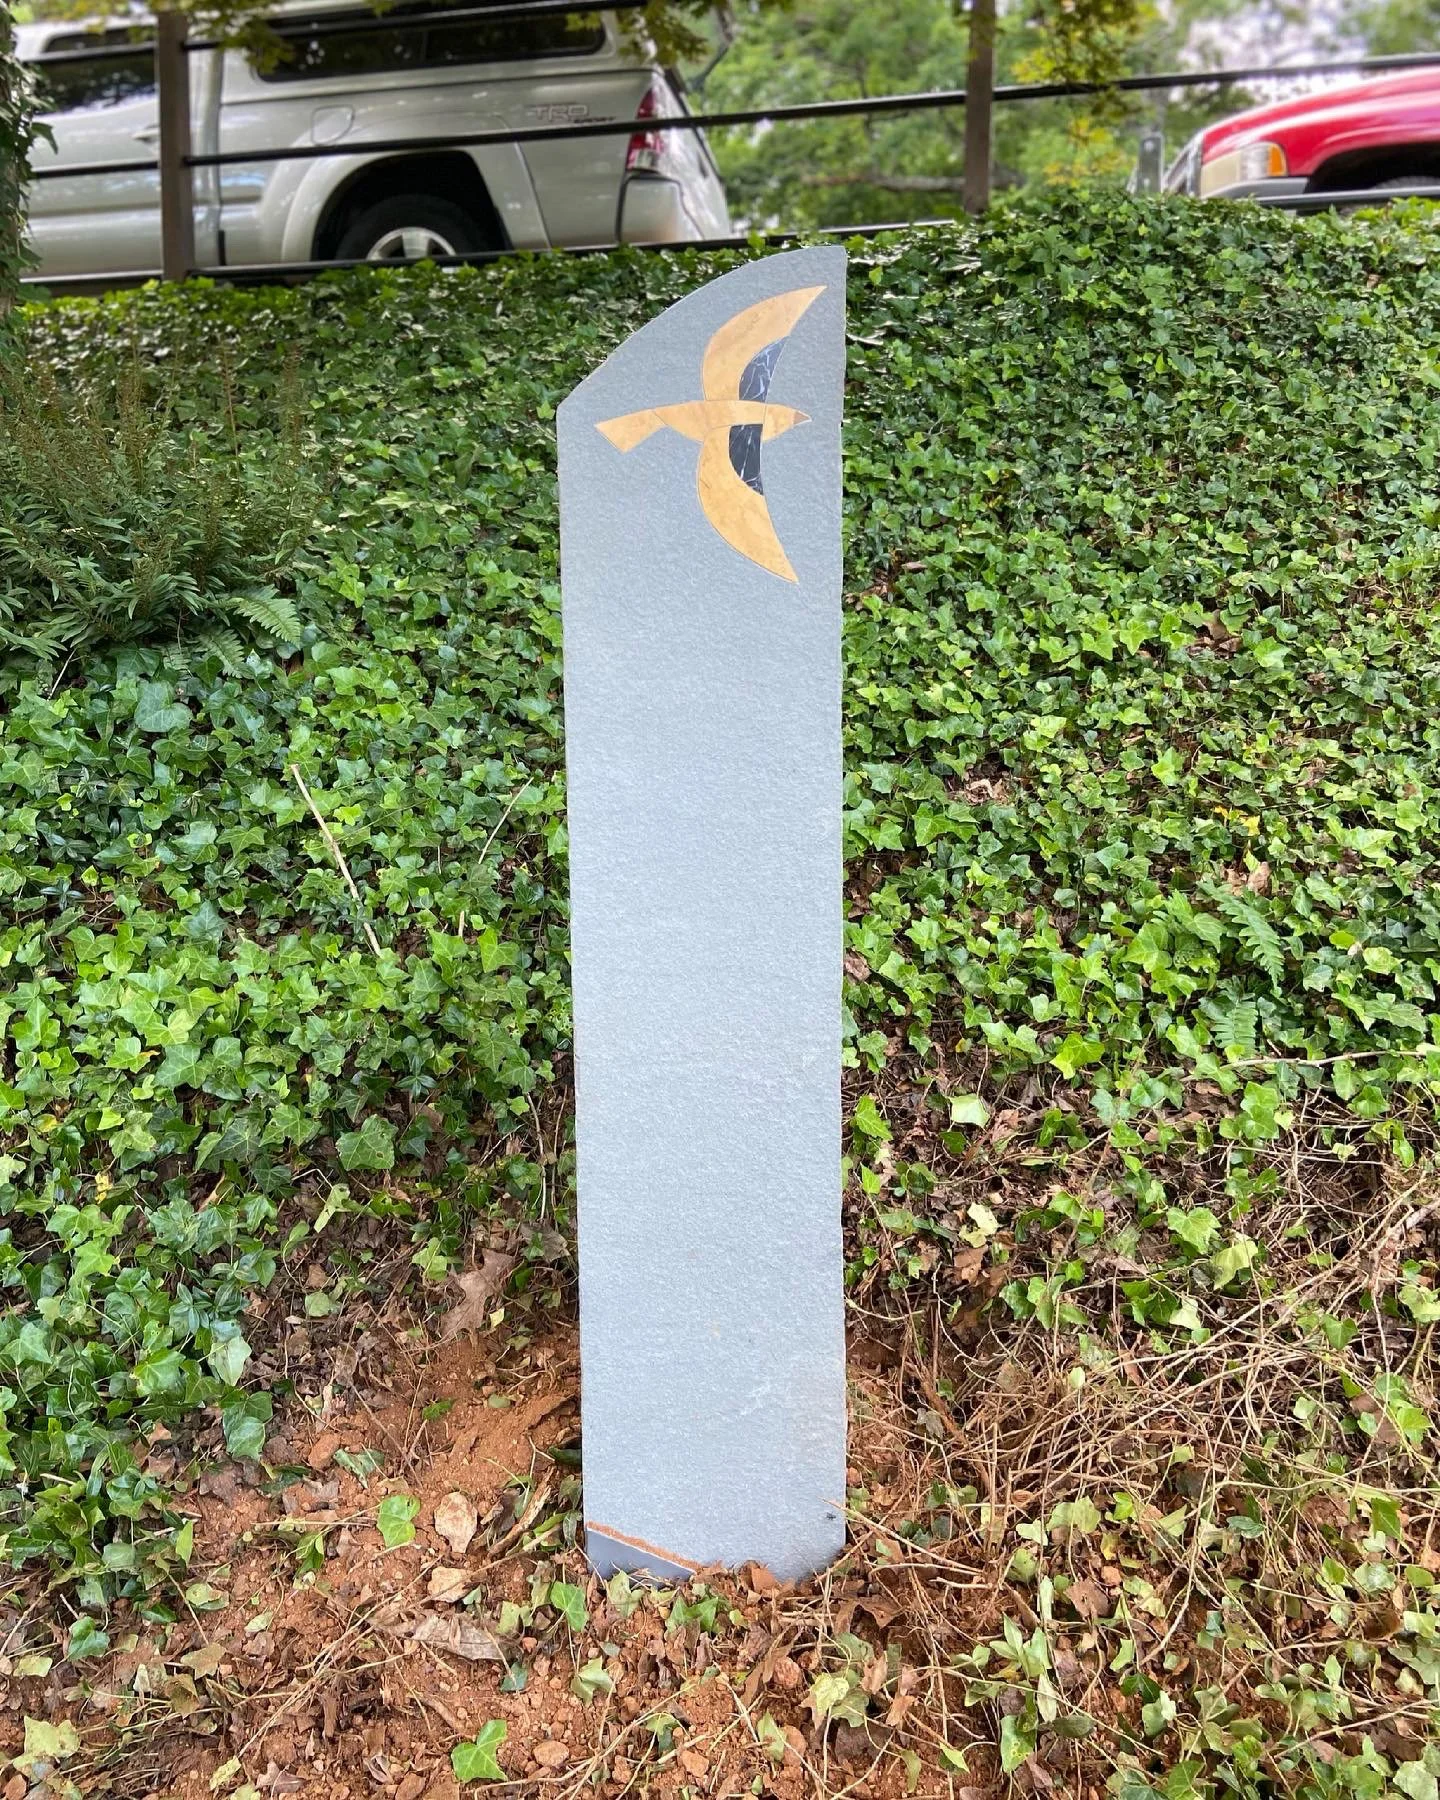
We have completed three projects at this residence in North Asheville. Each is defined by a mosaic inlay that we did. The first project was a set of steps and a landing at the top of the property. This was a very specific client request to allow them a view over their roof of the beautiful mountains beyond. We built a substantial retaining wall and installed of walkway on top of it. Pressure treated posts anchored in concrete support the swinging bench, installed by BB Barns. We built a short backyard trail that leads down from the bench to the back entrance of the home. The first inlay, a goldfinch, is set just off the trail.


The second inlay is a common sight in this part of the mountains. A black bear is set into a large stone in a walkway we created that leads from the back entrance of the house towards the landing and bench. There was a small section of wall to be built here as well. We tried to match the existing wall, a mortgage structure, comprising, local fieldstone and large river rock. While not our signature style, it is a common vernacular. Some of those old walls completely ignore the principles of good stone construction. We just can’t do that! So we cross our joints, but it’s similar enough in feel and look to be of a piece.


The most recent project was completed this spring. It’s another set of steps up another slope. This is a very steep property, as many are in Asheville. We built a small landing at the top of the steps, which connects the driveway to the deck and entrance at the opposite end of the house. We needed a small retaining wall to hold soil off the stone patio. We put a seating cap on it and now it’s a bench! The bench provides a nice vantage point to look at the bumblebee inlay we did, which celebrates a pollinator garden soon to be planted.


Traditional Stone Craft in Modern Architecture

The patio view, with a spot awaiting its Japanese maple.
In 2021, Hammerhead Stoneworks was approached by architects Emma Fuller and Michael Overby of the New York firm Fuller/Overby. They were building a private residence on Lake James in Nebo, North Carolina and sought our creativity and craftsmanship. We completed two stone projects as part of this amazingly beautiful home.
We built a backyard patio that connects the house and yard and allowed the homeowners a stunning view of the lake. Our patio offered a transition from the highly crafted interior of the home to the wild beauty of the nature surrounding.
A Japanese maple tree is planted in a well within the patio. We worked closely with a local arborist to provide a root growth pattern for the tree that would not disrupt the patio. Only time will tell, but the the tree evokes a strong feeling in the courtyard. It belongs there.

… a lake view…
There’s a subtle detail in the patio, a groove carved into the surface. Above the patio, there is a scupper, a gutter/drain that extends past the edge of the roof. It deposits rainwater onto the patio. The groove begins there, directly under the scupper, and meanders to the hole where the maple is planted. The groove widens as it goes, like a river gathering energy as it makes its way to the sea. The groove connects the house to the tree, nourishing it with water.

The carved groove, watering the tree while transporting water across the patio.
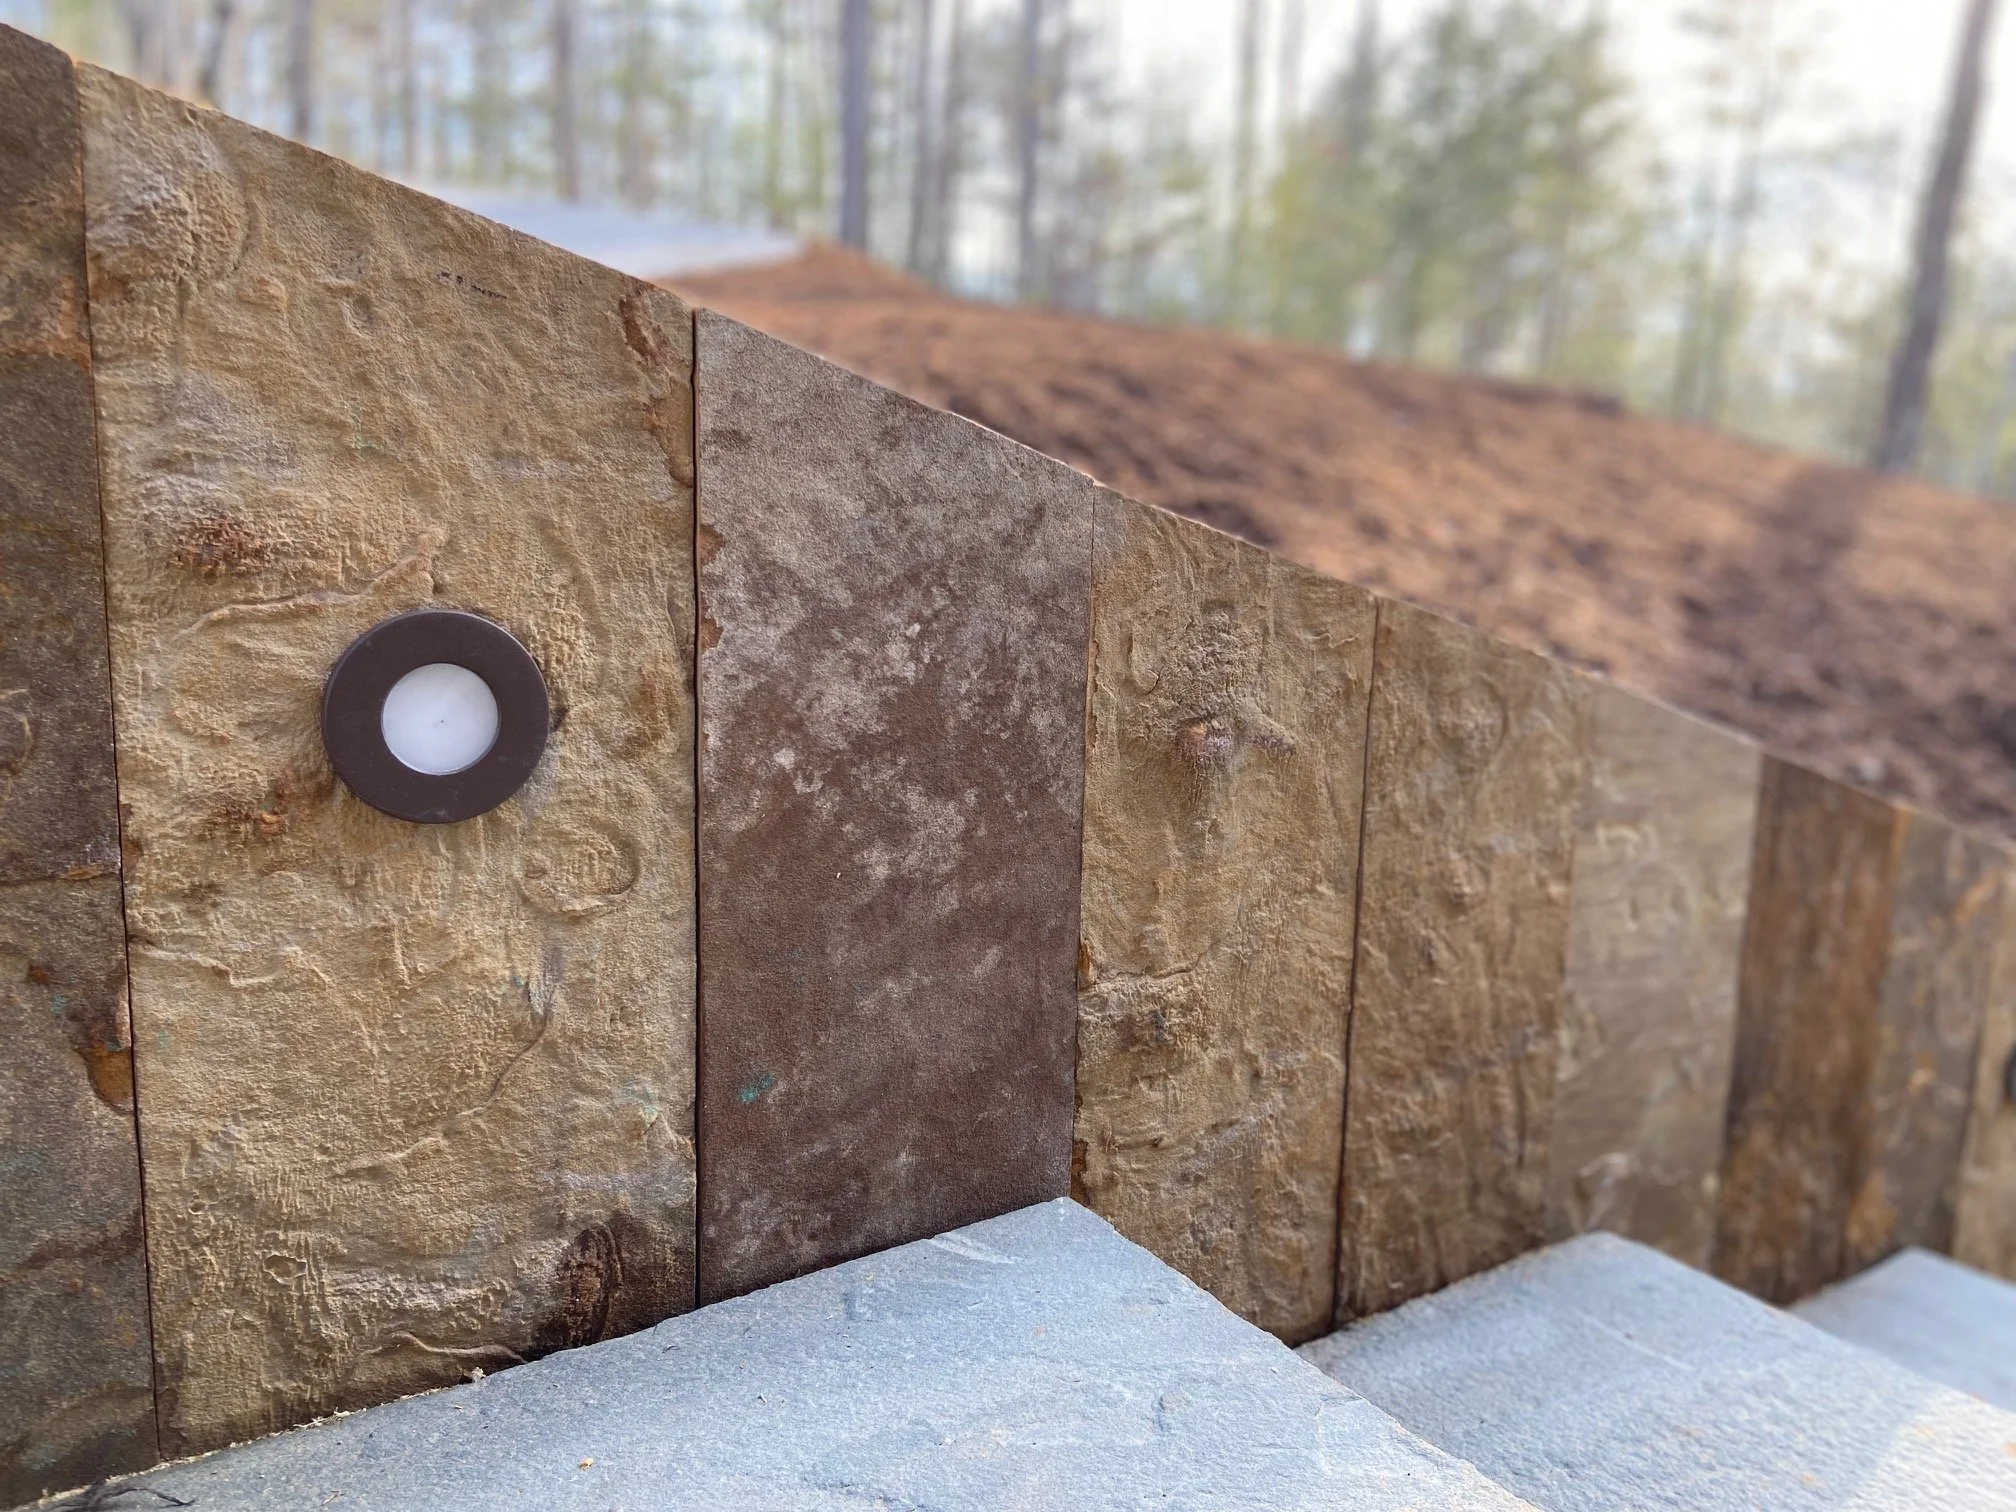
We also created a front entryway. The house is nestled into the hillside, and one must walk down from the driveway to the front door. Wide bluestone steps and a small landing at the front door imply cascading water.
Because the steps are lower than the surrounding earth, we needed a retaining wall. We took a novel approach, using cut pieces of Tennessee Stone, stood vertically. We anchored them deep in the ground and knitted them together with reinforcing rods on the back of the wall. This created a unique look which echoed the Shou Sugi Ban house siding. That is the Japanese style of burning cedar planks to enhance their durability and pest resistance. The brown colored siding of the house is not painted; it is charred wood. Circular lights are cut into the face of the wall to promote safe passage.
One can find a lovely portfolio of the house, and our work on the Fuller/Overby website. On the homepage, click the work icon in the upper right corner. The Nebo House is currently the first portfolio, indicated at the top of the page by a sketch that looks a little bit like a flattened box of takeout rice.
The Nebo House was selected by Architectural Record for their 2023 Record Houses issue. The article is behind a paywall, but if it’s your first time to their site, you get a free article or two. Check it out!


Principles of Drystone Work
A drystone wall is built stone on stone, without use of mortar or concrete. Gravity and skill ensure that the wall stays where it’s intended. A well-crafted drystone retaining wall will outlast and have a smaller carbon footprint than a similarly sited mortared wall. In the steep terrain of western North Carolina, drystone retaining walls are an excellent solution for addressing erosion, creating flatter yards and gardens, and otherwise sculpting the earth.
In a residential setting, by code, a retaining wall is limited to 48 inches tall. Anything taller, must be signed and stamped by a licensed engineer. In general, engineers don’t love stone walls. They like things that are consistent and predictable and more easily quantified than the crazy ecology of a stacked wall. This is boring, but expected. The human elements- care, intention, and experience- that the builders put into their structures cannot be easily factored into mathematical formulae.
Drystone walls have fallen out of favor in preference for segmented block, prefabricated panels, and poured concrete structures. These entities are the same throughout their structure and therefore more easily analyzed. It’s an apt metaphor for the state of modern society, this devotion to conformity and standardization. When using prefabricated, predictable materials, it matters much less if the people building care at all about what they’re doing. And if you can subtract care from the process, you can subtract cost. It’s always cheaper if you don’t give a damn. Cheaper in the short term, at least.
What Makes it Stay Up?
I get a version of this question quite frequently, particularly when people discover my preference to avoid concrete and mortar in my work. The answer is answer is simple: gravity and skill. Gravity is generally viewed as the enemy of a stone wall- but only if the wall is poorly built. Gravity holds the whole thing together.
Care + practice = skill. It takes time and failure and more time to acquire the skill needed to make beautiful and strong walls. Understanding the basic rules, and caring enough to follow them is the starting point, and the continuing journey for a craftsperson.
The rules that govern the construction of a drystone wall are simple and robust:
Two over one and one over two
End them in
Maximum contact- minimum movement
Good hearting
Batter back
The top must sit over the bottom
Weather always wins
The principle of emergence states that simple rules lead to complex (and beautiful) results. Bird flocking is often cited as the exemplar of emergence. The strange and wonderful synchronicity demonstrated by a thousand starlings sweeping through the air, without a leader, without discussion, is built on simple rules: maintain the same distance from your neighbor, maintain same speed, avoid predators. Gorgeous and complex patterns emerge. A drystone wall is another stunning example of this principle in practice. Every wall will be different, even if created by the same builder using the same materials. These simple rules offer infinite possible outcomes. And a well-built wall is inherently beautiful.
These are the principles of drystone construction.
Two Over One: One Over Two
This is the very simple principle that you must cross your joints. Tall vertical lines in masonry construction, often called running joints, weaken the structure significantly. Crossing joints- imagine the traditional running bond of the most common brick wall- creates a network. That web of dynamic forces is fundamental to what holds a wall together. It is shocking how often builders will violate this basic principle. Many new houses are wall papered in stone, to give the illusion of strength and permanence. These veneered walls use mortar, whether visible or not- to adhere the stone to the house frame. The mortar becomes a crutch or an excuse; often this rule about crossing joints is completely ignored. To my mind, a well built wall follows the principles, whether or not mortar is used. Poorly built wall are always ugly.
End Them In
Stones should run deep into the wall. Sometimes, in an effort to conserve their rock pile, people will use the long side of a stone as the face. This is called tracing and it makes for a shallow structure and therefore a weak wall. If you have a stone that is shaped like a french fry, run it long into the wall.
Maximum Contact- Minimum Movement
The next stone you put in should make as much contact as possible with the stones that are already in the wall. And so on and so on.
One of the great attributes of a dry stone wall is its flexibility. It has the capacity to move and therefore respond to environmental factors. The day-to-day expansion and contraction that comes with being heated by sunlight and cooled by frost will cause minuscule movements in a wall but will not crack it apart. It is not supposed to be a rigid structure. Inflexibility fails in walls, as in life.
Minimal movement is a great attribute. On the other hand, stones that pivot from side to side on a single point cause trouble. Maximum contact, minimum movement is where practice becomes most important to a wall builder.
Good Hearting
A stone wall is more than its face. There needs to be structure behind the stones you see. This is called ‘hearting.’ Some traditions demand that this is as carefully considered as the face stones. Others, like myself, take a more casual approach. Hearting should be stone or gravel and well consolidated. It shouldn’t have the ability to move or settle much over time. Soil or organic matter should be avoided at all costs. I use stone chips and gravel extensively to promote drainage behind my walls. It is important that the gravel not get between the stones, but only rest behind. Bits of gravel can act like ball bearings, making it hard to get maximum contact- minimum movement. I like to place a filter fabric behind my walls, separating the cut slope from the hearting. This prevents the backfill from silting up, and in the case of red clay, staining the wall.
Batter Back
A good dry stone wall has a slight backwards slope to its face, called the batter. Imagine the wall leaning into the hillside which it is intended to retain. This strengthens the wall and gives it leverage against the slope behind it. If your wall is a free-standing structure, then both sides batter back, towards the center. Every stone worker has their own ratio for the batter of a wall. I like 1/2” of slope per foot of wall height. Some traditions are steeper than that.
The Top Must Sit Over The Bottom
Lean back, but not too far. The top of the wall, where your capstones rest, must be sitting squarely over the bottom of the wall. It is a common beginner’s mistake to lean the wall back too steeply. A very steep batter on the face will have the top of the wall sitting over soft soil backfill instead of the hearty structure of the wall. The weight of the cap will compress the soil. The path of least resistance for that soil will be forward; it will blow out the bottom of the wall, collapsing the whole structure. This is where the concept of gravity really comes into play with the construction of the wall. With practice and care, gravity is a great ally.
Weather Always Wins
Fundamentally, all construction is an attempt to resist the forces of weather. And while weather is not a singular force, in my experience, water is the prime mover. Almost all of the structures we build live their lives in the weather. We have to constantly be conscious of what happens when it rains. Where does the water go? Where does it collect? What happens when it freezes? What happens when it builds up or when it moves the earth?
I think one of the most beautiful things about stonework is the endless potential. It suits me as a lifelong pursuit because there’s no end to what I can learn, tweak, try, mess up, try again, change, misapply, realize, and make. If I get bored, it’s my fault. That means it’s time to explore.
At the heart of this craft, there are a few simple rules. Understanding them, as principles and as thoughtful actions, opens up a whole world of creative possibility.

Get Good at Failure
In 2013, I was selected as a finalist for a public art project here in Asheville. Myself, along with a sculptor and a muralist/ceramic artist team were selected from a large pool of applicants to adorn a bare block wall on a new boutique hotel. I saw it as an exciting opportunity to push the boundaries of what I could do with stone.
I proposed a pair of huge stone mosaics, each approximately 25 feet tall and 6 feet wide. They were the faces of spirits. Apu was male, the spirit of the mountains, all jagged lines and rough stones, fierce and unyielding. Rio was female, the spirit of the river, all curves and smooth shapes, the gentle forces that wear those unyielding peaks down to sand. It was a yin-yang design drawn from our landscape.
The process was fraught with challenges, none of which I rose to. Most difficult for me was an event hosted at a prominent local art gallery. Each artist set up a display of their design and showed examples of previous work. My presentation materials were lackluster. My design was limited to fine line drawings of the faces. I didn’t even color them in. To me, a line drawing opens into a limitless world of possibility. To everyone else, it looked like a scratch at an idea with lots of room to grow.
At this point, I had no real practice with the technical side of fabricating and installing a large piece like this. I imagined it could be done. I brought a mosaic with me to the gallery as a demonstration, a proof of concept. It was so tiny! It was literally 1/10 of 1% of the size of the mosaic I was proposing to build. Nothing I presented suggested the scale or impact that the artwork could have. Including me.
The gallery event was this introvert’s version of a nightmare. If felt like being the new kid in school walking into the noisy cafeteria on the first day. I didn’t want to be noticed. I didn’t want to be not noticed. Really, I just wanted to be anywhere else. I’m sure that people could tell.
The folks in attendance perused our portfolios, asked questions about our designs, and then had the opportunity to vote for their favorite. The votes tallied at the event were to be combined with online votes and the opinions of the arts commission to choose the final artist.
The online voting was open for a couple of weeks. During that time each artist was expected to submit a finalized design with a detailed budget. The amount of money available for the project was $25,000. Our budgets were not to exceed that but address how that money would be spent. Because the artwork was going to hang on a vertical exterior wall, the budget had to include engineering costs.
I connected with a local engineer and we had fruitful discussions about how we might do such a thing. I have always enjoyed the technical challenges of my work and this was especially exciting because it was such uncharted territory. The engineer wrestled with the concept of my art and identified ways to make it real. It was to be a complex system of steel fasteners embedded into the concrete wall that could bear the load, resist wind shear, and survive the elements. He sent the specifications off to a fabricator that he knew who could create such a system. The day before the finalized proposals were due, I got the quote from the fabricator. It was going to be just shy of $20,000. My budget would be 80% gone before I purchased a single stone. I was screwed.
Or not.
I did not get the project. It was awarded to the team of muralist Ian Wilkerson and ceramic artist Alex Irvine, a gifted duo also based here in Asheville. I was very, very disappointed. Crushed, really.
Hindsight suggests that I was also very, very lucky. The project would have either bankrupted me or seriously damaged my reputation because there was no way I could have completed even a fraction of it for the budget available.
I was still very disappointed. I had failed.
“You got your name out there.”
“Being selected is an accomplishment.”
“You learned a lot.”
All the words of encouragement I was offered sounded to me like versions of “You failed.” And though I was busy enough with my work, I am more likely to dwell on disappointment than celebrate successes. Sometimes what-could-have-been seems more real than what-is.

I kept the sketch of Apu on my wall. He kept watch over me in my office and I would study his face from time to time, imagining how he would look realized in stone. I just had to see it, so a few months later, I started working on a scaled down version of Apu. Instead of covering a whole wall, it would be about the size of a door. I wouldn’t have to worry about engineering or vote tallies or committee feedback. I was making it for myself- to see it and to see if it worked. Nothing else really mattered.
I worked on it at home on weekends, shaping stones in my driveway and then laying the pieces in a specially made sandbox in my yard. I started with Apu’s beard, jagged lightning lines cut from a native gneiss, an unruly stone that speaks to me of these mountains. Each piece I cut and added to the sandbox got me a little more excited about the project. It was beautiful to me.
Progress was slow. In fact, four years later it’s still not done! I have taken it apart and moved it at least three times since then. I still love it; I just don’t find much time to work on it.
From Apu to GreenMan
In 2015- two years later- another opportunity to put the face of a spirit on a wall appeared. The spirit was the Green Man, intended for the wall of a local craft brewer’s tasting room. During the dance of the design process, I showed my customer Apu, only half finished, laying in the sandbox at my shop. Here was my great failure. Here, too, was proof to my customer- and to myself- that it could be done and that it could look amazing. They saw the potential and hired me to make Green Man. The failure of Apu led directly towards GreenMan, which helped me secure my current public art project in schools in Norfolk, Virginia. The failure was instrumental in teaching me how to do the work and helping others see the idea and believe in it. It was disappointing, yes, but it was an important stepping stone forward.

Apu is still only half finished, resting regally at the shop, periodically overrun by bamboo grass. Maybe someday someone will want him for their own and I will finish him. Sometimes I think he would make a good grave marker for me. His stern countenance would be a capable guard of my earthly remains, and a good reminder that it’s only failure if you quit.

Drystone Walls
for reference: https://www.hammerheadstoneworks.com/2018/10/09/montreat-big-wall/
Montreat Big Wall
I helped build this wall when I worked with Fred Lashley at the Unturned Stone. We built it 18 years ago and it remains the tallest drystone wall I have ever worked on. At its tallest, it is 7 feet high. Made mostly of fieldstone from Maggie Valley, we supplemented with Hoopers Creek, which shows up as the rusty colored faces in the pictures.
The wall is in Montreat, and I like to visit when I make my way out to Black Mountain. It is an impressive structure. It looks largely the same now as it did then, except for the glorious patina of lichen. I don’t think I will ever build another wall so tall.
Codes? What Codes?!
These days there are building codes that limit the height of a retaining wall. In a residential setting, like this, the max is 48 inches tall. Anything taller, must be signed and sealed by a licensed engineer. In general, engineers do not love stone walls. They like things that are consistent and predictable and more easily quantified than the crazy ecology of a stacked wall. The human elements, care, intention, and experience that the builders put into the structure cannot be factored into mathematical formulae.
Drystone walls have fallen out of favor in preference for segmented block, prefabricated panels, and poured concrete structures. They are all the same and more easily analyzed. It’s an apt metaphor for the state of modern society, our blind devotion to conformity and standardization.
When building with prefabricated predictable materials, it matters much less if the people building care at all about what they are doing. And if you can subtract care from the process, you can subtract cost. It’s always cheaper if you don’t give a shit. Until later.
Whether or not the same codes were in effect 18 years ago, I don’t know; I just worked on the wall and was not much involved in the process that brought the project to be. I know it was subcontract work, for a landscape guy in Black Mountain with a stellar reputation and very organized and disciplined approach to his work. If anyone was likely to get the necessary approval, it would have been him. To my eye, the wall has not moved at all and I see no evidence of it having needed repairs for the last 18 years.
What Makes it Stay Up?
I get a version of this question quite frequently, especially when people discover that we usually work without mortar or concrete. The answer is amazingly complex, but I generally begin with a very simple answer: gravity and skill.
I’ve already mentioned how important care is in the creation of a structure like this. Care plus practice equals skill.
The rules that govern the construction of a drystone wall are simple and robust: two over one and one over two, end them in, maximum contact, minimum movement, batter back, the top must sit over the bottom, weather always wins. From the simple rules emerge an infinite number of possibilities. Bird flocking is often used as the epitome of the principles of emergence, simple rules lead to complex (and beautiful) results. A drystone wall is another stunning example.
Two Over One: One Over Two.
This is a very simple principle that you must cross your joints. Tall vertical lines in masonry construction “often called running joints” weaken the structure significantly. Crossing joints imagine the traditional running bond of the most common brick wall and creates a network. That web of dynamic forces is fundamental to what holds a wall together.
End Them In
Another simple rule: stones should run deep into the wall. Sometimes, in an effort to conserve their rock pile, people will use the long side of a stone as the face. This is called tracing and it makes for a shallow structure and therefore a weak wall. If you have a stone that is shaped like a french fry, run it long into the wall.
Maximum Contact & Minimum Movement
The next stone you put in should make as much contact as possible with the stones that are already in the wall. And so on and so on.
One of the great attributes of a dry stone wall is its flexibility. It has the capacity to move and therefore respond to environmental factors. The day-to-day expansion and contraction that comes with being heated by sunlight and cooled by frost may cause minuscule movements in a wall but not crack it apart. It is not supposed to be a rigid structure. Inflexibility fails in walls, as in life.
Minimal movement is a great attribute. On the other hand, stones that pivot from side to side on a single point cause trouble. Maximum contact, minimum movement is where practice becomes most important to a wall builder.
Batter Back
A good dry stone wall has a slight backwards slope to its face, called the batter. Imagine the wall leaning into the hillside which it is intended to retain. This strengthens the wall and gives it leverage against the slope behind it.
The Top Must Sit Over The Bottom
Lean back, but not too far. The top of the wall, where your caps rest, must be sitting squarely over the bottom of the wall. It is a common beginners mistake to lean the wall back too steeply. A very steep batter on the face will have the top of the wall sitting over soft soil backfill instead of the hearty structure of the wall. The weight of the cap will compress the soil. The path of least resistance for that soil will be forward; it will blow out the bottom of the wall, collapsing the whole structure. This is where the concept of gravity really comes into play with the construction of the wall. With practice and care, gravity is a great ally.
Weather Always Wins
Fundamentally, all construction is an attempt to resist the forces of weather. And while weather is not a singular force, in my experience, water is the prime mover.
Almost all of the structures we build live their lives in the weather. We have to constantly be conscious of what happens when it rains. Where does the water go? Where does it collect? What happens when it freezes? What happens when it builds up or when it moves the earth?
With this particular wall, so tall and at the bottom of such a steep bank, managing water was a primary concern. We lined the cut bank behind the wall with a filter fabric that allows water to pass through, but holds back the soil. In addition to keeping the backfill of the wall from getting silted up, it prevents red clay from washing through the wall and staining the face.
This wall is also very deep or thick, depending on how you want to look at it. Behind the face there is an enormous amount of ugly stone, chips, and gravel. Rain water runs through it and does not linger long enough to build up hydrostatic pressure, the force that pushes over so many rigid, impermeable walls. There are no drain pipes behind the wall, because the whole wall functions as a drain.
Eighteen years and counting.

A Communal Urn / Ash Vault

A shop presentation of the Communal Urn, a stone vault in process.
On September 4th of 2020, I hosted a client at my shop to discuss an unusual project I am working on. A local church has commissioned me to create a communal urn, a stone vault for the cremated remains of members of their congregation. I am drawn to these types of unusual projects and I’m grateful that such work finds me.
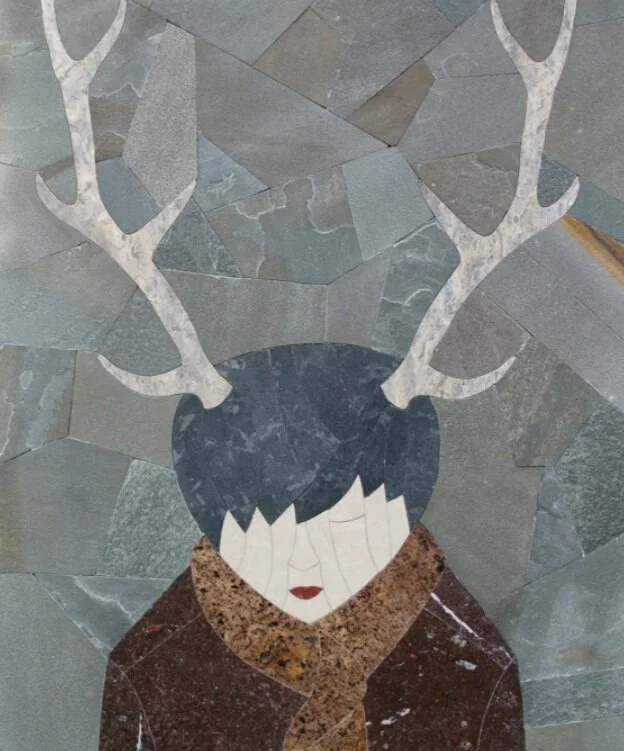
I set up my “presentation“ in the lower shop – the same place I hosted last fall’s studio tour. In fact, in the background of the picture you can see “The Boy With Antlers“ mosaic, which has been hanging there for almost a year now.
To the middle left of the photo is a full-scale print out of the vault. It’s just over 4 feet tall and 42 inches across. I am a big fan of full scale templates, at least when contemplating something new or unusual. It’s easier to critique the design at full size. About halfway up the urn there is an inscription, noted in my drawing with scribbles. While the exact quote has not been completely nailed down yet, the basic concept is that the inscription is in a single piece of stone, which I am calling the donut. I’ve already had that piece fabricated by my friends at Tennessee Marble Company. It’s resting on the pallet just behind the poster. The donut hole has been cut out; the Styrofoam was to prevent it from moving during transit. Originally a scrap piece, I believe the donut hole will now factor into the completed vault, possibly as the cap.
To the right there is a pallet of Tennessee sandstone. You can’t really tell from this picture, but those pieces have a 21 inch radius on them. Those will make up the body of the vault. We have been making these pieces here and there at the shop, when we have a few idle moments. We’ll need a bunch more, but it’s a good start.

Communal Urn Vault Opening with ‘door’ closed.
In the background, stretched out on the floor is a poster with the possible inscription laid out in multiple typefaces. It’s 11 feet long! That’s a lot a letter carving. In the foreground are some samples and even a comparison between sandblasting and letter carving. I’m excited that they are going to let me carve the inscription. I am not a super skilled letter carver, but it just seems appropriate in this context for this inscription to be done by hand. This will make me a better letter carver. Or completely insane.
UPDATE OCTOBER 5, 2020
I’m still pecking away at the opening to the communal urn. I have the major pieces done, though I still have to cut a ramp into the big bottom stone. I thinned down the door again, so it’s very manageable weight now. I still need to devise a locking mechanism, but that will be easier now that I have the whole thing in place to look at. I like it. It’s fun to make things I’ve never made before.

The completed Communal Urn and Ash Vault at Trinity United Methodist Church in West Asheville, NC.
UPDATE MARCH 21, 2021

Design
I have to admit I was not familiar with the concept of a communal urn before the pastor of the church approached me. She had come across a brick structure at another church and wanted to commission something similar. I did not care for the brick urn, which was square and had a flat top. To me, it looked like a bear proof garbage can in a state park. Plus, we don’t work with brick!
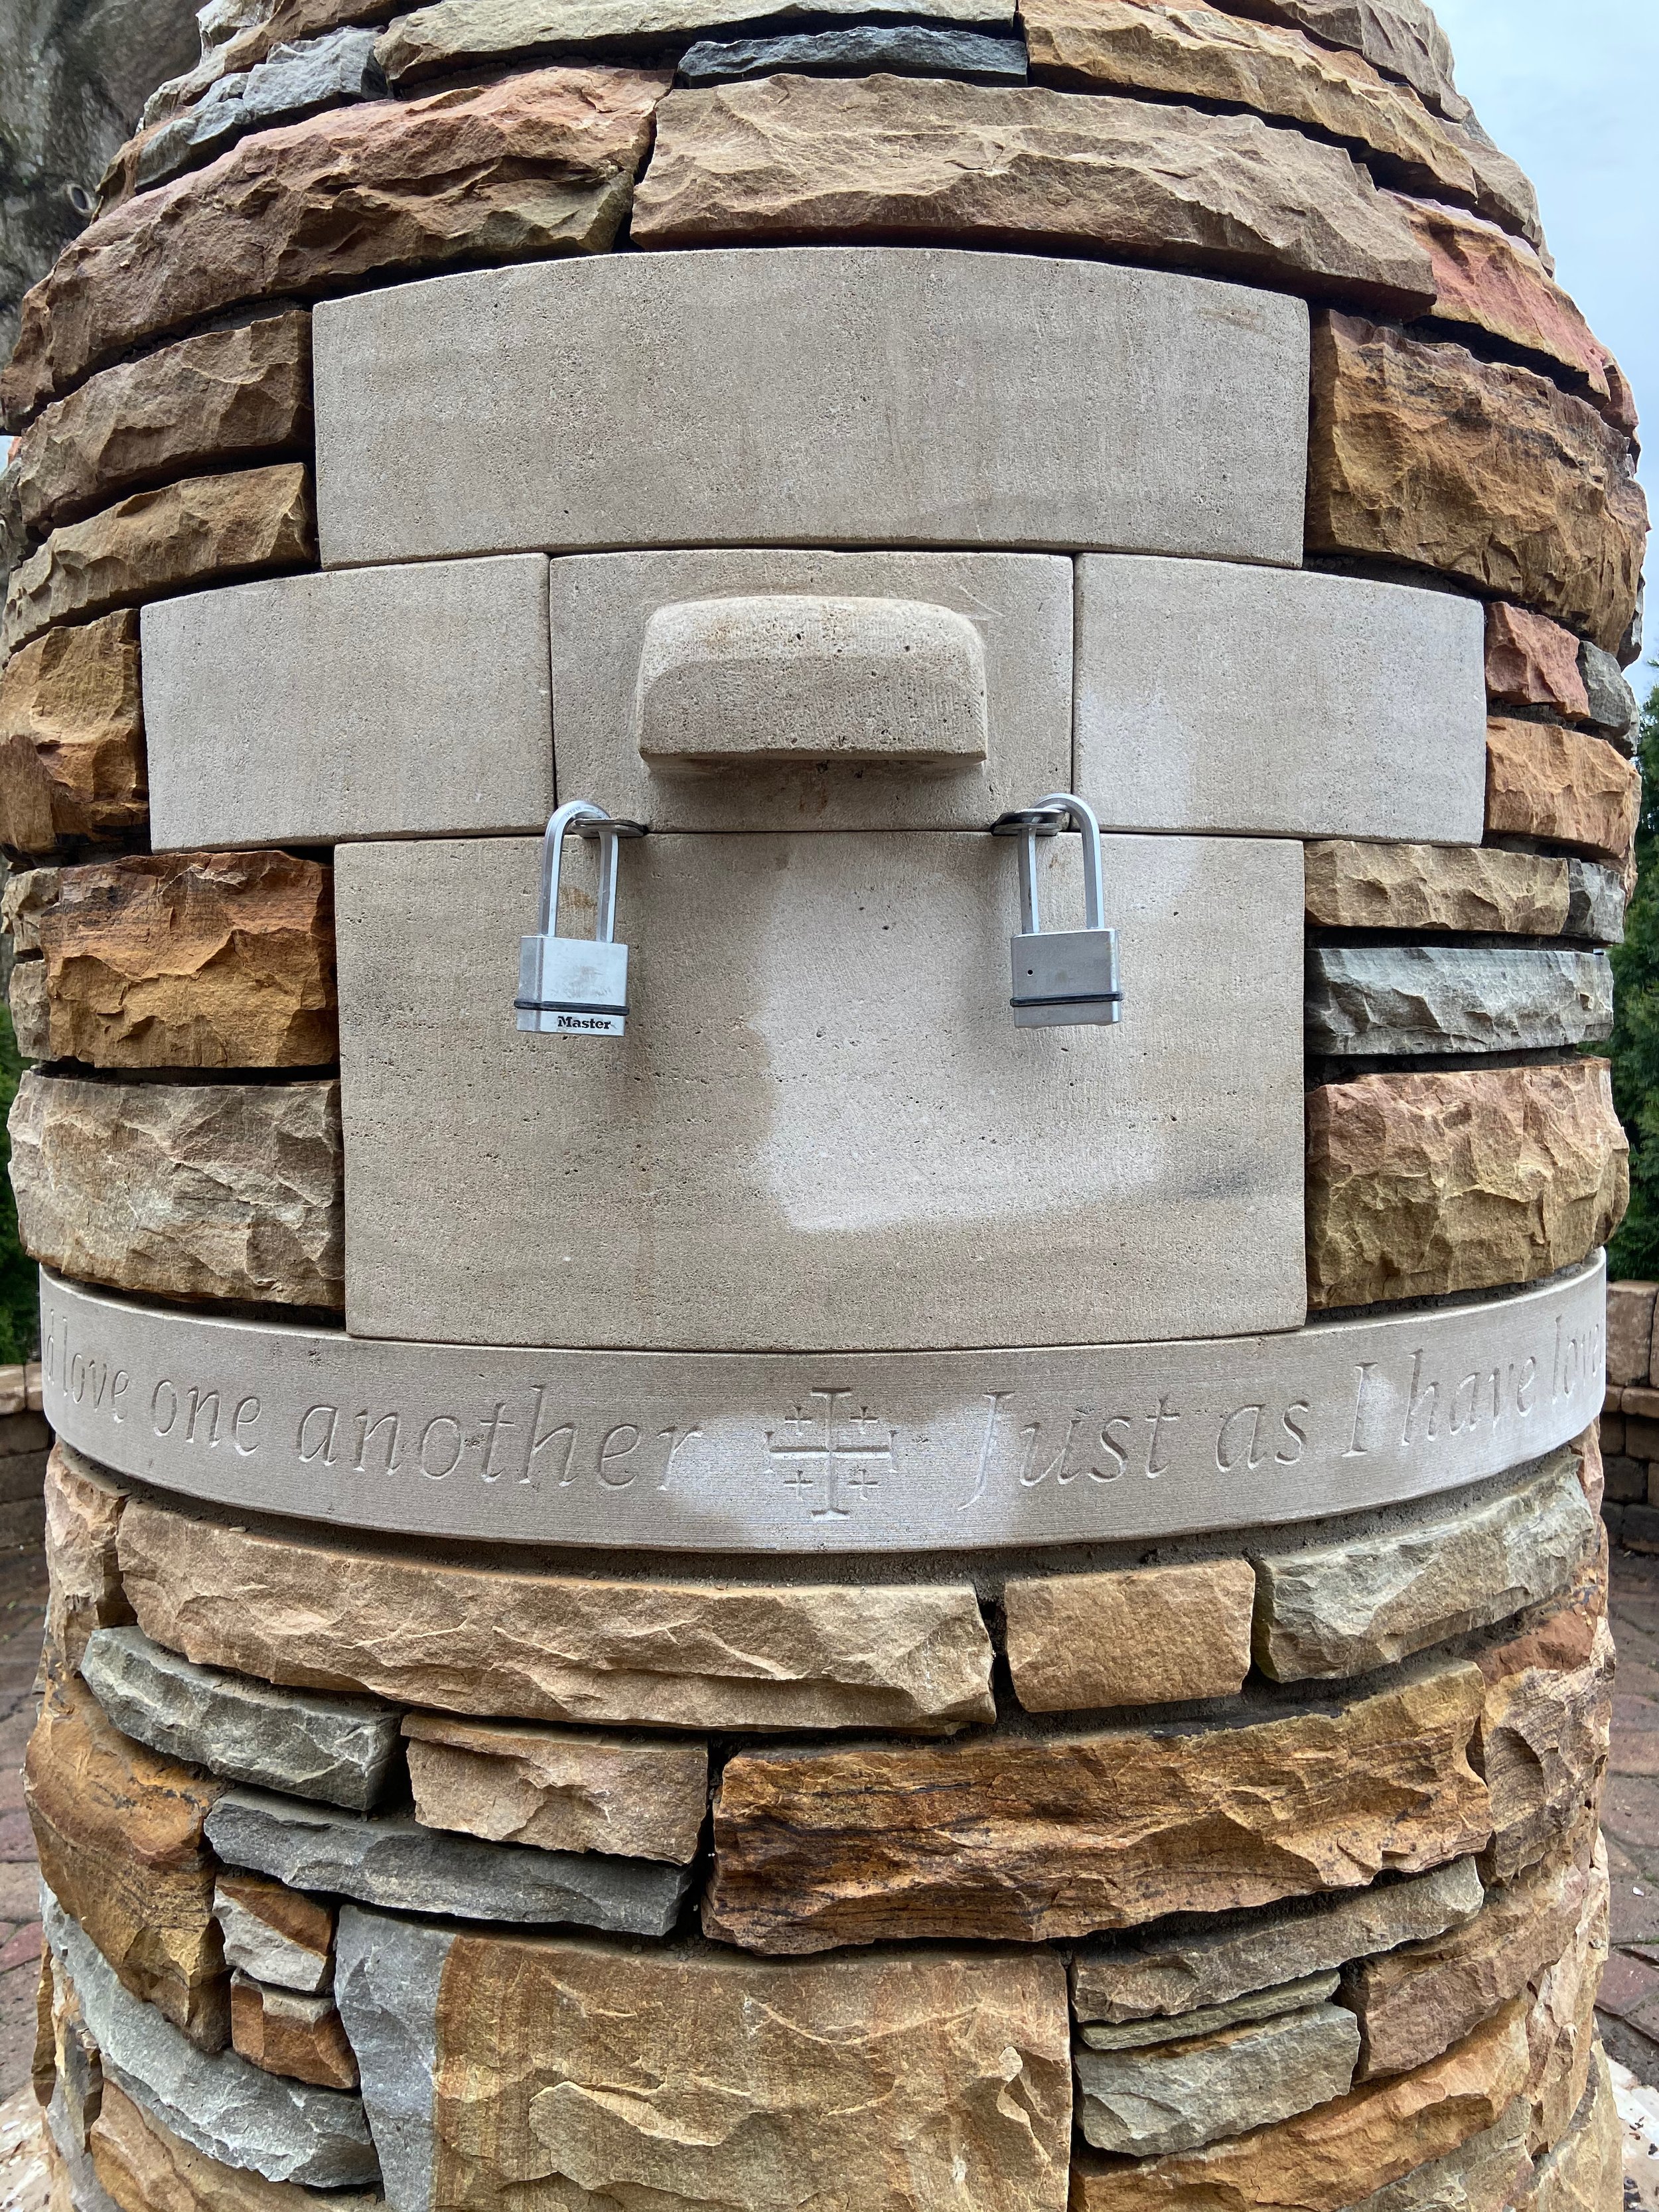
My design is cylindrical. This reduces the interior volume, but a circle feels more appropriate to an artifact such as this, meant to celebrate the cycle of life. An early iteration of the design resembled an acorn, which was metaphoric, but too expensive.
The final shape resembles a cairn, a stack of stones usually found somewhere in the woods. They are sometimes used as way-finders, markers the show the path to follow. That seemed an apt metaphor as well. Artist Andy Goldsworthy has built many similar structures that he calls seeds. They are arresting structures that make one pause and reflect. Cairns are typically laid stone on stone, with no mortar. They aren’t usually hollow though. The urn is built of Tennessee sandstone with 9” thick mortared walls and a void within. The whole thing is 42” in diameter.
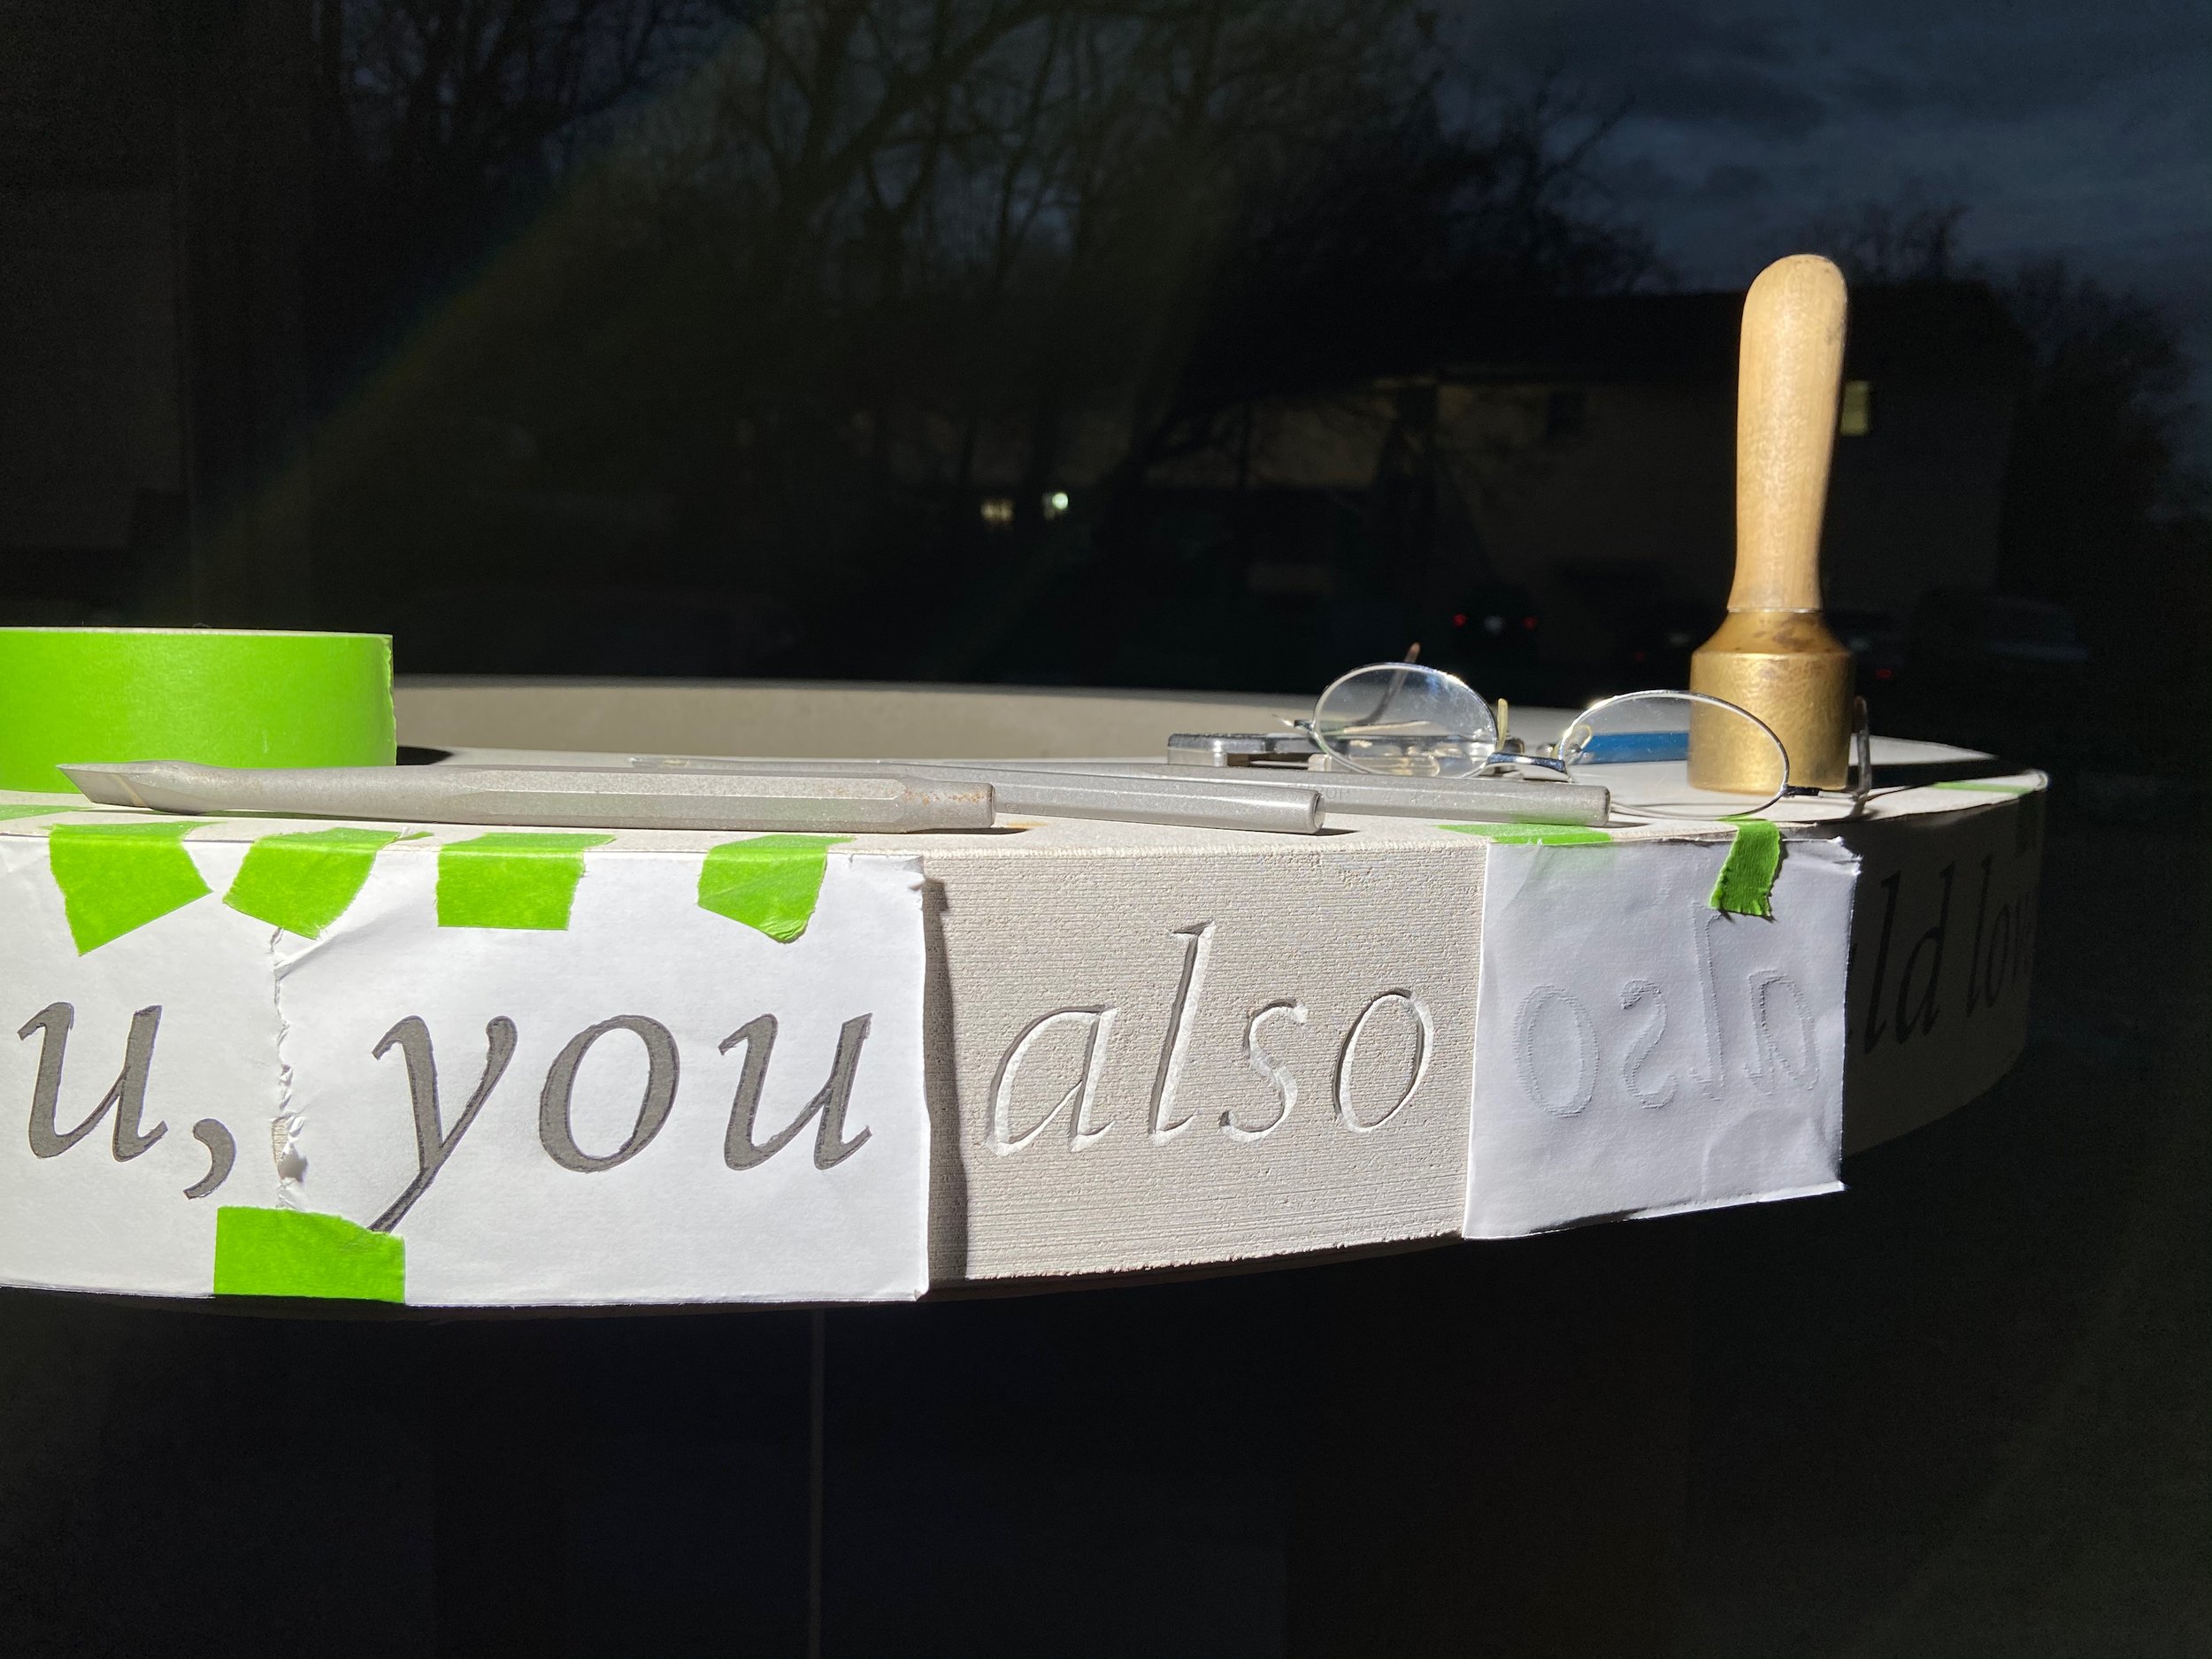
THE DONUT: LETTERS CARVED IN STONE
The key design piece is a single piece of limestone located about halfway up the urn. We referred to it as “the donut” because of the opening in the center to allow the ashes to fall through. The stone features an inscription selected by the congregation. The inscription repeats twice. “Just as I have loved you, you also should love one another.” I had imagined some type of circular phrase that looped back onto itself, but couldn’t think of one!

Lettering carved into limestone ‘donut’ for the communal urn
I had a piece of Indiana limestone cut for me by Tennessee Marble Company. I chose limestone because it is relatively easy to carve. As it turns out, there are architectural details made from Indiana limestone in the church building itself. I decided to do the letter carving myself. I have dabbled with this in the past, but this was my largest project by far. It came out pretty well I think. Incised letters like this have more character than the sandblasted lettering most commonly seen today. I had a special table made to support the stone at chest height. I had a powerful lamp and a space heater nearby, so I was able to work on it throughout the winter. It took a long time!
THE RAMP AND THE DOOR
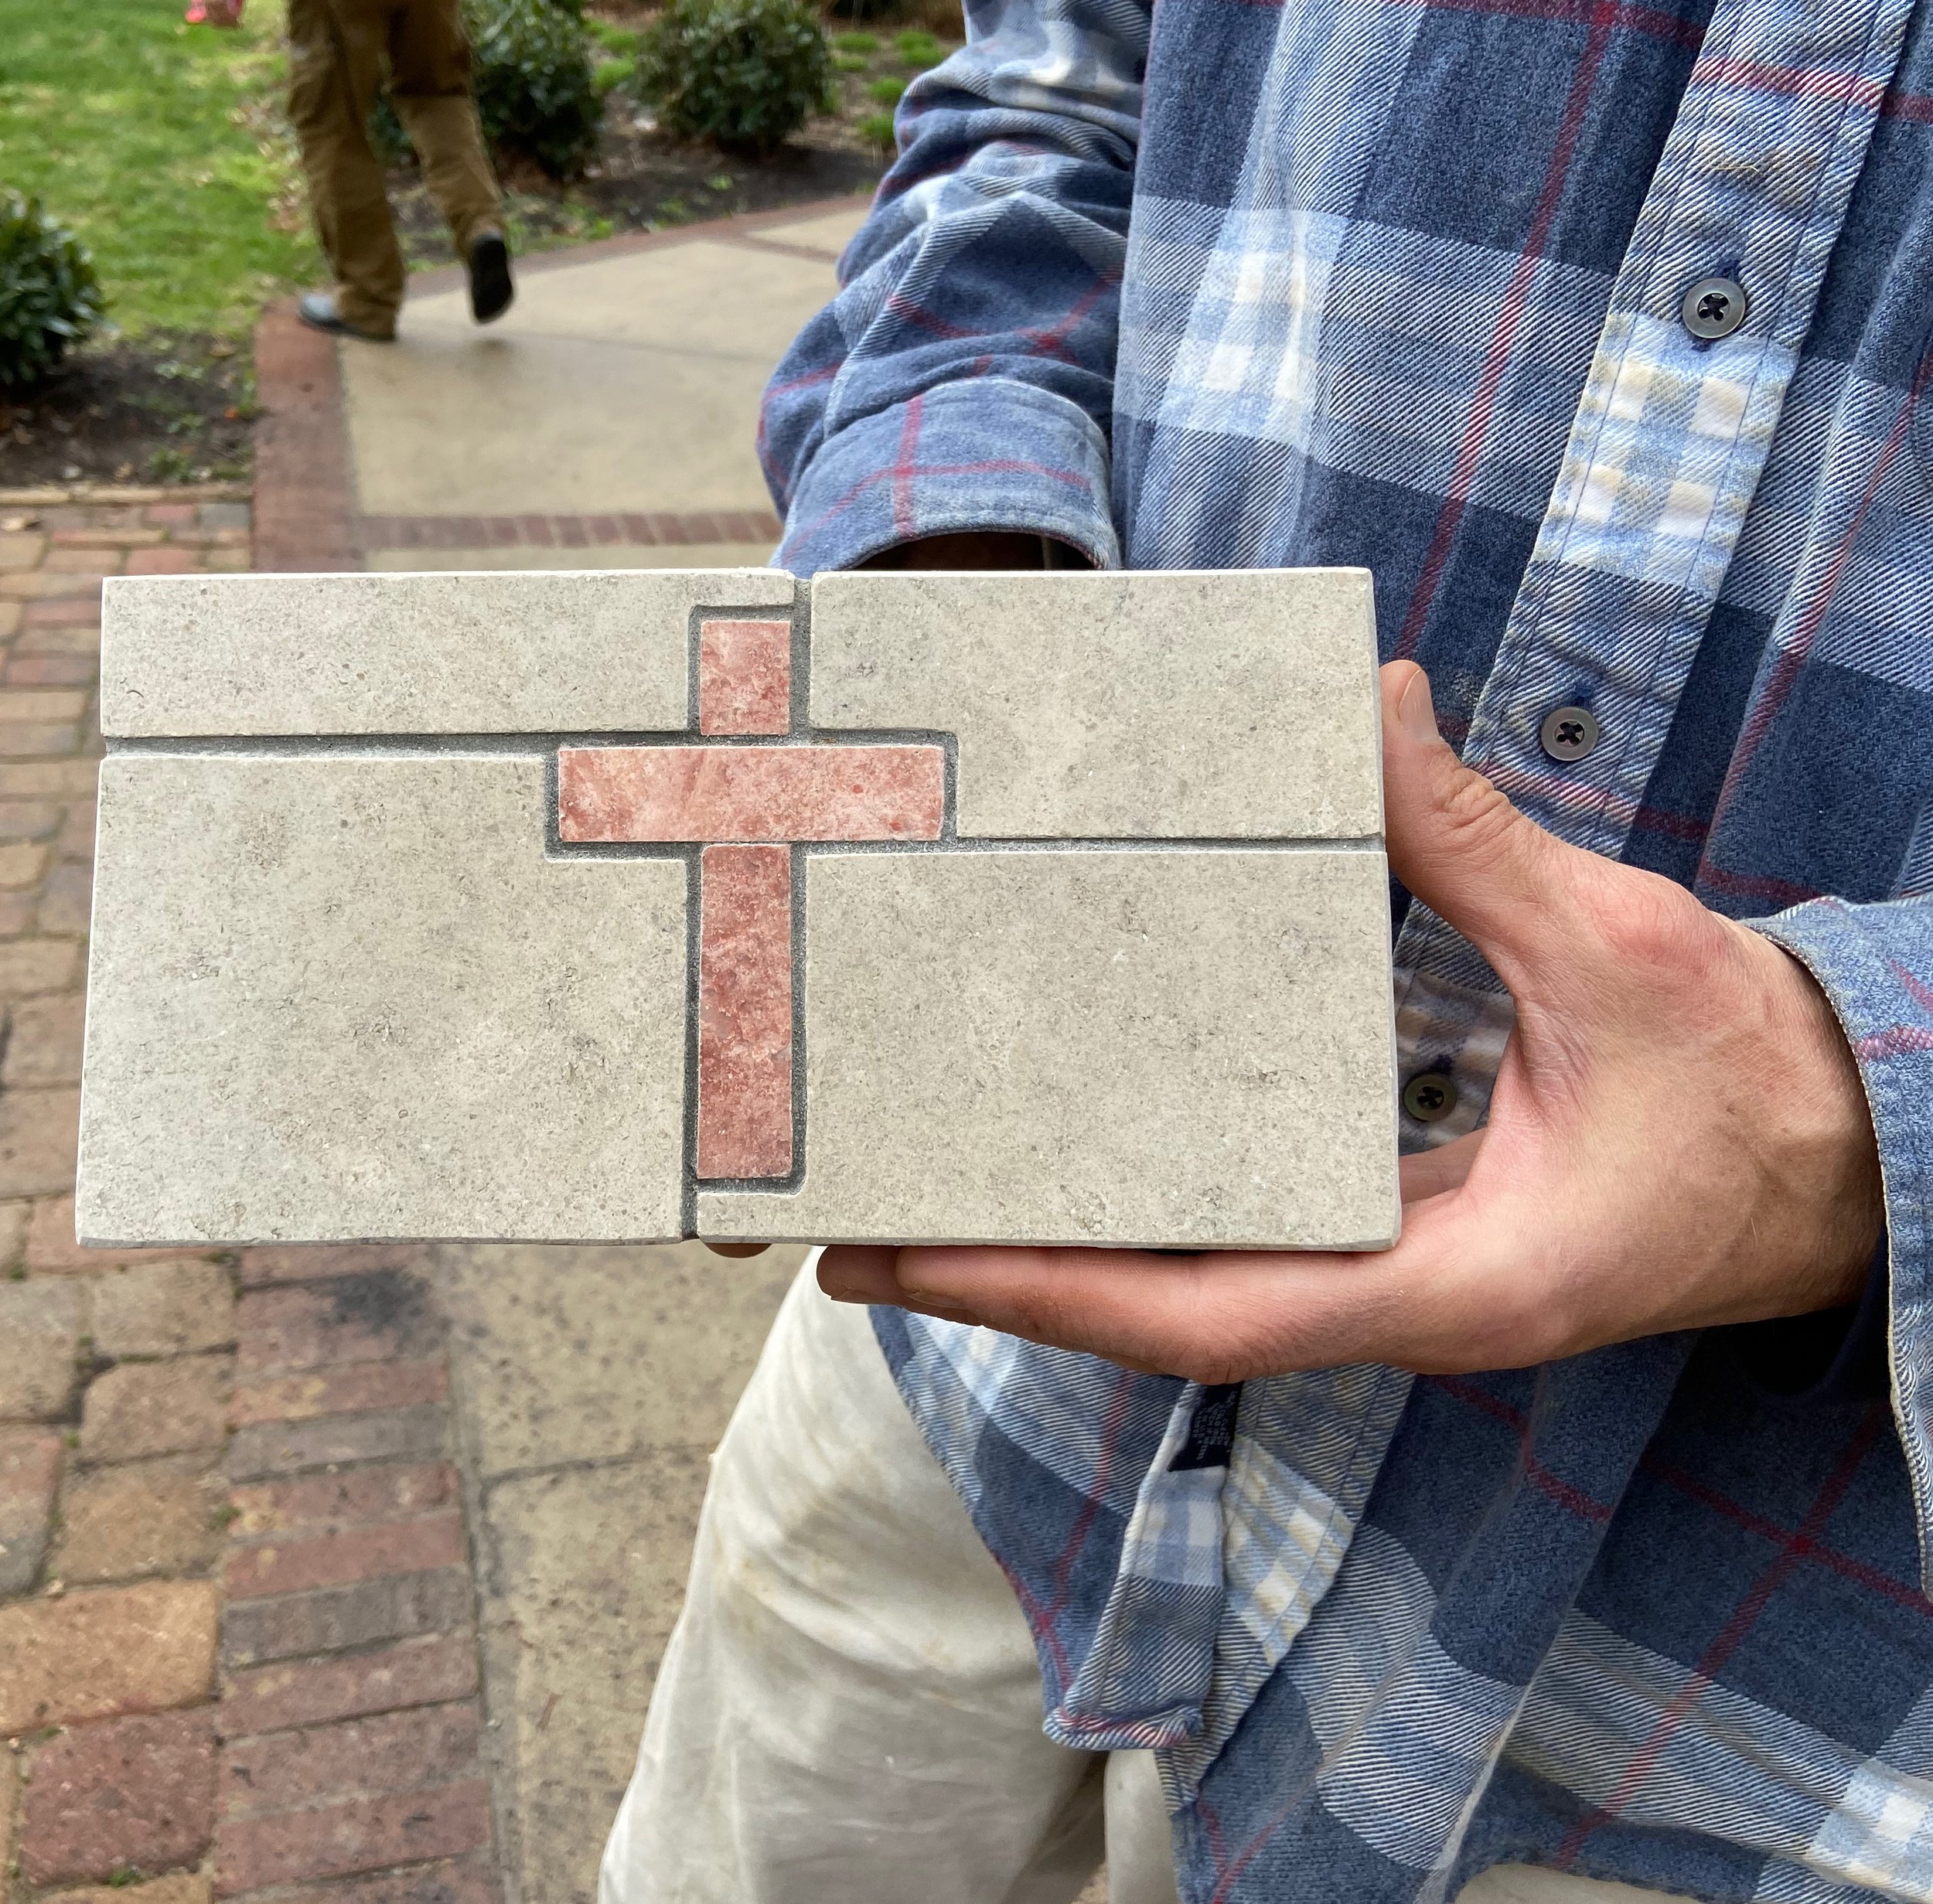
Ashes have to get into the vault somehow. I had a couple of random blocks of the same kind of limestone that I used to create a portal. There’s a ramp cut into the big piece at the bottom. The ramp rests right on top of the engraved donut stone.
I ended up making THREE doors for this thing. I broke the first one drilling holes to fasten the locking mechanism in place. I made an exact copy of that (in a fraction of the time, since I had already figured it out during the first go round.) Then I decided to make the drawer handle out of stone rather than an added piece of steel hardware. The third and final iteration is all one stone with a small indentation underneath for grip. The door is heavy but will rarely be removed. I made a small mosaic on the backside of the door. A cross faces into the vault where ashes shall be interred. This watches over everyone’s remains. It also hides the hardware used to mount the locking mechanism.
THE DOME
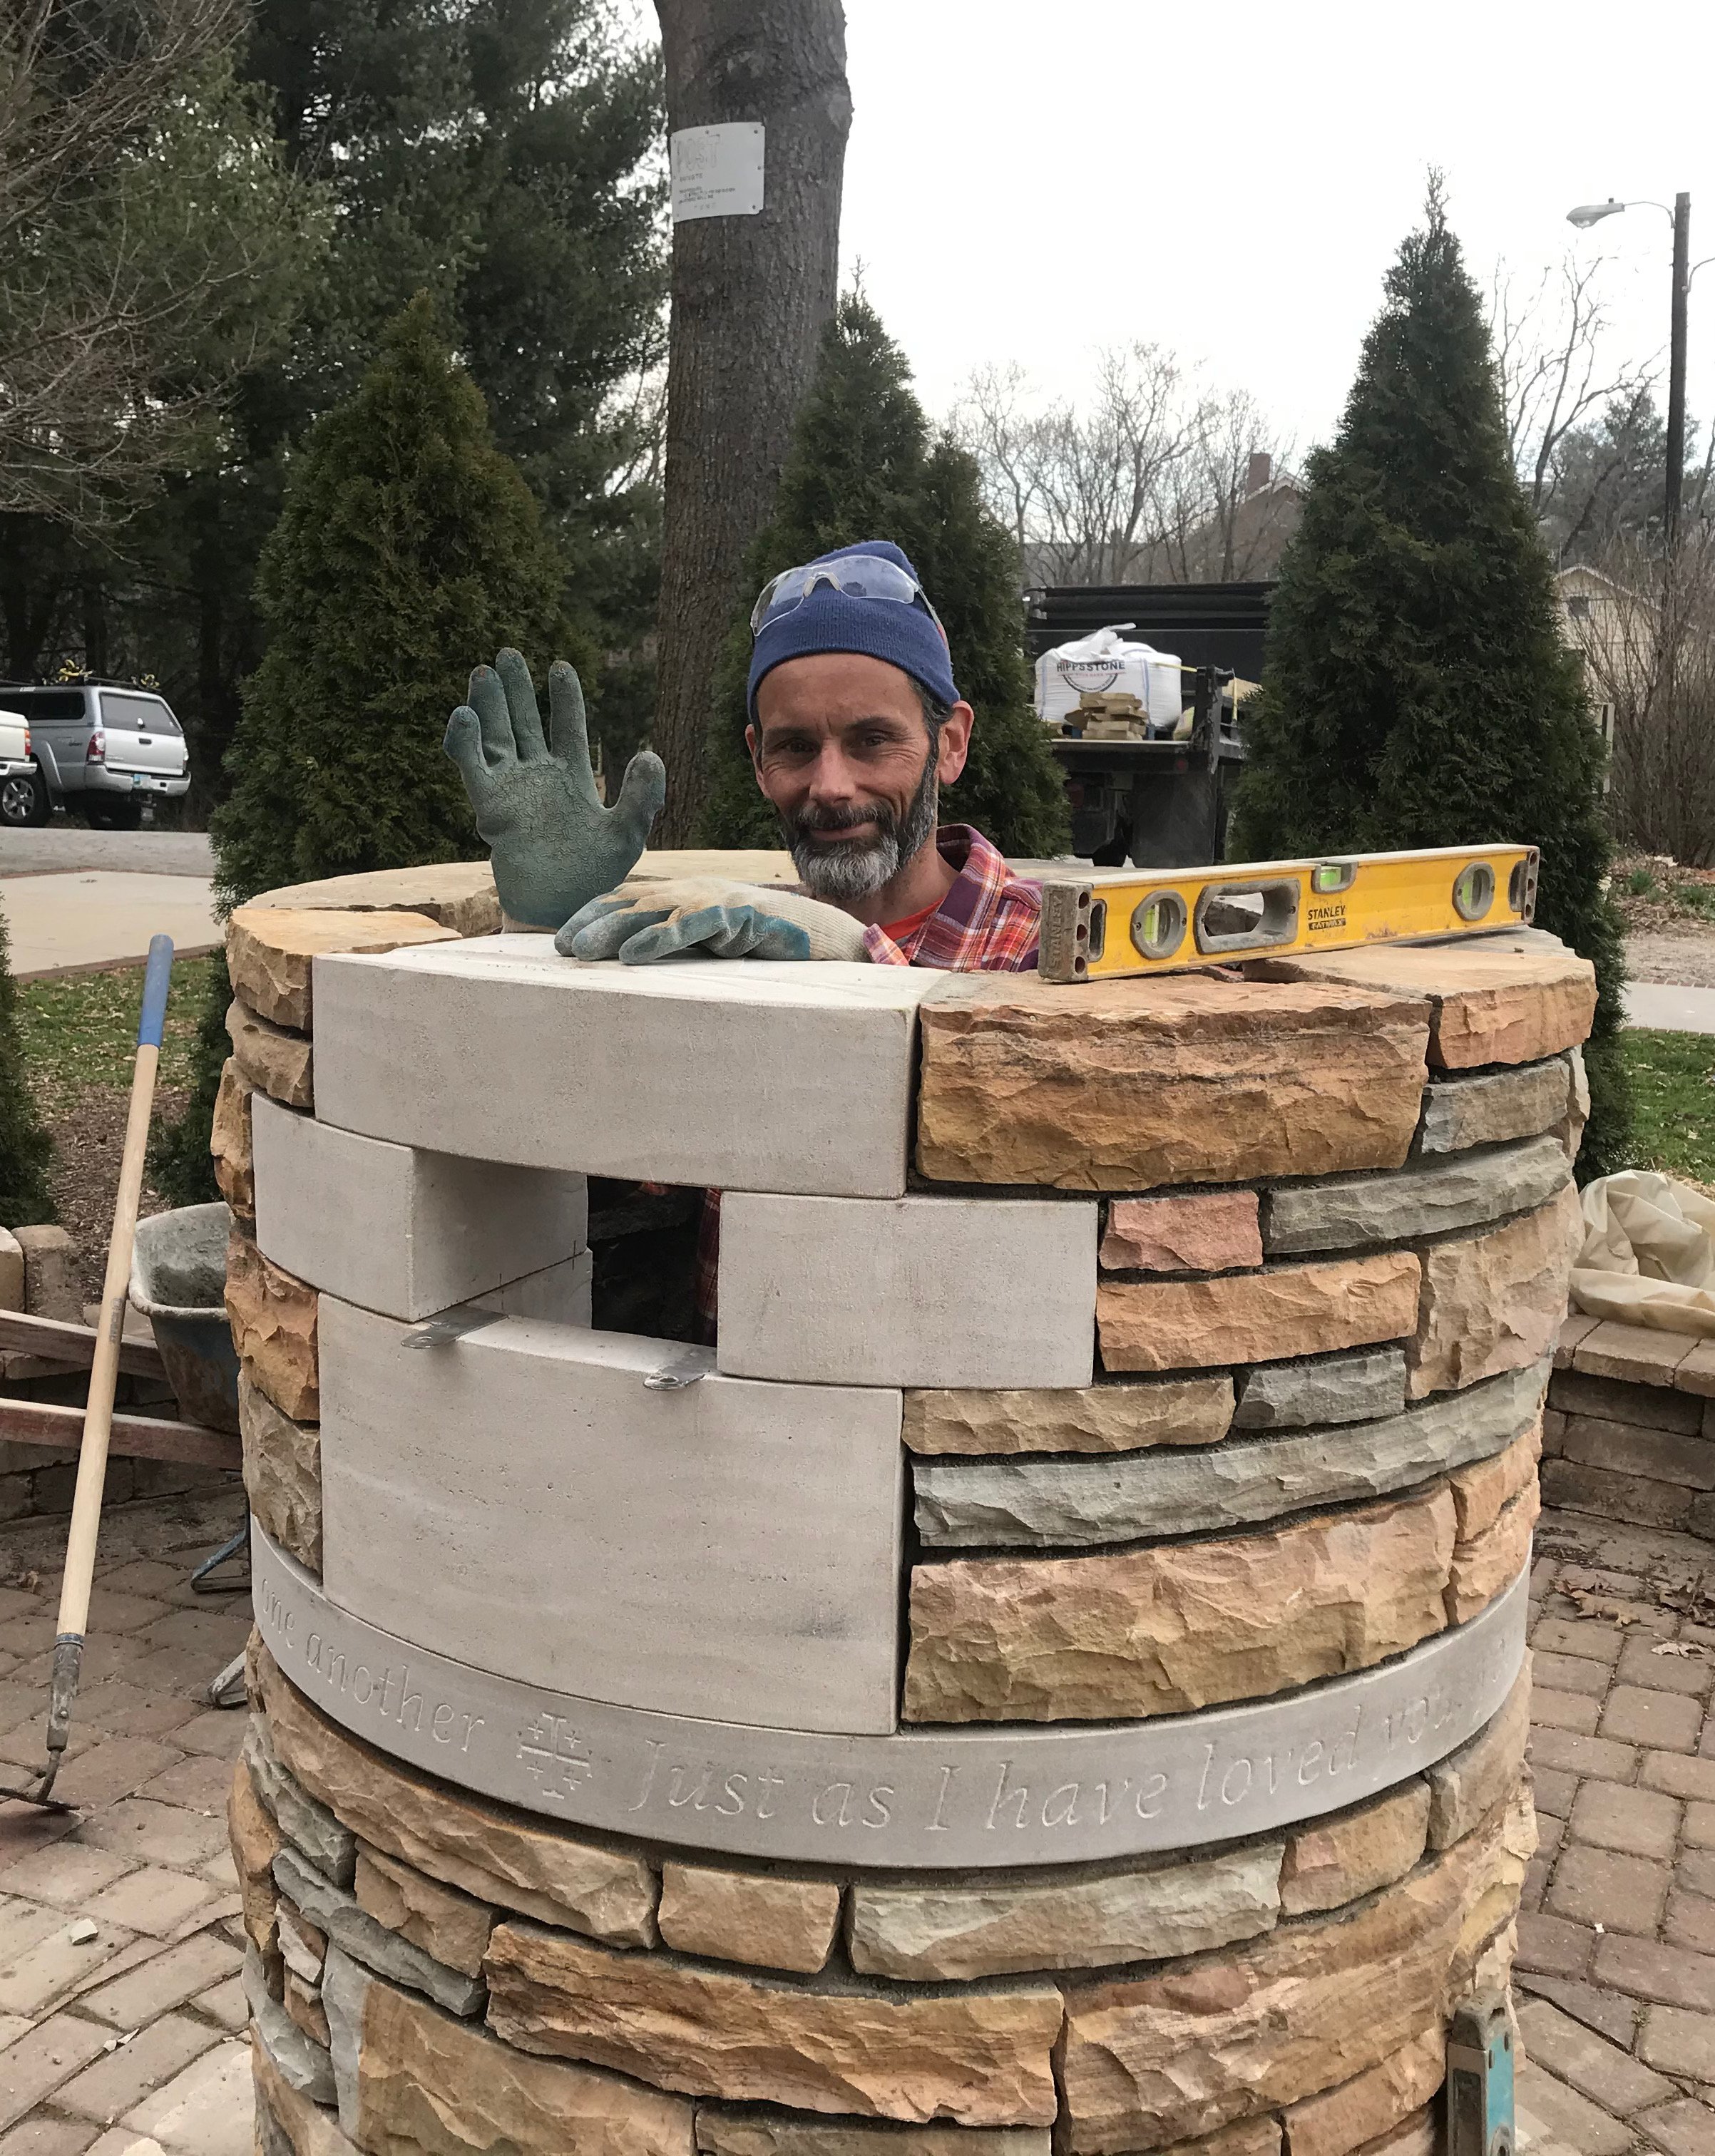
Creepy, but it does show the depth of the thing.
The dome is not self-supporting, though we toyed with that idea. Just above the ramp, we put a single piece of stone to seal off the vault area. More than anything else, that prevented extra mortar from falling into the hole and reducing the volume of the vault. At one point I climbed into the cylinder to clean it out. Tight fit! So the dome stones all sit on that interior cap and the space is filled with mortar and chips. I admit that I got so focused on the donut and door that I didn’t think through the cap in enough detail. I like it but it took forever and I can imagine a better process and product for the next time.
It was a fun and challenging project and I like the results. It’s unlike anything I’d ever built before. Those are the most fun! And crazy-making!

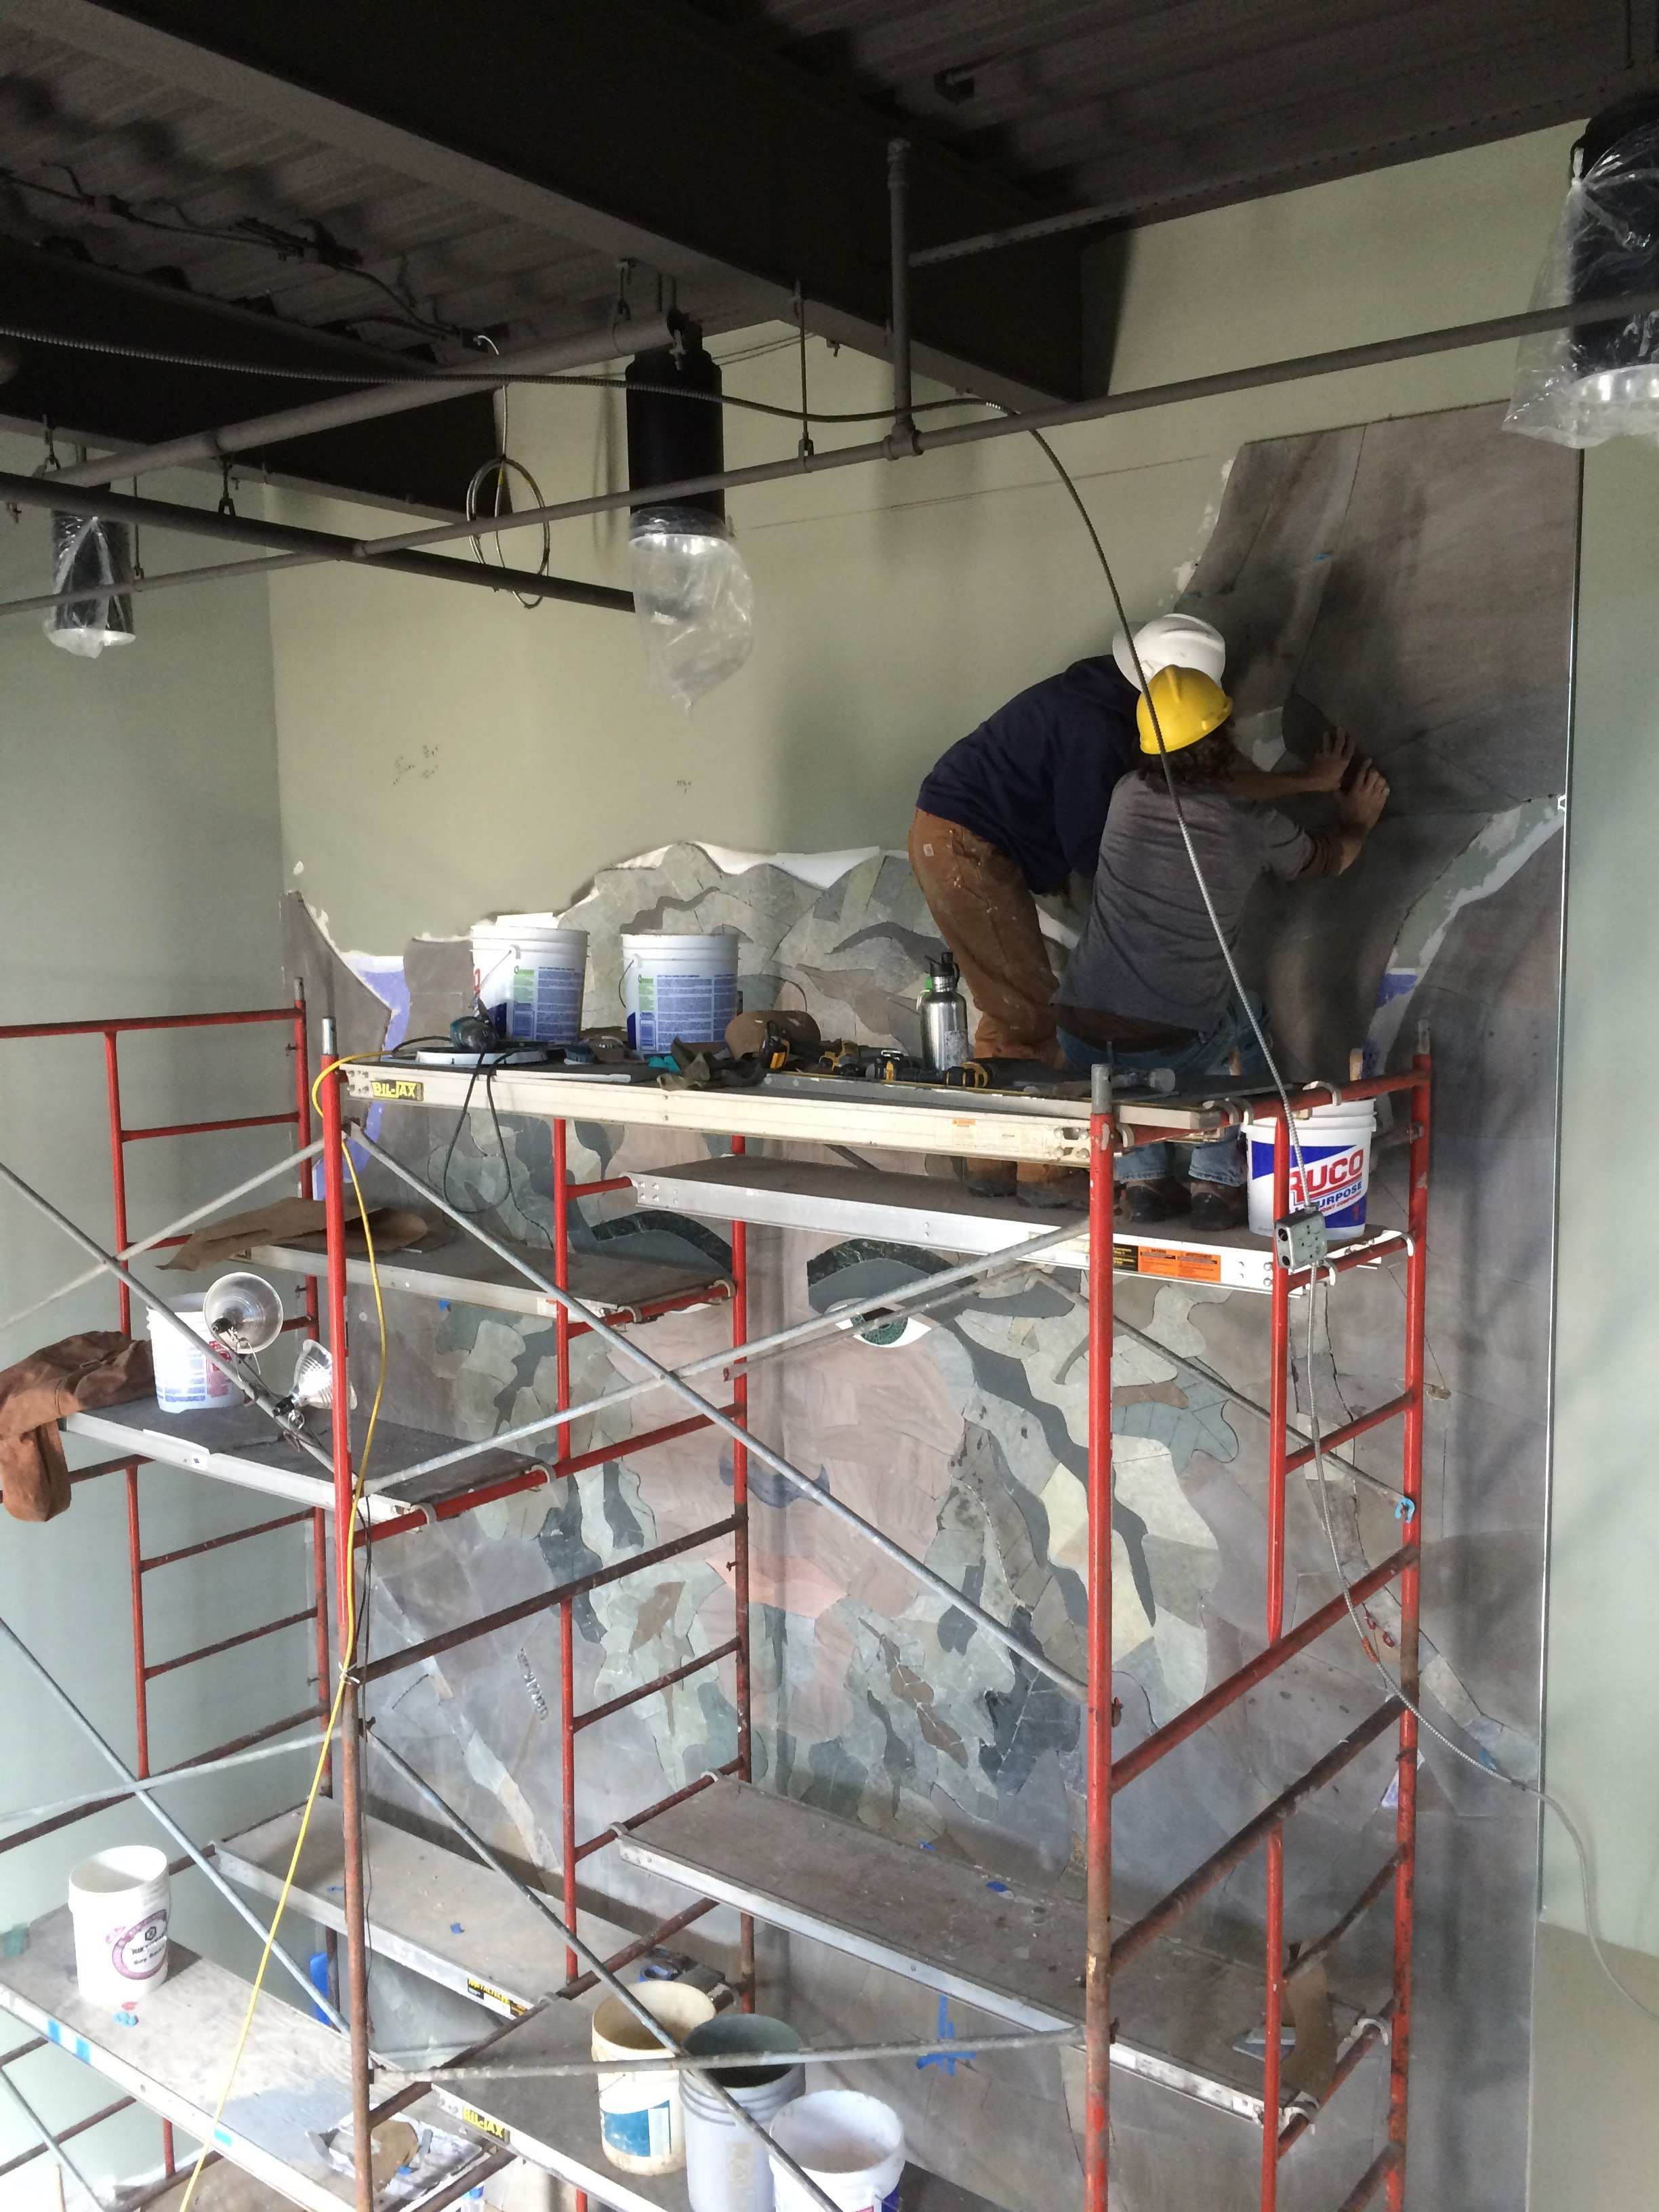
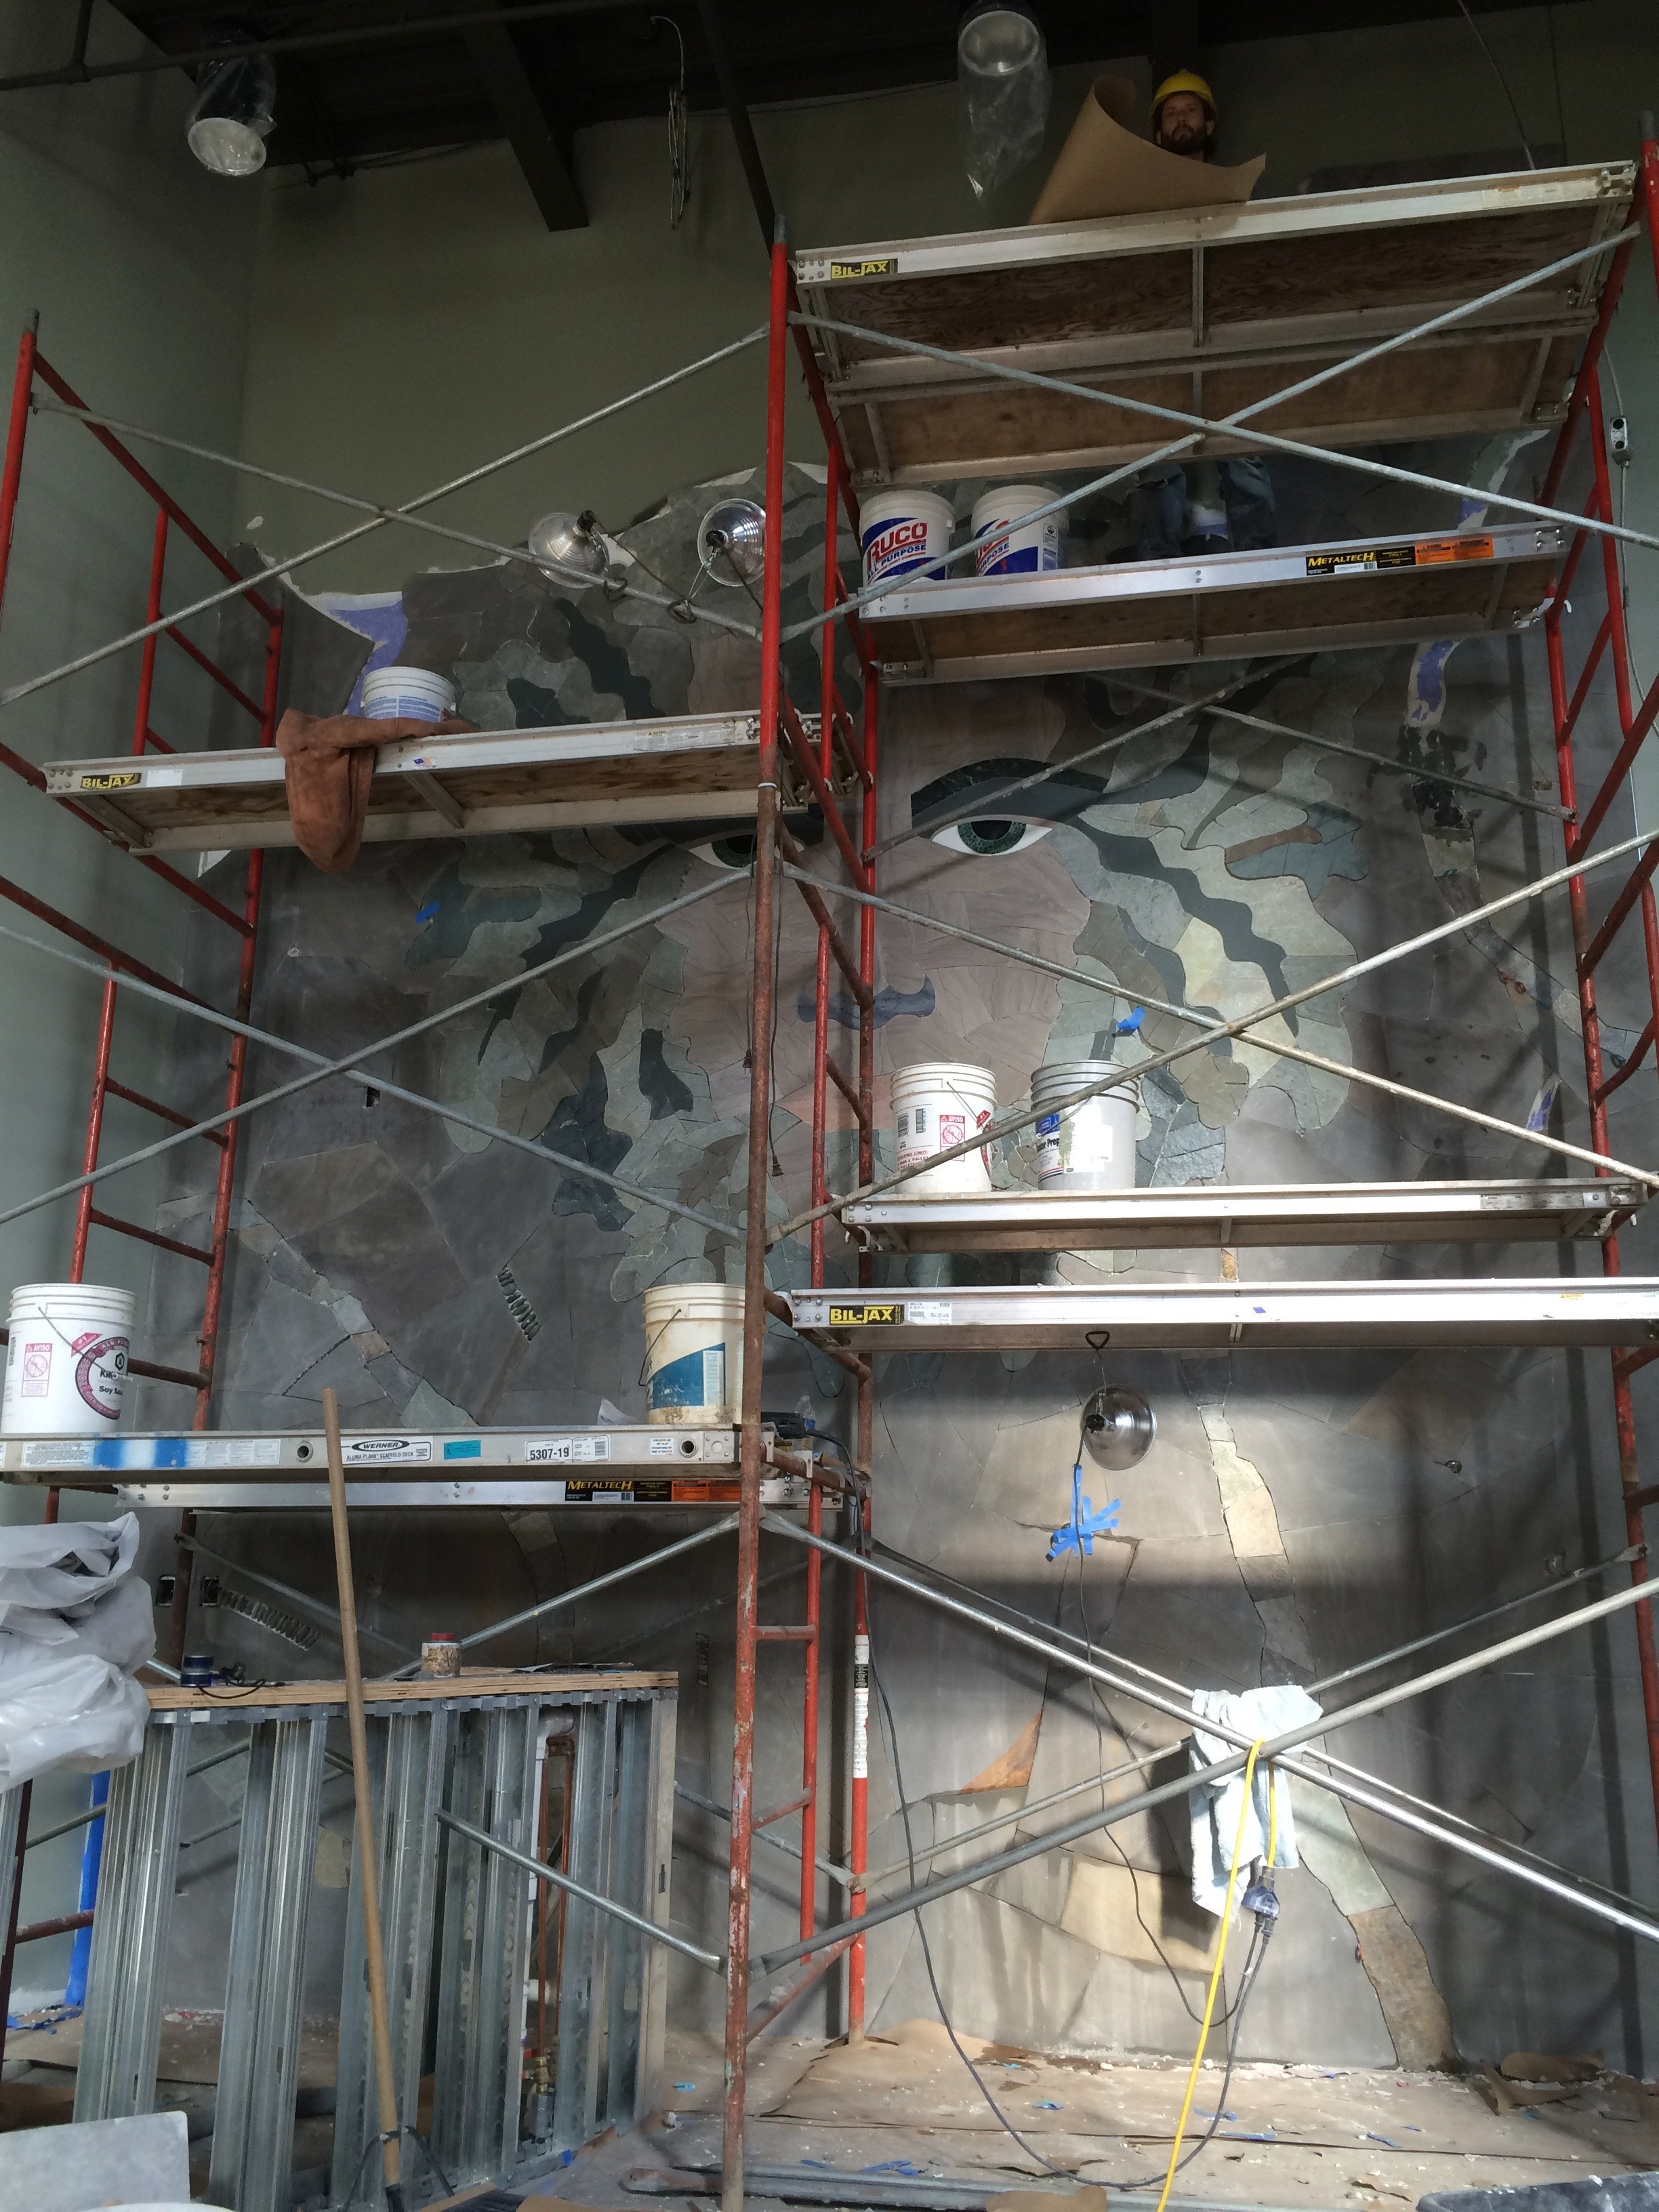
The Green Man Mosaic
This was our first large scale mosaic and a wonderful opportunity to paint with stone. When the brewery opened in 2016, this 320 square foot projects became one of the first things visitors encounter.
The printed image of the GreenMan in this journal shows the second full scale face I printed and assembled. The first one showed some clear design concerns, particularly in terms of the size of facial features. It’s one thing to draw at screen size. Blown up to eleven feet across and hung up over my head, it was clear the lips were too big compared to the eyes. This printed version fixed those issues and was used to host a meeting with the designer, Krista Lablue and Wendy from GreenMan.
The stone samples on the ground helped us choose the palette for the final mosaic. The whole Hammerhead team took part in this meeting, which I think helped us move forward smoothly with the process; everyone had input in the stone choices and had a good understanding of the customer’s vision.

Creating the malachite eyes
I like how GreenMan’s eyes evoke a more traditional style of mosaic, with smaller tesserae and grout used to fill the interspaces. The grout adds some depth and detail, as in real eyes. The irises are made of malachite. I had to buy display pieces from local crystal shops (there are oodles in Asheville) and slice them down and break them to create the tesserae. I ended up doing them twice. The first time around I made one eye from a single piece of malachite. Doing that I figured out that it would work, so I got another piece. But it was a slightly different hue. I don’t know if anyone else would have noticed the two eyes being slightly different, but I couldn’t let it ride. The source malachite is now well blended between the two eyes.
The whole mosaic is natural stone. Most of the materials are regionally sourced. Lots of stone from North Carolina and Tennessee, though Georgia, Pennsylvania, and New England are also represented. The malachite in the eyes is one of the few materials sourced from an exotic locale. I’m not sure exactly, but I believe it originated in Africa.

I ended up making the eyes twice. The first time became a test of the concept, which worked! But because the malachite was so costly I only bought enough to make one. I bought more and made the second eye, but there were clear differences in the color and look. I took them apart and rebuilt them mixing the stone randomly and got the look I wanted. The eyes are the only place where we used a more traditional mosaic style, making tiny tesserae. I like the effect though, it is evocative of ancient mosaics, populated with characters like Dionysus and Bacchus.


We cut and laid out the mosaic at the workshop, detailing the fits as best we could prior to installation. Space was limited, so we had to build the GreenMan right over the top of the Labyrinth. The green insulation foam guided the fitting of the pieces, all of which had been cut from templates.

Installation began with the eyes, as they needed to be level and centered on the wall. The green foam was perfect for supporting the mosaic pieces on the wall while they cured. Even through all the clutter, it was amazing to watch the GreenMan’s towering visage appear on the wall.


The face is made of marble from Tennessee. The leaves that surround the GreenMan’s face is mostly native North Carolina stone, though we used a fair amount of slate reclaimed from an old house in Asheville. I’m not sure it’s source. The eyebrows are serpentine. Again, I’m not sure where it comes from, but there’s some of the same stone on older buildings in downtown Asheville, making me think it’s at least regional. The background surround is sandstone from Tennessee.
LOCATION: Green Man Brewery, Asheville, North Carolina
DATE: December 2015
DIMENSIONS: 16′ by 20′
COMMISSIONED BY: Dennis & Wendy Thies, Green Man Brewery
PROJECT DESIGNER: Krista Washam LaBlue
DESIGNED BY: Marc Archambault
FABRICATED BY: Marc Archambault, Fred Lashley, Gary Wilson, Jonathan Frederick
INSTALLED BY: Marc Archambault, Fred Lashley, Gary Wilson, Jonathan Frederick, Skyler Sabin
Goldfinch Trail

The Goldfinch trail is in North Asheville and since we placed Garden Guardian Goldfinch, we’ve returned to add a set of steps that connect the first part of the project- steps and trail down a steep hillside - to the back porch. There was some pretty bad stone work in this spot, but we’ve replaced it with a new design and once again collaborated with Emily Gregory of BB Barns.
This project is unique in that there’s a true natural surface trail component. Trails are the work that Fred Lashley here at Hammerhead is renowned for. We just normally don’t pursue these types of projects.

The original steps were a combination of timbers and river rock, and they plunged straight down the hill. They were too tall and awkward, hard to walk on and generally unsafe. We turned the line of the path, so that it ran sideways across the yard, with a switchback that leads to a new spot. We created a landing towards the top and covered the trail surface with mulch.


Tiny Kingdom
Despite its name, the Tiny Kingdom was not a small undertaking, either in physical labor or personal influences and intersections. We installed this wall mosaic at Southside STEM Academy at Campostella in Norfolk, Virginia. The mosaic itself is about 37’ feet long and about 4 1/2’ tall.

An overview of the completed “The Tiny Kingdom” mosaic at STEM Academy at Campostella in Norfolk. ©Dave Chance Photography
Part of the design mandate was to reflect the school’s status as STEM school. That means the curriculum has a focus on Science, Technology, Engineering and Mathematics. My immediate concern was how to represent the technology component without creating a design that would soon be outdated. Technology is advancing so quickly these days that any device I put on the wall would soon seem archaic and out-of-touch.
My strategy then was to go old school. Kids (and scientists) still use magnifying glasses and pencil and paper to observe the world.

A view of the completed “The Tiny Kingdom” mosaic. ©Dave Chance Photography

These two kids are the central element of the stone mosaic “The Tiny Kingdom”. ©Dave Chance Photography
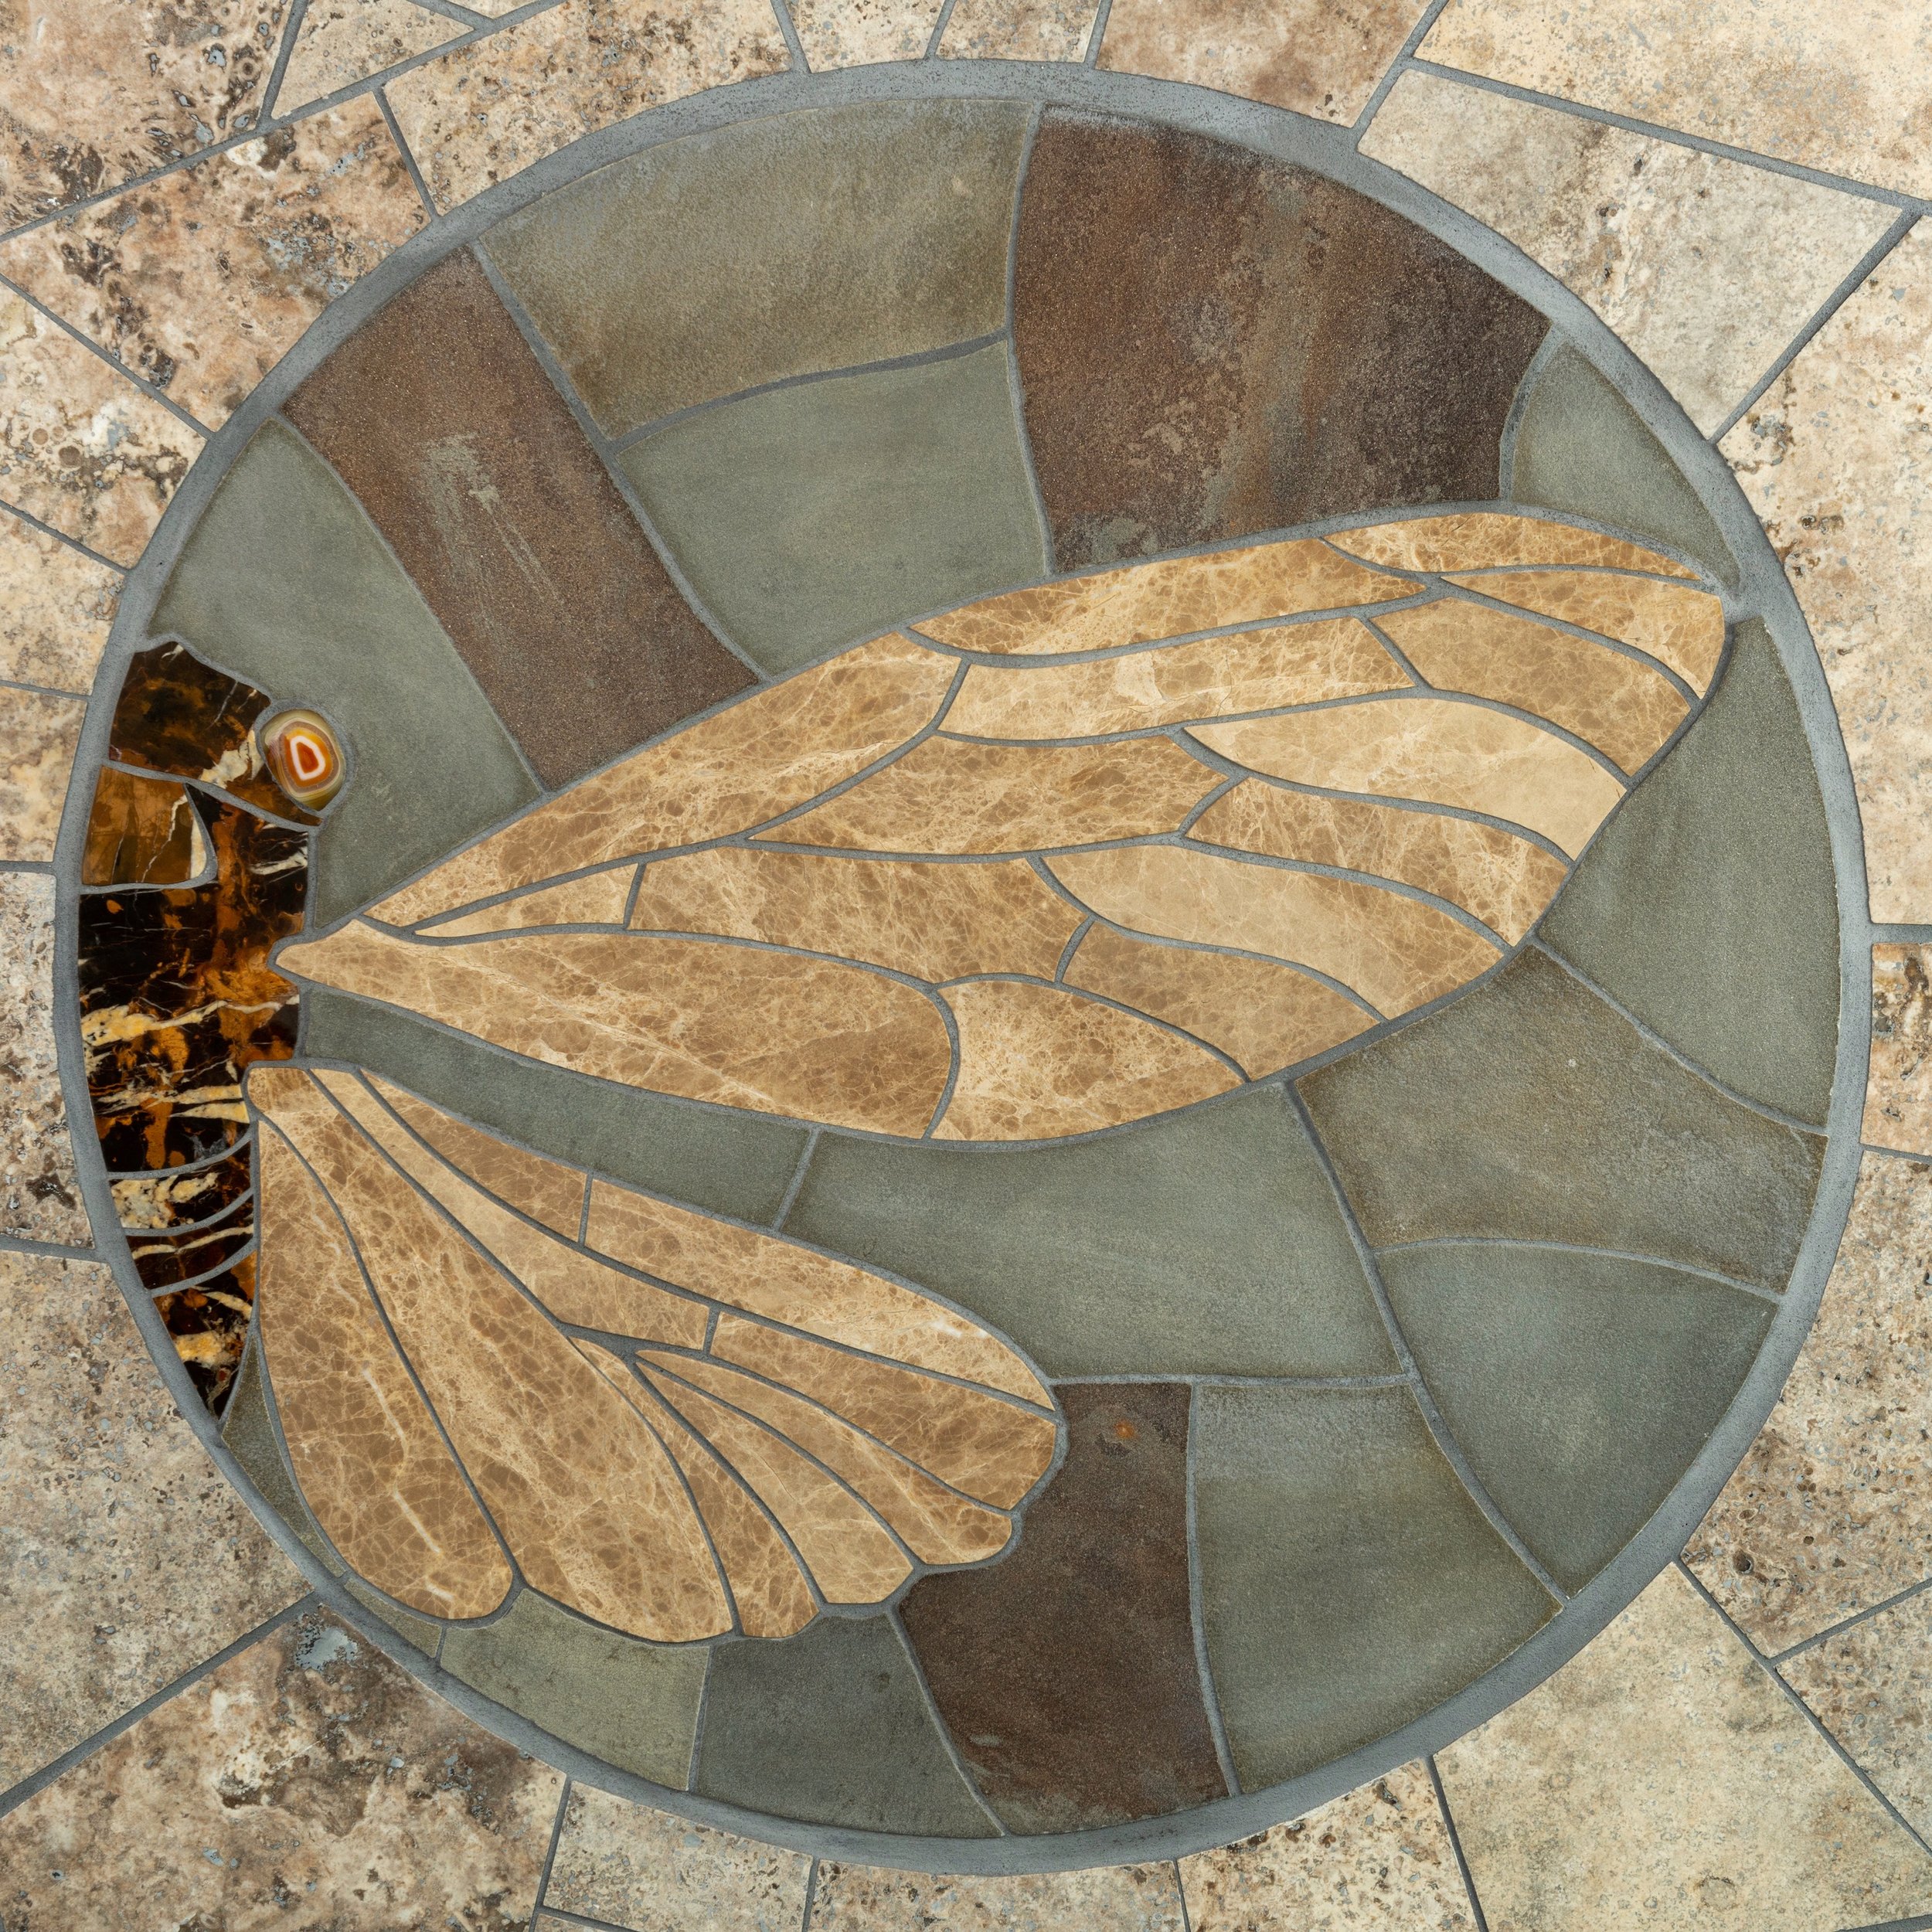
The center of the mosaic depicts two kids who are exploring their world together. The girl is using her magnifying glass to look at a moon snail shell. The boy is drawing a picture of a cicada wing. These simple activities are at the heart of scientific inquiry: curiosity, observation, documentation, exploration. I don’t usually use any materials besides stone. In this particular piece, however I used blue glass for the girl's magnifying lens. The shell she’s looking at is an actual moon snail shell that my Dad sent me.
The lines in the cicada wing that the boy is drawing are etched onto the surface of the stone. I did that with a diamond blade on my grinder. The lines really make the drawing work to my eye.

This boy is drawing a cicada as part of “The Tiny Kingdom” mosaic. ©Dave Chance Photography

This girl is using her magnifying glass to observe “The Tiny Kingdom”- as part of a stone mosaic. ©Dave Chance Photography
With all mosaics in the schools, it’s important to me to represent the students in the artwork. I want the kids to see themselves as active participants in the world, being creative, learning, engaging. The overwhelming majority of the students at Campostella are black. A significant challenge for me was finding a way to respectfully represent their skin color in the mosaic. I did a lot of research on representations of black skin in art history. Sadly, there wasn’t much to go on. Representation can be a controversial issue. I read articles about a huge sculpture of black icon Martin Luther King Jr. made of white granite that had outraged people. Many historical paintings had people of African descent depicted in a version of blackface. Another challenge was the limited selection of brown stones to choose from.
I decided on a marble from Spain called Emprador. It was the only stone I found that had the warmth and depth of color that seemed alive and beautifully human. The schools and the arts commission were actively involved in that decision.
There are eight circular mosaics flanking the kids; each represents a drawing that the kids made of the tiny kingdom they are exploring.
The ladybug is one of the most complex mosaics I’ve ever made. All those little leg pieces!
The ladybug’s eye is made of a stone called labradorite that has an iridescent quality about it that cannot truly be captured in photographs. It has wonderful shine and depth to it. I had a jar full of pebbles to use as the antennae, but forgot them when we went to Norfolk for the installation. Our fall back plan, when we discovered this oversight, was to go to a pet store and buy a couple jars of aquarium pebbles. We found enough of the right color to make it work.

This stone ladybug has an eye made of Labradorite as part of “The Tiny Kingdom” mosaic. ©Dave Chance Photography

A speckled crab claw made of stone as part of “The Tiny Kingdom” mosaic. ©Dave Chance Photography
Norfolk is right on the ocean, so I tried to include some things you might find exploring the beach or a tide pool. One such item was the claw of a speckled crab. It came out more abstract than I intended, so I’m not sure that it’s obvious to people what it is at first glance. All of the stones used in the claw design are from a company outside of Knoxville Tennessee where I go periodically to scrounge through their scrap piles. (I call it the boneyard. I always find cool stuff there!) They still operate a quarry there, producing mostly pink and gray stones. I found the white marble there too, though it may have been quarried in Georgia or Vermont. The darker red piece on the upper leg section- with all the white dots and spikes- was the oddest single shape I’ve ever cut out of stone.
My absolute favorite part of this whole mosaic is the cicada. I love how the veins in the light brown marble echo the veins you would see in the transparent wing of one of these insects. And I love the way the eye came out. I often visit the local gem and mineral stores to find cool details like eyes. The upper wing is the same design the boy is drawing. Details of other elements are below and I’m so proud of how each one turned out and played a part in the story of curiosity and nature.

A stone cicada as part of “The Tiny Kingdom” mosaic. ©Dave Chance Photography

This is another favorite of mine from this project. I wish I had greater contrast between the praying mantis and the background. The mantis body is made of a stone quarried in the North Carolina mountains. The eyes are Petosky stone, a fossilized coral found in Michigan. A stone praying mantis on the wall as part of “The Tiny Kingdom” mosaic. ©Dave Chance Photography

This Thimbleweed flower is made of white marble from various sources. Most of the pebbles were gathered on beaches in Rhode Island. ©Dave Chance Photography

This stone sand dollar features relief elements that protrude forward from the wall as part of “The Tiny Kingdom” mosaic. ©Dave Chance Photography

This circle is meant to represent the moon snail the girl is holding, made from a sandstone from India called Teakwood. ©Dave Chance Photography

This is an Eastern Swallowtail Butterfly wing. The yellow stone is travertine that I believe is quarried in Iran. ©Dave Chance Photography

LOCATION: STEM Academy at Campostella Elementary School, Norfolk, Virginia
DATE: February 2019
DIMENSIONS: 37′ by 4.5′, on a curved wall
COMMISSIONED BY: Norfolk Arts
PROJECT MANAGER: Karen Rudd
DESIGNED BY: Marc Archambault
FABRICATED BY: Marc Archambault, Fred Lashley, Jonathan Frederick, Tony Costa
INSTALLED BY: Marc Archambault, Fred Lashley, Tony Costa, Michael Sellars
ENGINEERING: Andrew Terrell of Lysaght & Associates, Raleigh, NC
TECHNICAL SUPPORT: Bo Thompson of Blackstone Masonry

Biltmore Forest Patio
Patio with firepit, firewood storage and pathways leading from the house to this private residential space in Biltmore Forest, Asheville, NC
Hammerhead built this patio space in Biltmore Forest (Asheville, NC) during the spring and summer of 2019. It involved steps and walkways, as well as retaining walls. The payoff is a fairly large patio space with a central fire pit. We worked in collaboration with Emily Gregory at BB Barns, and used Tennessee sandstone throughout.

The seating area: complete and ready for guests, conversation and relaxation.
This space is more than the finished patio. The client wanted the patio to be oriented with the yard and include a stone pathway, as well as incorporate changes to the terrain and the surrounding lawn and garden. Almost the entire project is laid dry except for two elements: the cap on the retaining wall and the fire pit use mortar.


The finished design is an inviting space for the family and guests to relax and unwind, read, enjoy conversation and never leave their home.


The Care Takers
“The Care Takers” is a natural stone mosaic installed at Ocean View Elementary School in Norfolk, Virginia. It is part of my public art commission to create mosaics for elementary schools there. This mosaic features a strong message of environmental stewardship, inspired by the school’s amazing hands-on science programs.

Image © 2020 Dave Chance Photography
This mosaic features a strong message of environmental stewardship, inspired by the school’s amazing hands-on science programs, including aquaculture and water quality issues. Older students guide young learners through the life cycle of the oyster, aquaculture techniques, and the process of analyzing water quality. This mosaic includes relief elements that project out from the wall, inviting student to touch and interact with the artwork.

“The Care Takers” in the context of the school’s main hallway.
Image © 2020 Dave Chance Photography

Striped Bass detail
Image © 2020 Dave Chance Photography
The Striped Bass (Morone saxatilis) is a vitally important part of the Chesapeake Bay ecosystem. A large portion of the bass population along the eastern seaboard breed in the estuary waters of the bay. They are a success story of conservation, as pollution and overfishing had decimated their populations. Since the 80’s, environmental regulations and stewardship have helped the fish recover.
They are an important fish to me personally too. My Dad is an avid striped bass fisherman along the New England coast. When I was growing up, I would go fishing with him sometimes. If I got bored, I would take a flashlight and go beach-combing (we always fished at night) hunting for seashells and crabs and whatever else I could find. The last time I visited my Dad, he took me and my sons bass fishing.

A Green Sea Turtle mosaic with a moon jelly.
Image © 2020 Dave Chance Photography
While not common in the Chesapeake Bay, the Green Sea Turtle (Chelonia mydas) does visit those waters in the summer and fall. There a handful of nesting sites along the Virginia coast as well. My colleague Jonathan Frederick made this sea turtle. He used serpentine for the shell. It has a leathered finish, which gives it an added patina of age and rugged life. The turtle’s head and body is made of a ming green marble called Chartreuse. This stone featured heavily in the Camp Allen Dragon.
Below the sea turtle is a Moon Jelly (Aurelia aurita). These are common along the east coast and sometimes, turtle food.

Horseshoe crab stone mosaic as part of “The Care Takers”
Image © 2020 Dave Chance Photography

Horseshoe crab stone mosaic as part of “The Care Takers”
Image © 2020 Dave Chance Photography
The Horseshoe Crab (Limulus polyphemus) is a resident of the Chesapeake Bay and an important part of the ecosystem. They are odd looking creatures, more closely related to scorpions and spiders than crabs. They are sometimes called living fossils because they first appeared in the fossil record an astounding 450 million years ago. These horseshoe crabs are made of travertine. The eyes are made of Petoskey stone, a fossilized coral from Michigan. There’s also a sand dollar in one of these images, made from a marble from Tennessee called Quaker Gray.

A relief sculptural element of a mackerel as part of the “The Care Takers” mosaic.
Image © 2020 Dave Chance Photography
The Atlantic Mackerel (Scomber scombrus) is commonly found in the North Atlantic. When I was growing up, shoals of them would turn up along the Rhode Island coast during the summer. We called them tinker mackerel, which I think was a reference to their size. Honestly, I can’t say that this particular piece of the mosaic is a great representation of the physiology of the species, but I still like it. In fact, this is one of my favorite things that I’ve ever made out of stone.

Hooded merganser, part of “The Care Takers” mosaic.
Image © 2020 Dave Chance Photography
I don’t really do much sculptural work. It’s not something my clients need a whole lot of! I wanted this mosaic to have some relief elements and so this idea evolved. I had one scrap of this green stone, which is just so beautiful. I don’t know what it is called or where it came from, either geologically or how this small scrap ended up in my possession. The fish barely fit on the scrap. I did all of the work with the angle grinder, using a variety of blades to cut, shape, and polish the piece. The eye is a tiny black pebble, epoxied in place.

Hooded merganser, part of “The Care Takers” mosaic.
Image © 2020 Dave Chance Photography
The Northern Pufferfish (Sphoeroides maculatus) is an unusual species that can puff up when threatened, expanding its body which is covered with tiny spines. According to wikipedia, in the Chesapeake Bay area they are known as sugar toads and are eaten as a delicacy. Despite my numerous visits to the area for this mosaic project, this has never turned up on any menus…
Also pictured is a Channeled Whelk (Busycotypus canaliculatus), a common mollusk up and down the East Coast. I was an avid beachcomber when I was a kid and I would find their shells and egg cases washed up on the shore all the time. Under ideal circumstances, the egg cases would be dried out and I would cut them open to find dozens of tiny whelk shells not much larger than grains of sand. Full grown, a whelk can be eight inches long.
Most of the ‘ocean’ material is bluestone from Pennsylvania. I mixed in a few pieces of Blue Macaubas, a ridiculously expensive and gorgeous stone from Brazil. It’s gray with threads of bright blue in it. It’s the rare stone that seems to glow from some kind of internal light. I think of it as a marble, but it is often identified as a quartzite.

Phoenix Rising
This natural stone mosaic utilizes marble, travertine, sandstone, onyx and a host of other stones to create an enduring piece of public art. Commissioned by the Norfolk Public Art Commission, it is installed at Richard Bowling Elementary School in Norfolk, Virginia. It depicts two students creating artwork together. It is meant to inspire the students to be creative and to see the great potential that the arts offer them in school and in life.
A full view of the “Phoenix Rising” public art mosaic from Richard Bowling Elementary School in Norfolk, Virginia.
Image © 2018 Dave Chance Photography
This mosaic was inspired by a visit I made to an art class at Richard Bowling Elementary School in Norfolk, Virginia. The students showed me their sketchbooks and we talked about their lessons on ‘Life Drawing.” Life drawing generally refers to sketching the human figure from a live model, often in a class or studio setting. It is a fundamental practice to developing one’s skills as an illustrator, painter, or sculptor. The term can also refer to any practice of drawing from real life. A painter friend makes a lot of sketches of his dog, as a way to practice form and movement. I like to draw the people stranded with me in airports, waiting for a delayed flight.

A colorful detail of the head of the “Phoenix Rising” public art mosaic.
© 2018 Dave Chance Photography

A young artist draws the “Phoenix Rising” part of a public art mosaic in an elementary school.© 2018 Dave Chance Photography
When I think of ‘life drawing’ I also think of those people who need to draw, to paint, to make things as a way to survive and flourish. I am one of those people and I met some kindred spirits at the schools on my visit. To me, a creative life is a full life.
I want my mosaics to speak to the idea of the students making things. Not just drawing life that they see, but drawing the life they want for themselves. I want the kids of the Norfolk schools to recognize themselves in the artwork. I hope they will see themselves and see value and possibility in creating art and making things.
I wanted to show art as a fundamental part of life, not something esoteric and ‘over there.’ Drawing is not reserved for famous artists and faraway gallery shows. Engineers & architects draw, cartoonists & advertisers draw, scientists & naturalists draw, city planners & art teachers draw.
I wanted to show kids building our future.

A young artist draws the wing of the “Phoenix Rising” public art mosaic from Richard Bowling Elementary School in Norfolk, Virginia. © 2018 Dave Chance Photography

A colorful detail of the stones used in “Phoenix Rising” public art mosaic.
Image © 2018 Dave Chance Photography
The mosaic was recognized by the Society of American Mosaic Artists (SAMA) during their 2019 juried exhibit Mosaic Arts International: Architectural & Site-Specific category.

Stone mosaic “Phoenix Rising” adorns the hallway of Richard Bowling Elementary School in Norfolk, Virginia. © 2018 Dave Chance
ADD - Featured in CODA Magazine’s Flipbook.

Sacred Circle Fire Ring
The Sacred Circle is a ceremonial fire pit near Asheville, North Carolina used as a sacred gathering place for a diverse community of spiritual practices. It can accommodate groups of well over one hundred people.

Granite scraps make a cool addition to this bluestone patio.
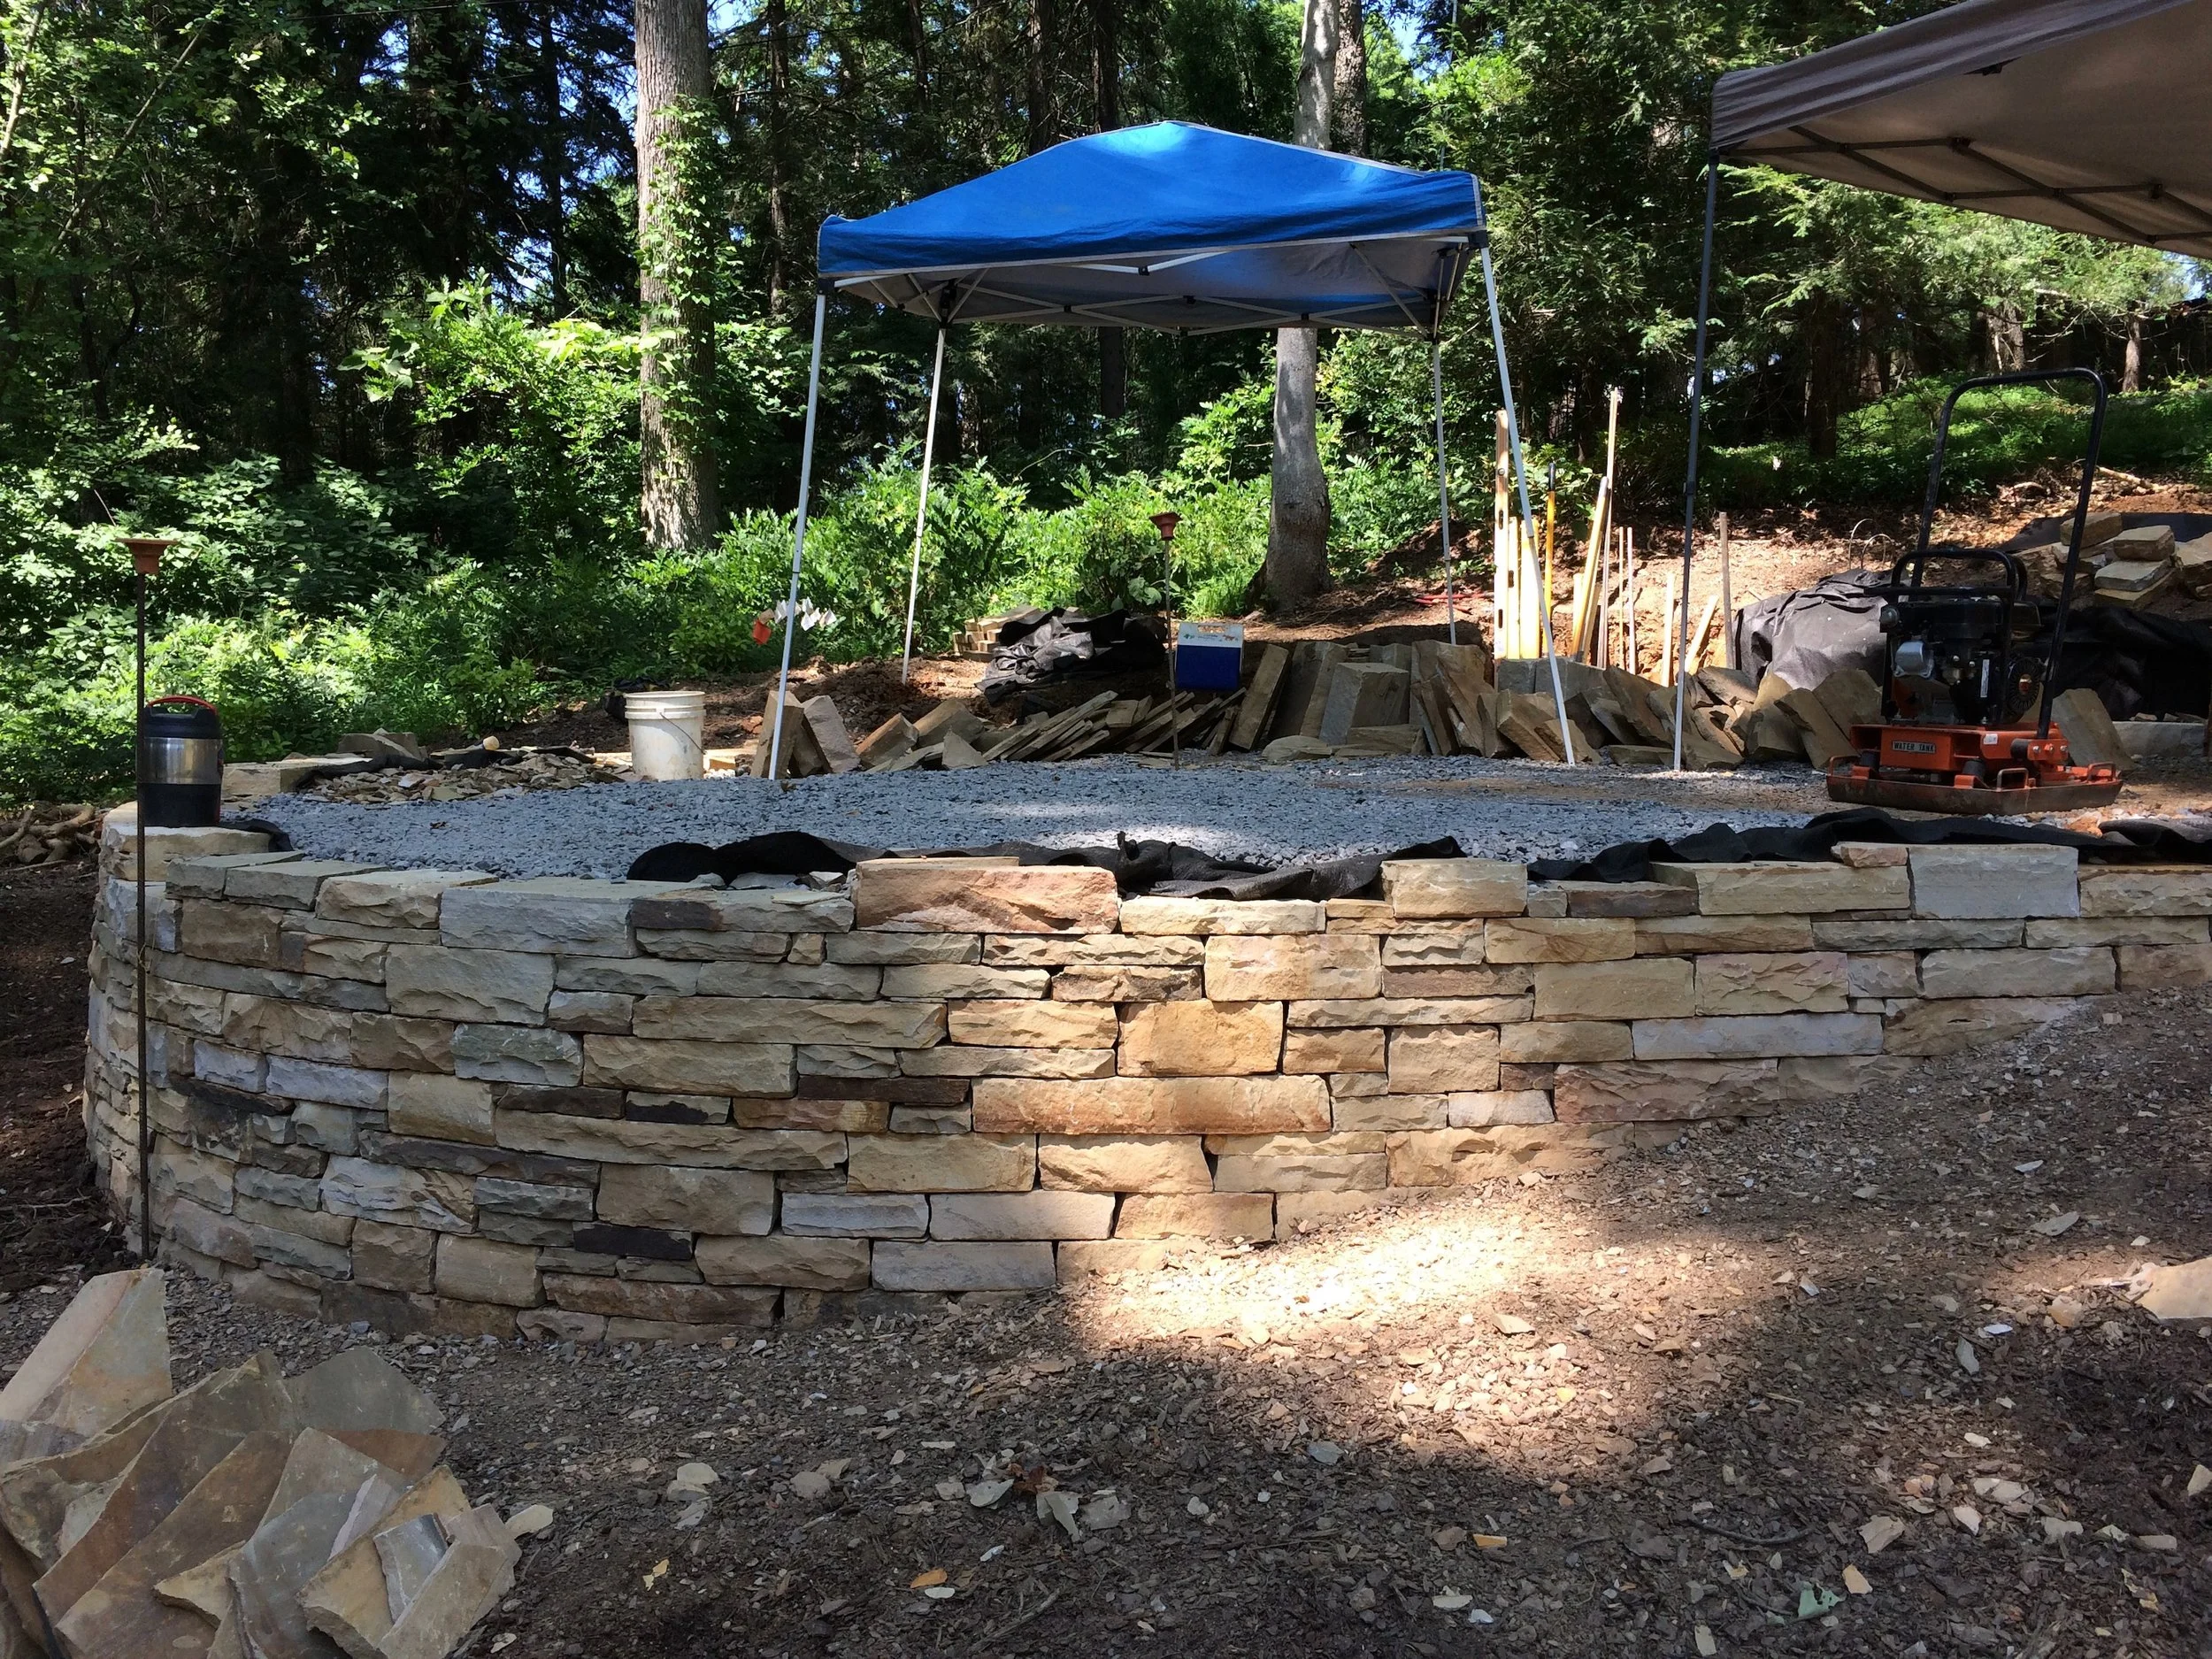
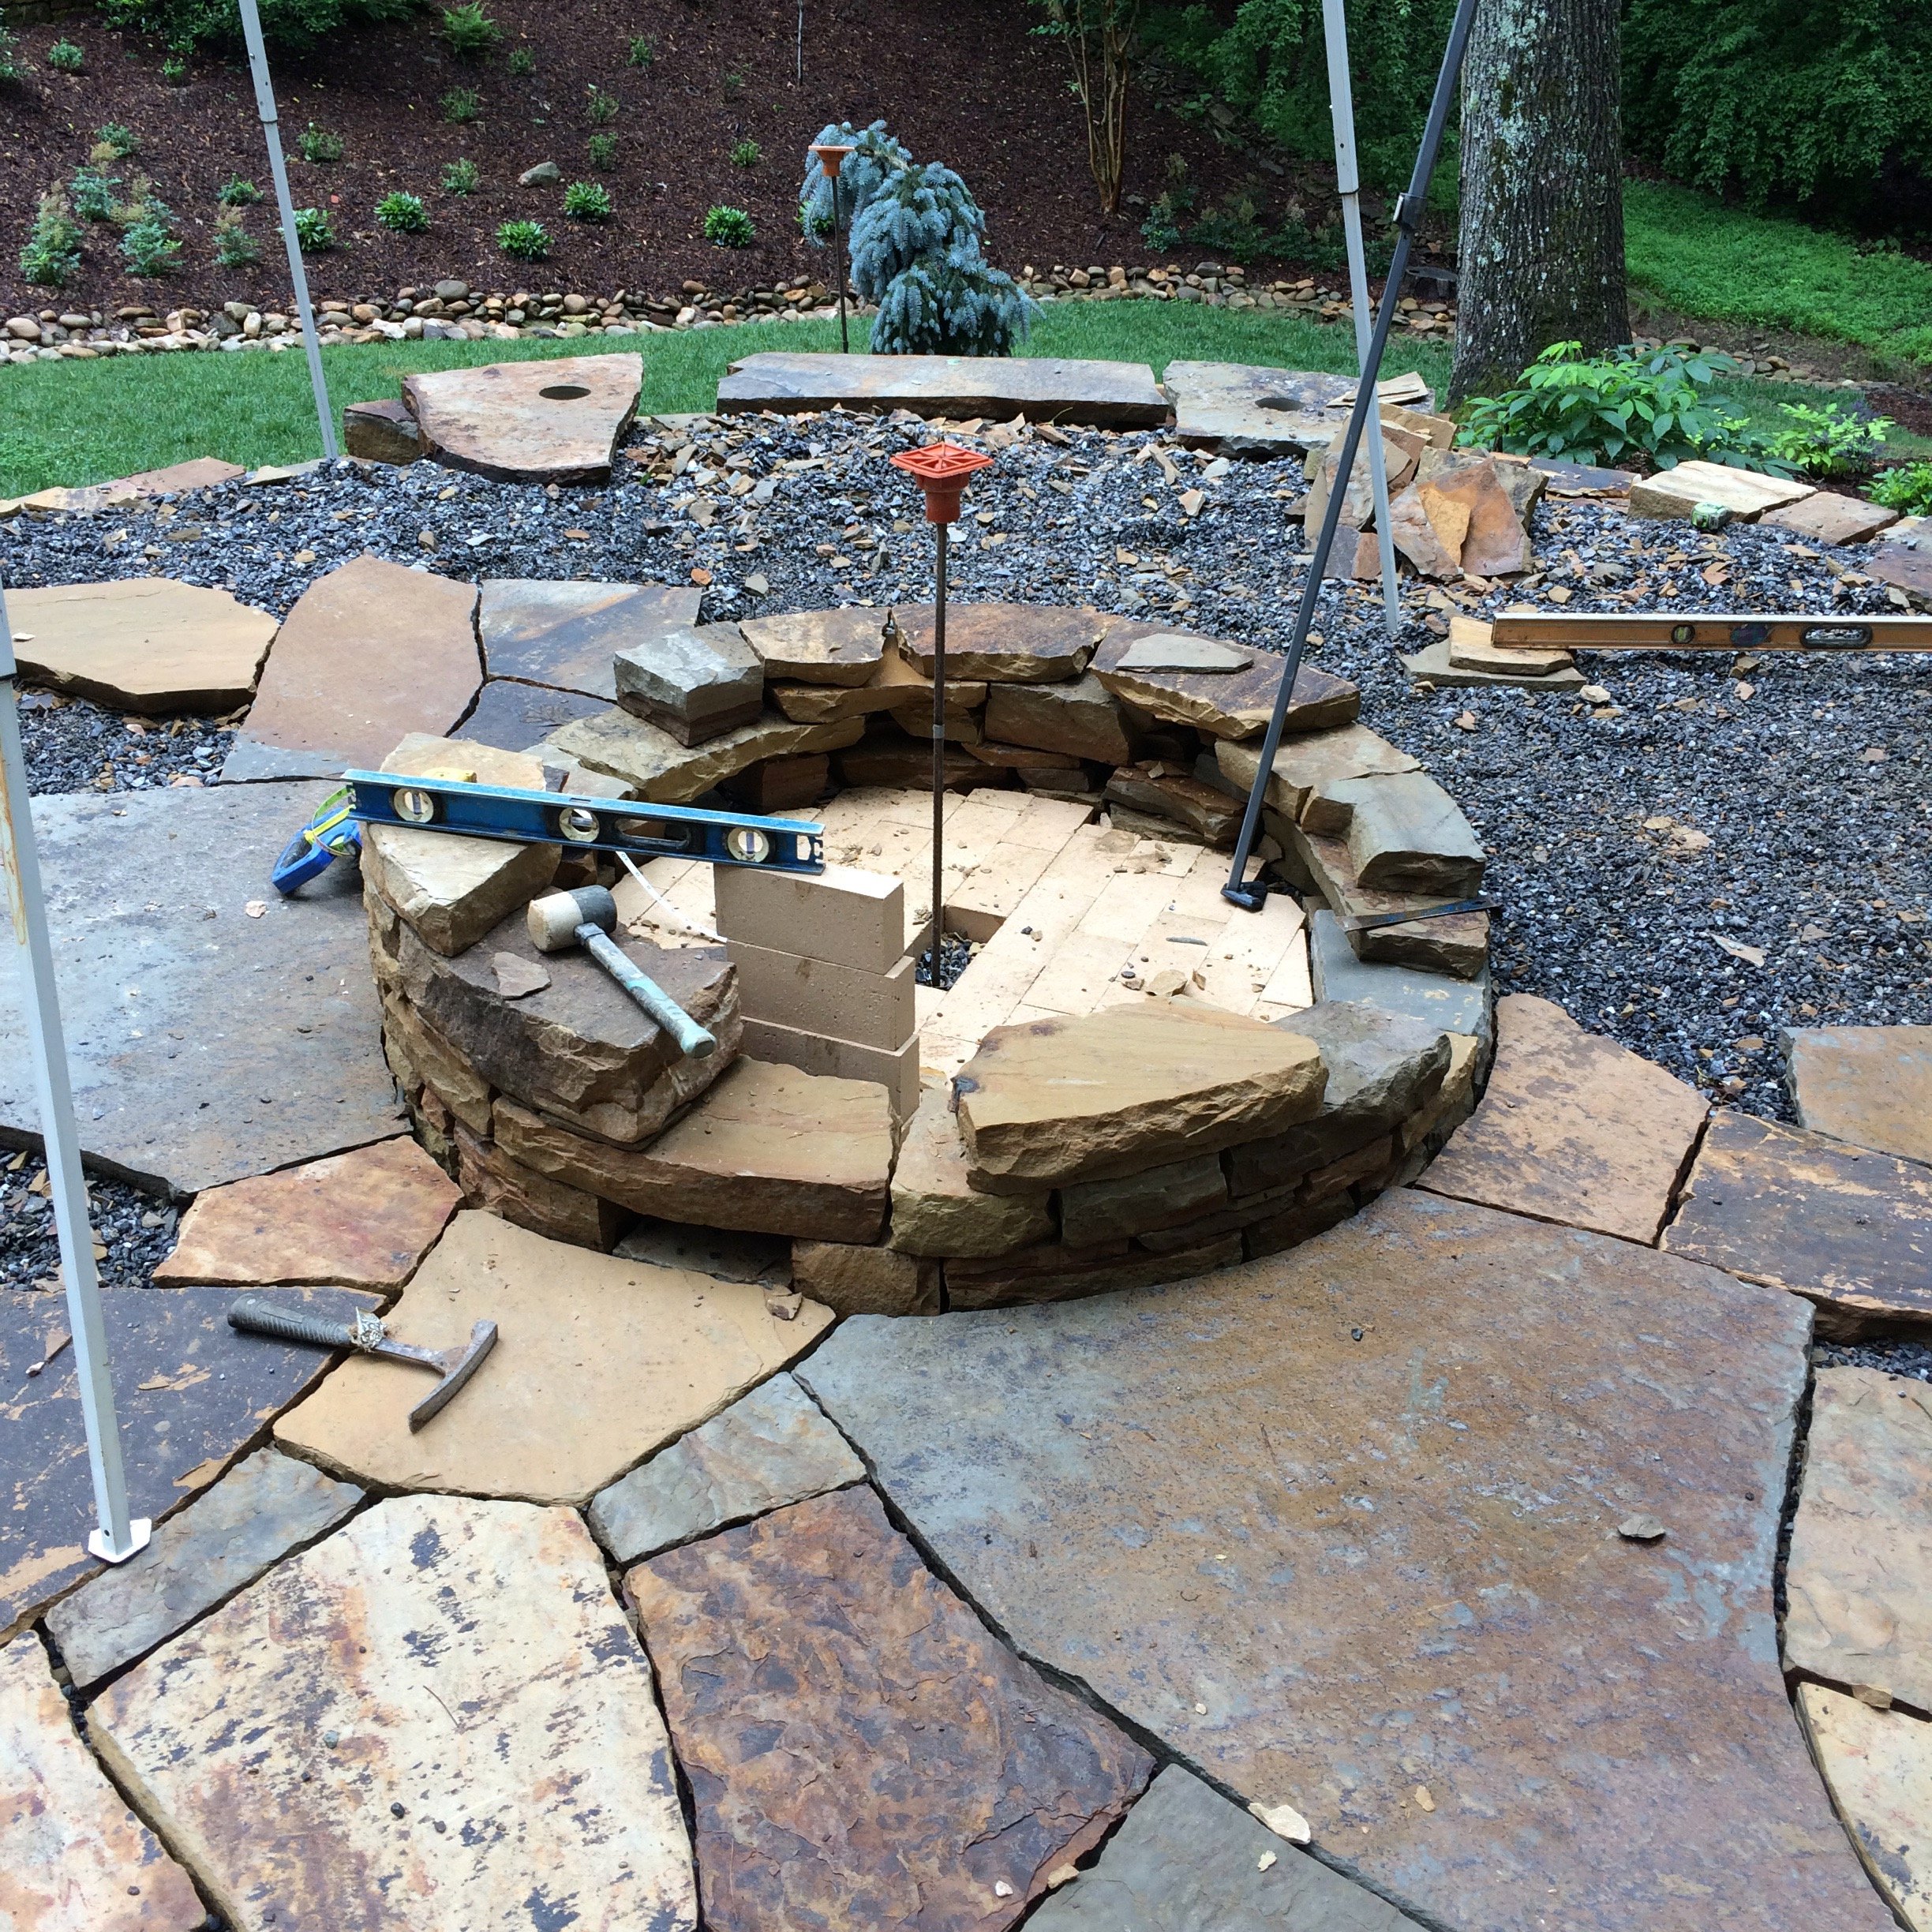
The Sacred Circle is a ceremonial fire pit, Hammerhead Stoneworks built on the outskirts of Asheville, North Carolina. Forty-five feet in diameter and requiring over 50 tons of stone, the Sacred Circle is used as a gathering place for a diverse community of spiritual practices. The space can accommodate groups of well over one hundred people.
Tennessee Sandstone was used for the drystone walls, seating caps, and the majority of the flagstone paving. Blades of Absolute Black radiate from the central fire pit to site boulders placed at the cardinal compass points. Immediately surrounding the fire ring, Pennsylvania bluestone along with countertop scraps create a celestial design, depicting our solar system from multiple perspectives.
Built in the winter of 2013-14, this was a large project for Hammerhead at the time and encompassed all of our craftsmanship and aesthetic ideals. This creation is a community gathering space as well as a beautiful and enduring work of functional art.

Firepit project layout
We confirmed the site layout with a rainbow of spray paint.

A car port frame laced with sheet plastic protects us from the elements.
Construction started with the drystone walls. Mason Gary Wilson works beneath the winter shelter. The gray conduit is for lighting spaced around the perimeter.

A long curving free-standing wall as part of a ceremonial fire pit.
Culverts are placed in each wall to allow surface drainage to escape the central patio, which crowns in the center at the fire pit.

Seating wall with capstones at the Sacred Circle fire ring.
The seating walls are 18″ tall. They are built drystone, though the caps are mortared in place for stability.

Rays of Absolute Black granite lead from the boulders to the fire ring.
We purchased two slabs of Absolute Black granite to complete the rays that connect the fire pit to the boulders.

Granite scraps make a cool addition to this bluestone patio.
Mars and Jupiter, scrap counter tops transformed into planets, float in a sky of Pennsylvania bluestone. The seams that make up the orbit of each planet are slightly beveled; from certain angles, one can see arc they follow around the sun. Pluto makes an appearance in the next segment, as a small icy white orb with an odd elliptical orbit.

A panorama of the fire pit dedication ceremony.
Over eighty people attended the first fire, a dedication event welcoming a diverse community of spiritual practices to the Sacred Circle. Taoist, Buddhist, Shamanic and Cherokee traditions were all honored.

First fire at the Sacred Circle

Sacred Circle Ring

Vines Mosaic Floor
Hammerhead Stoneworks created this stone mosaic floor in collaboration with Interior Designer Krista Washam LaBlue for a small balcony overlooking the city of Asheville. The design of leaves creates a stone mosaic using bluestone from Pennsylvania that is cut to exacting standards.
Hammerhead Stoneworks created this stone mosaic floor in collaboration with Interior Designer Krista Washam LaBlue for a small balcony overlooking the city of Asheville. The design of leaves along a vine was inspired by a handmade rug and other fixtures and furnishing of this high end residence. The stone mosaic uses bluestone from Pennsylvania that is cut to exacting standards to ensure a precise fit.
I started with a full size paper template, labeled so I could keep the pieces organized.

I transferred the shape from the paper to roofing felt to create my templates. I have since eliminated that step, and now just use the paper directly onto the stone.

Lining up a straight cut on my bridge saw.


Cut!

This grinder is equipped with a zero tolerance wheel. I was subletting shop space from Rockstar Marble and Granite. Owner Matt Olofson taught me so much about the tools and techniques of cutting stone.


Pieces were laid out based on the template, revisions made and then stacked.


Preparing to set the last piece …


Gary Wilson helping me set the last piece. The joints were so tight that we needed nylon webbing to lift the piece in and out.
Design, completed.


The leave shapes are bluestone from Pennsylvania. The background field is full color Pennsylvania. I was very picky about stones, trying to find the coolest textures.


Another detail view
A Patio Space, ready to use


The Boy with Antlers
“The Boy With Antlers” is a natural stone mosaic based on one of the characters from bedtime stories Marc Archambault tells his sons. He is one of four friends possessed of animal traits- an impressive rack of elk antlers, as well as an incredible sense of smell. Of the four friends, he’s the only one who is troubled by his wild nature.
“The Boy With Antlers” is a natural stone mosaic I made based on one of the characters from bedtime stories I tell my sons. He is one of four friends possessed of animal traits- an impressive rack of elk antlers, as well as an incredible sense of smell. Of the four friends, he’s the only one who is troubled by his wild nature. I have posted one of the stories I wrote about Bo (his name) that can be downloaded here as a PDF. I also have recorded a couple of stories about the friends and posted them here.
The mosaic is currently on display (from March 4th to April 22) at the Betty Ray McCain Gallery in the Duke Energy Center at 2 East South Street, Raleigh, NC 27601. The mosaic was selected to take part in the 2018 North Carolina Artists Exhibition sponsored by the Raleigh Fine Arts Society. It is an honor to be selected to this juried show of talented North Carolina artists. The piece is for sale as part of the gallery show.


I worked on this mosaic for over a year, finding time to cut a few stones on the weekends. The face is marble and the antlers are made of travertine.

The mosaic is mounted to a cement backerboard using thinset mortar.


The Dragon Family
“The Dragon Family” mosaic represents that story of Camp Allen. It is a place where young people are protected and supported and encouraged to learn, to grow, to create, and to make friends.

A full view of The Dragon Family mosaic, reflected in the polished floor. © Dave Chance Photography
Before I started my work on this project, I visited the school to meet with a leadership council comprising a small group of smart, thoughtful and articulate students. I told them about the project and they told me about the design. They wanted a dragon, the Camp Allen mascot.
I was not particularly keen on the idea at first. Every school has a mascot, a logo, a cartoon creature to rally the sports teams. I imagined the artwork to be something more “serious” than a mascot. The kids however made it clear to me why the artwork absolutely had to be a dragon.
The students told me what they saw in the dragon and what they saw in themselves: strength, courage, resolve, and fierceness. The dragon was a symbol, a powerful representation of them and their school. It was an illuminating conversation that guided my work.
I still wanted to create something more than just a dragon on the wall; I hope to make art that tells a story, that shares ideas, and has room for interpretation.
Many of the schools that I have worked with in Norfolk deal with high levels of student turnover. At Camp Allen, military families are routinely deployed to other parts of the world, regardless of the school schedule. New students arrive on a weekly basis. Camp Allen’s leadership has found innovative and creative solutions to help ease this transition for students. The kids told me about the houses with their names, colors and points system, so similar to the Hogwarts houses in the Harry Potter books. Every kid on that leadership council had a story about arriving at Camp Allen as a new student, nervous and unsure. They were welcomed. They were included from the first moment. They described the school as a family.

A full view of The Dragon Family mosaic, in the school’s main hallway. © Dave Chance Photography
Early in the design phase, there was some concern; we wanted an approachable dragon, but not a silly cartoon. Sometimes, fairy tales dragons can be scary, frightening beasts that must be vanquished, but that’s not the message we wanted to send. In this story about Camp Allen, dragons are caring and supportive. That said, I hope some of the fierceness still comes through. Do not mess with a dragon’s family, because dragons will always protect their treasure.
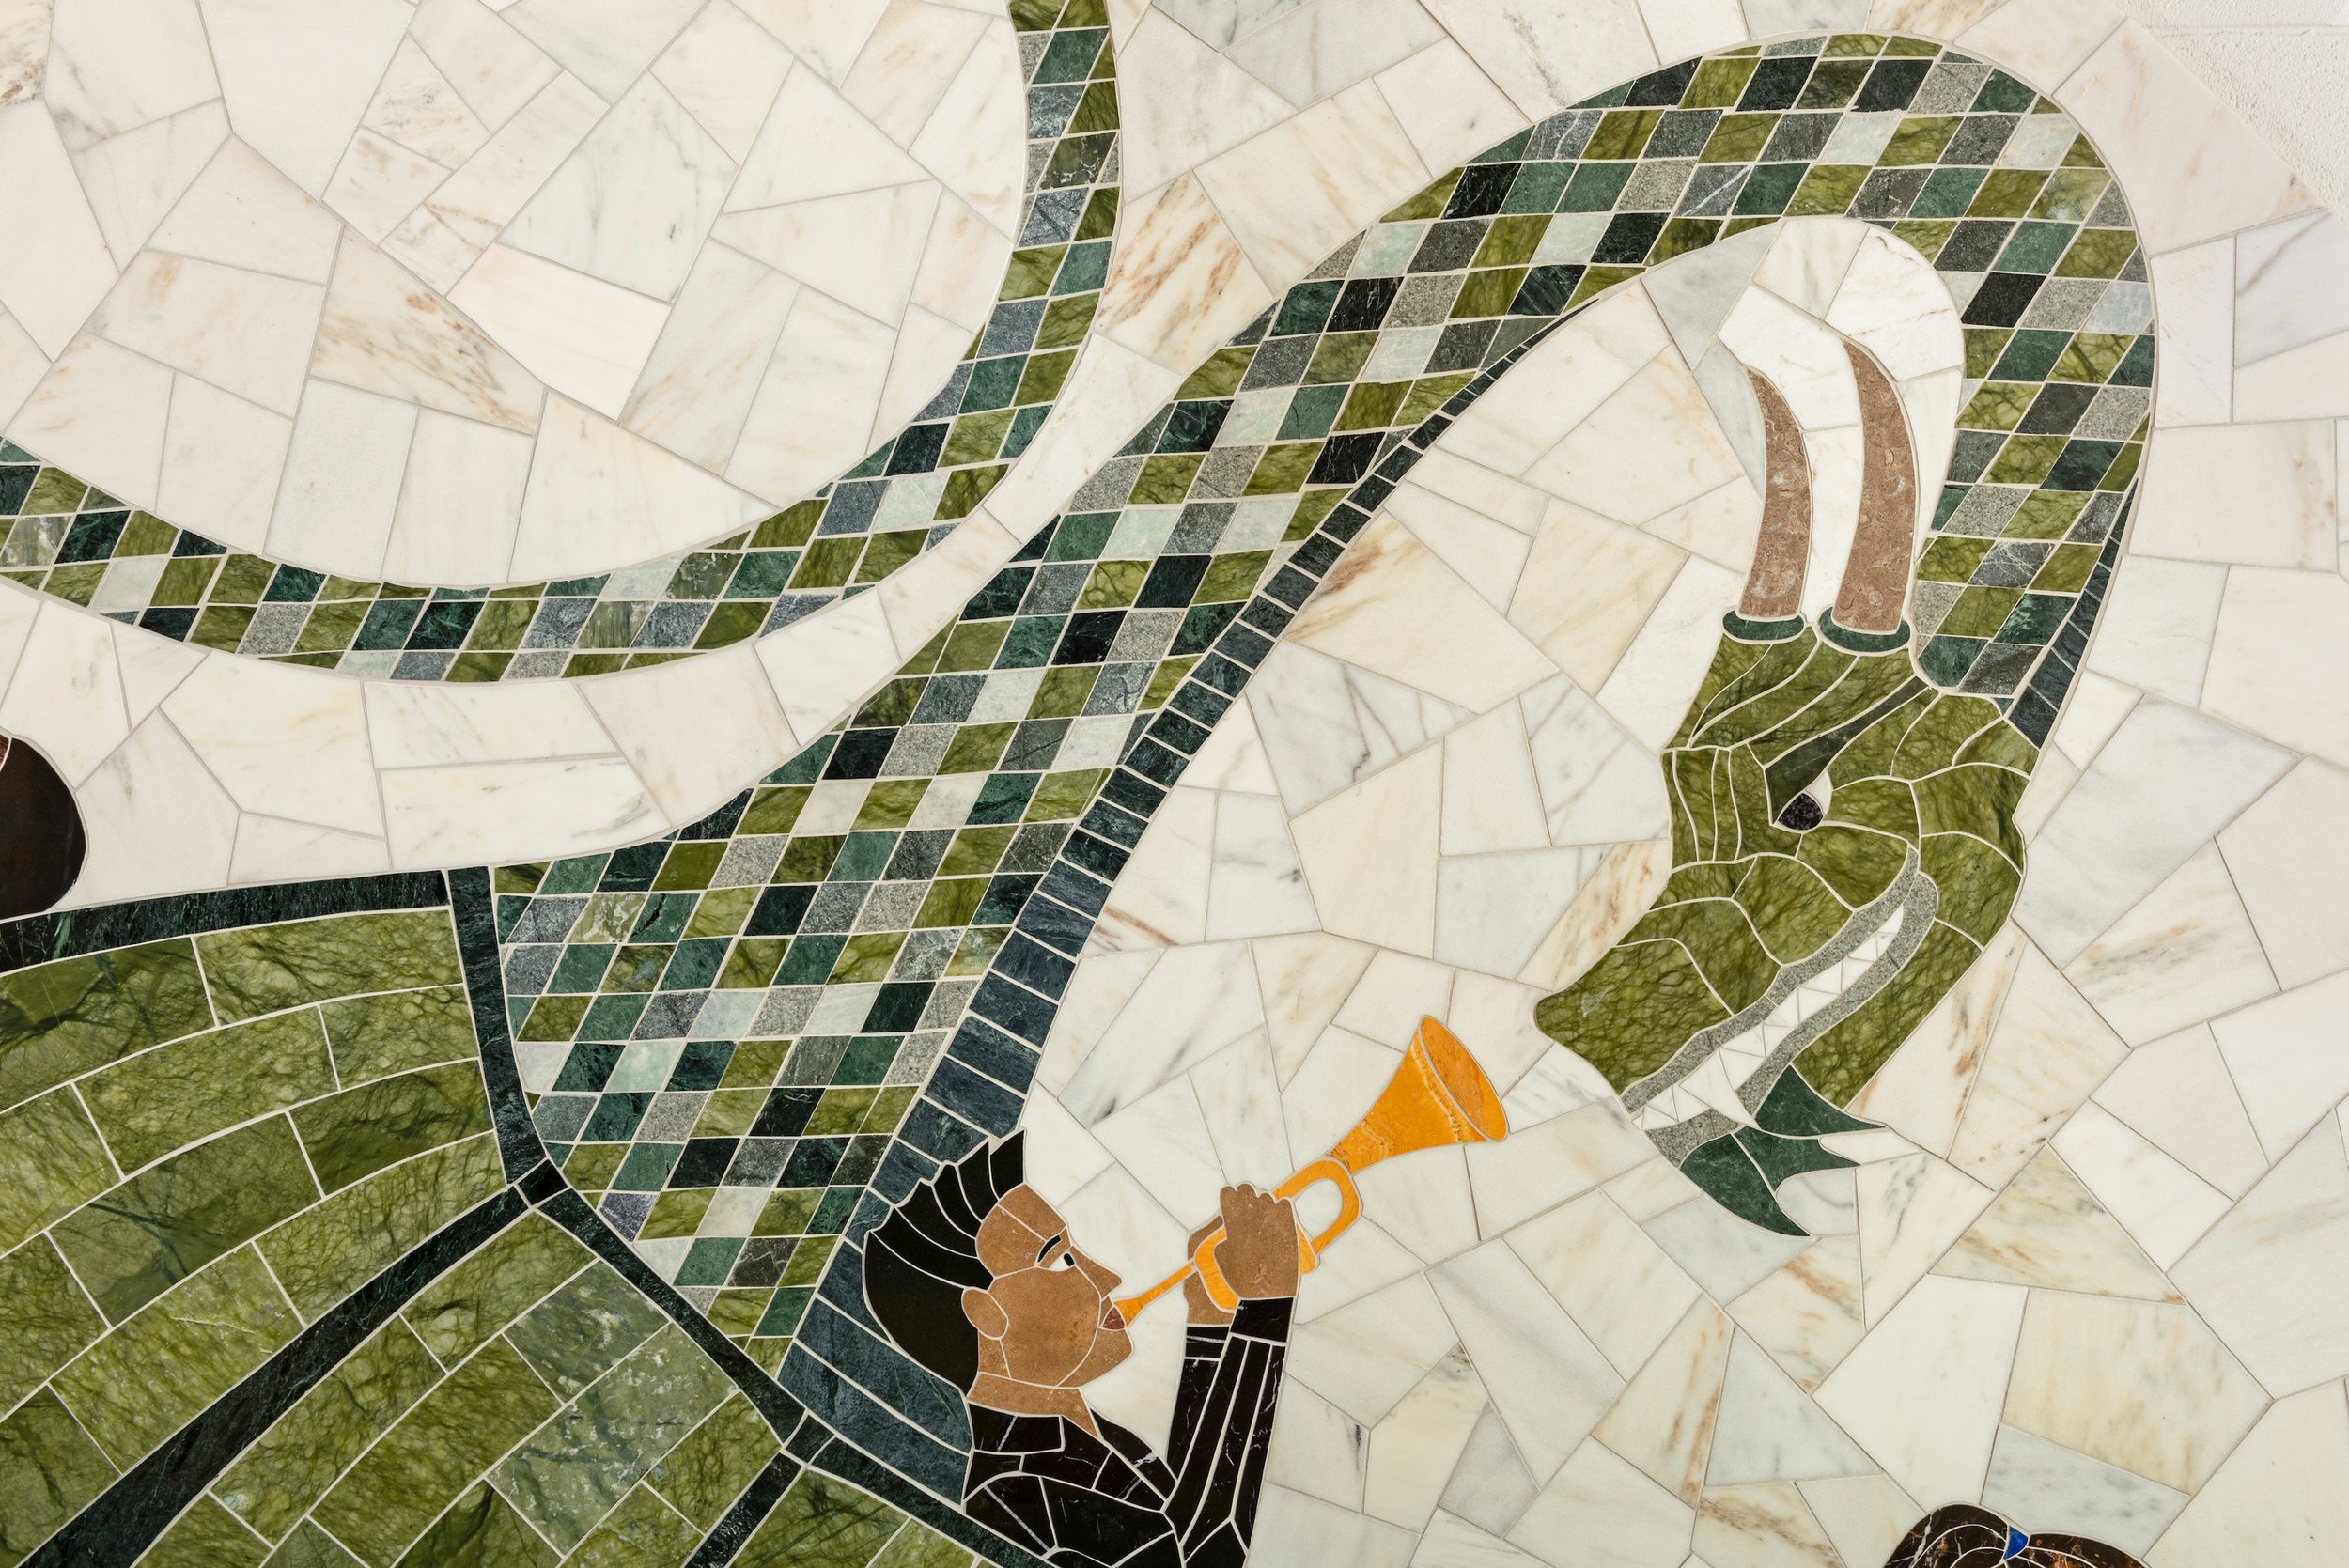
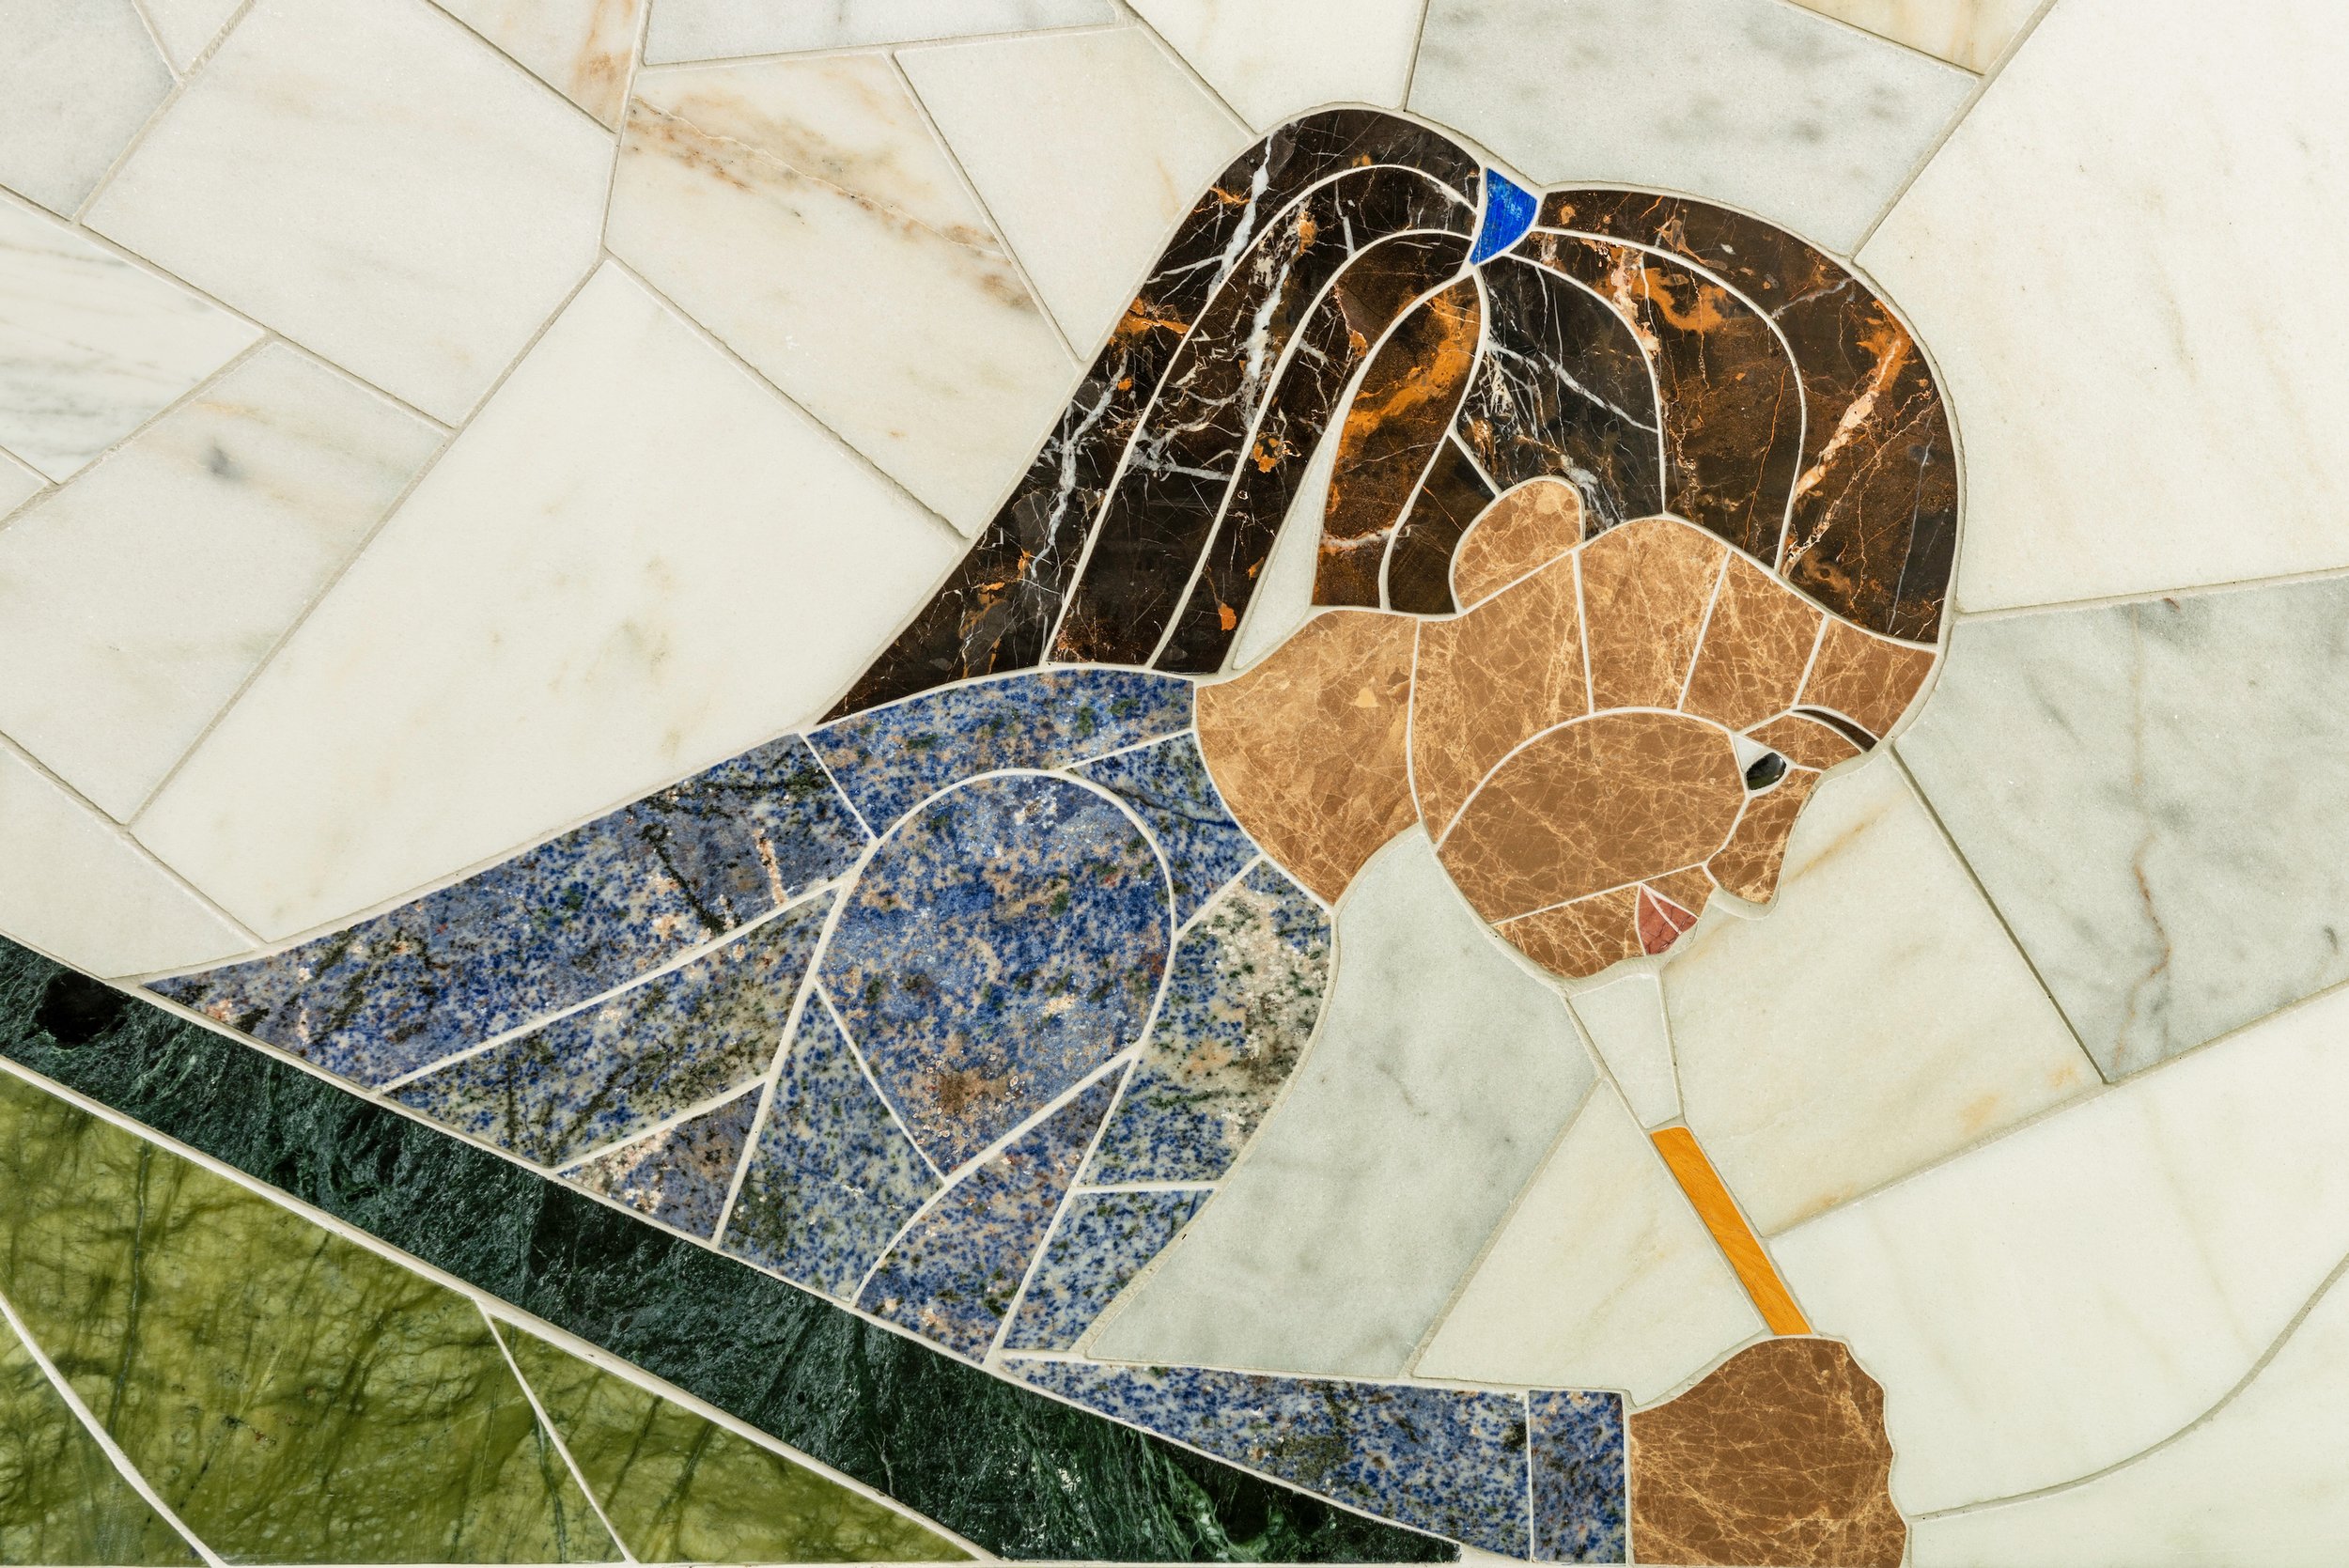
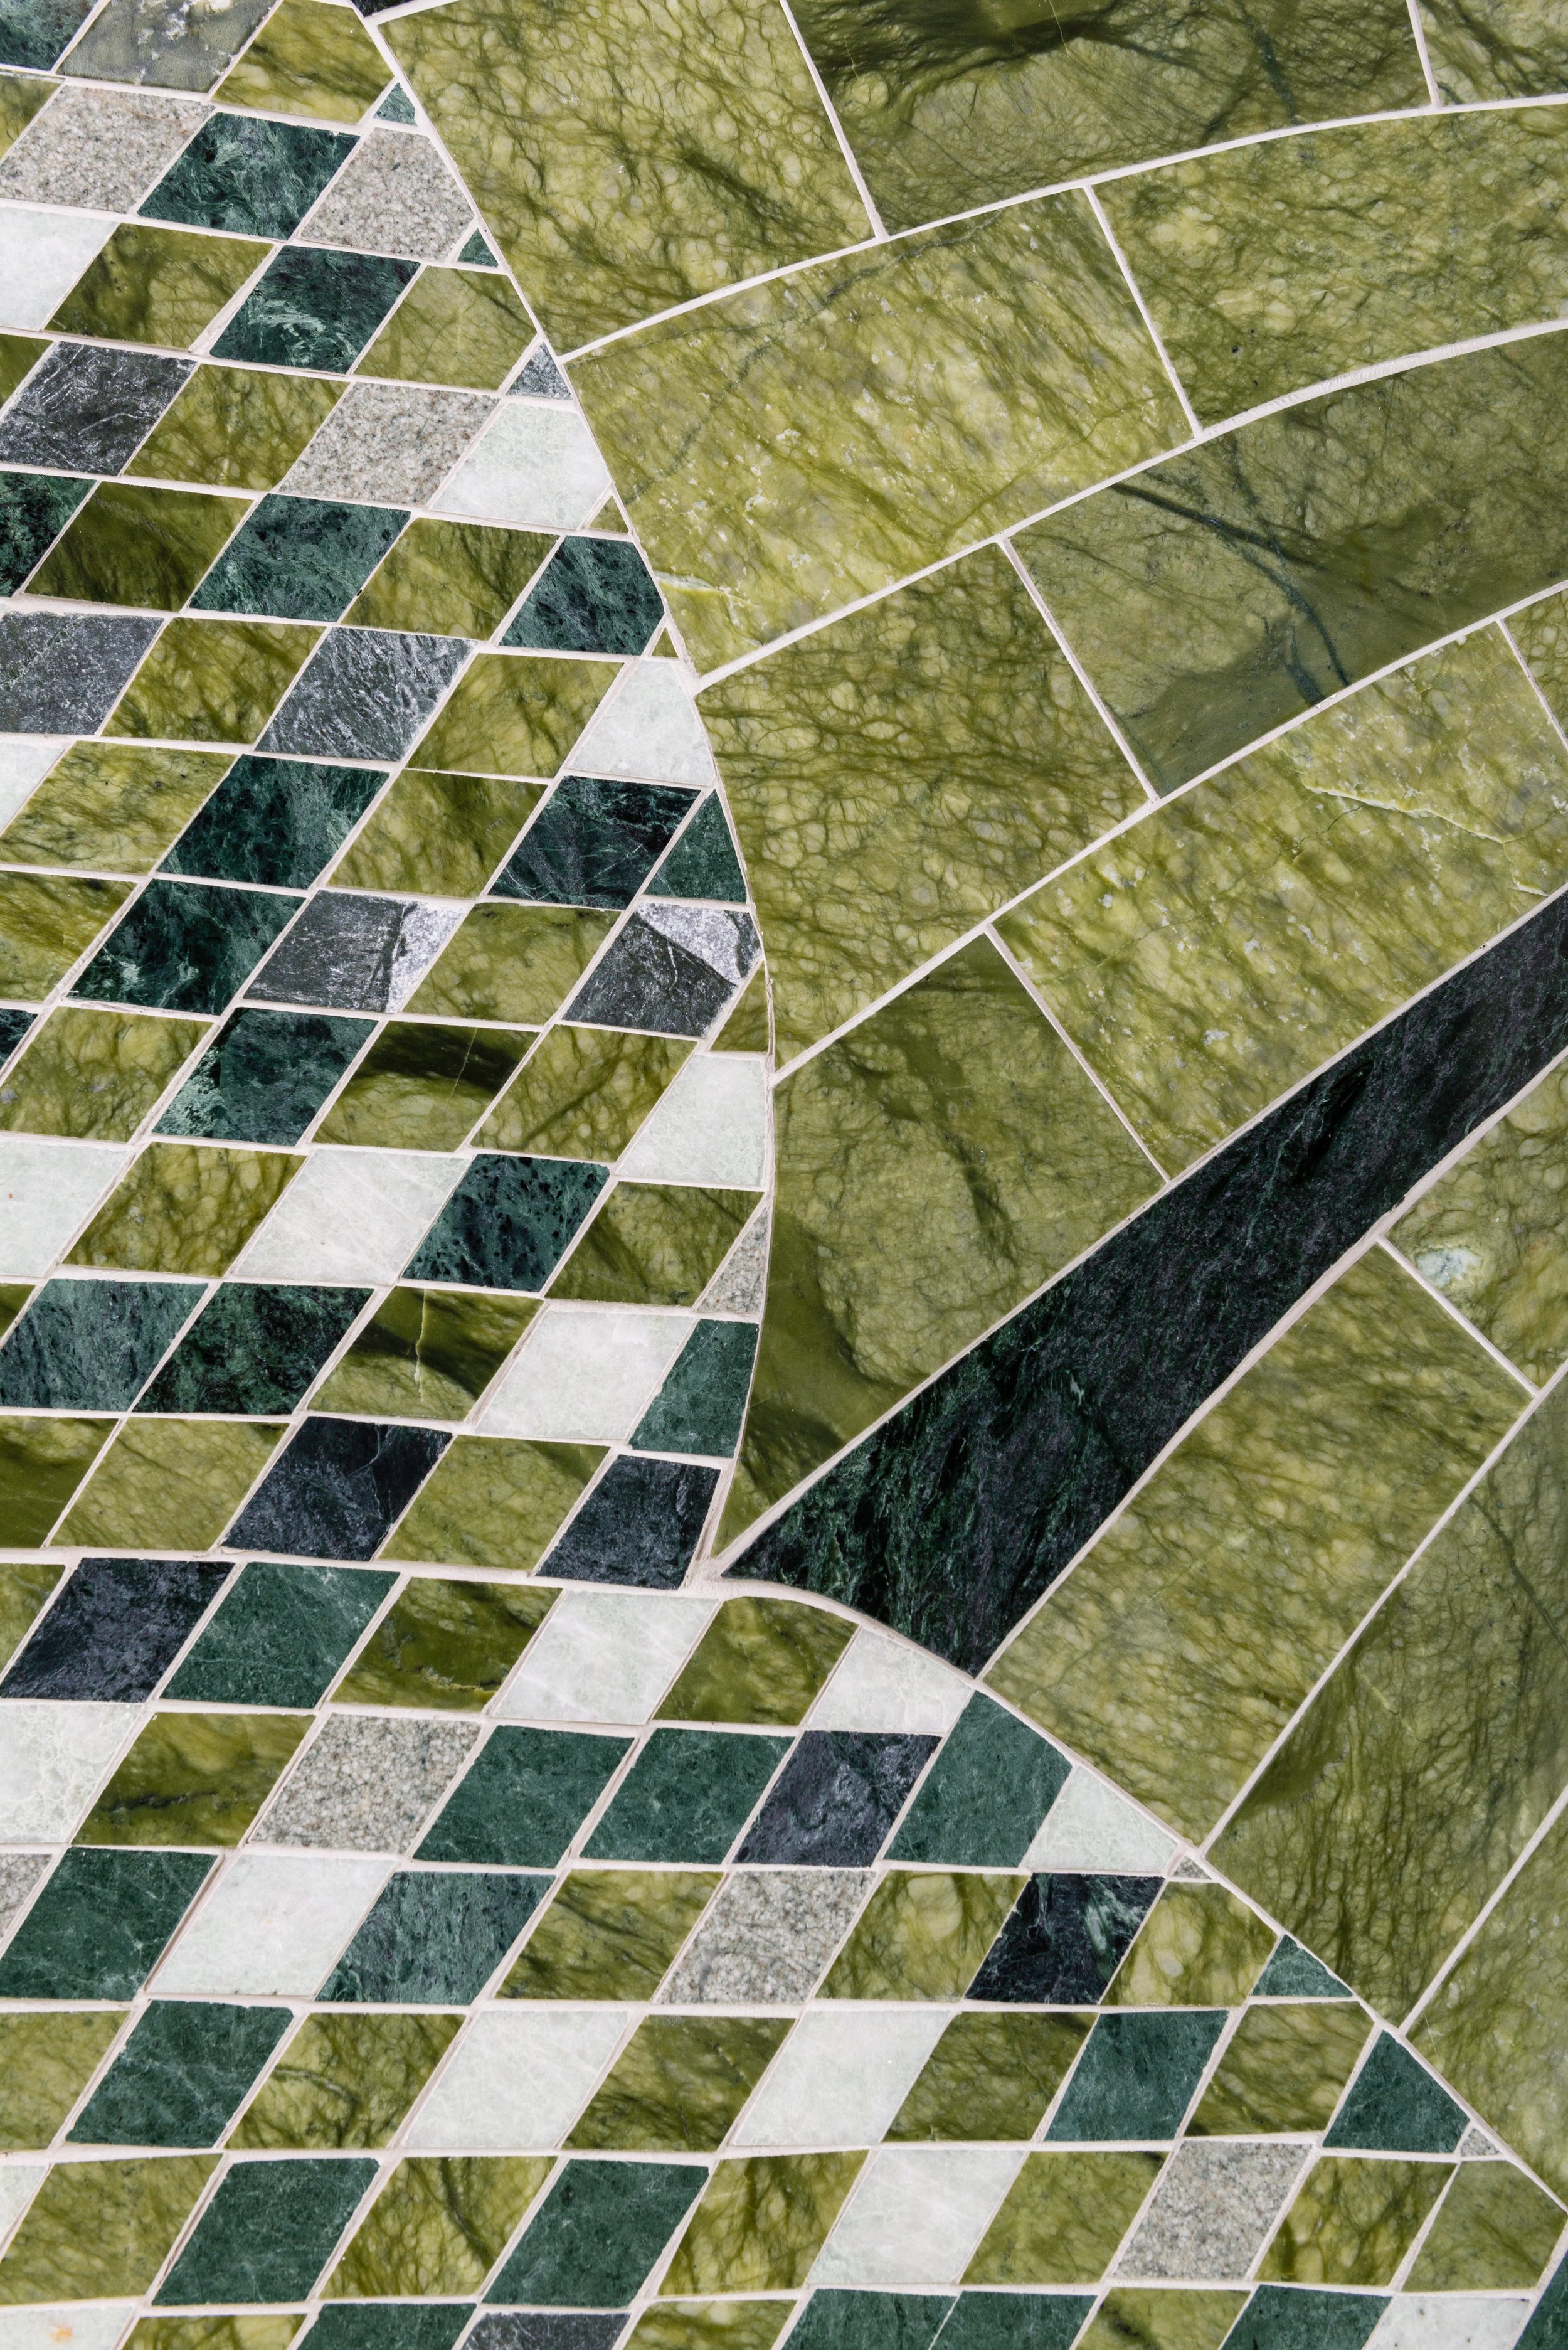
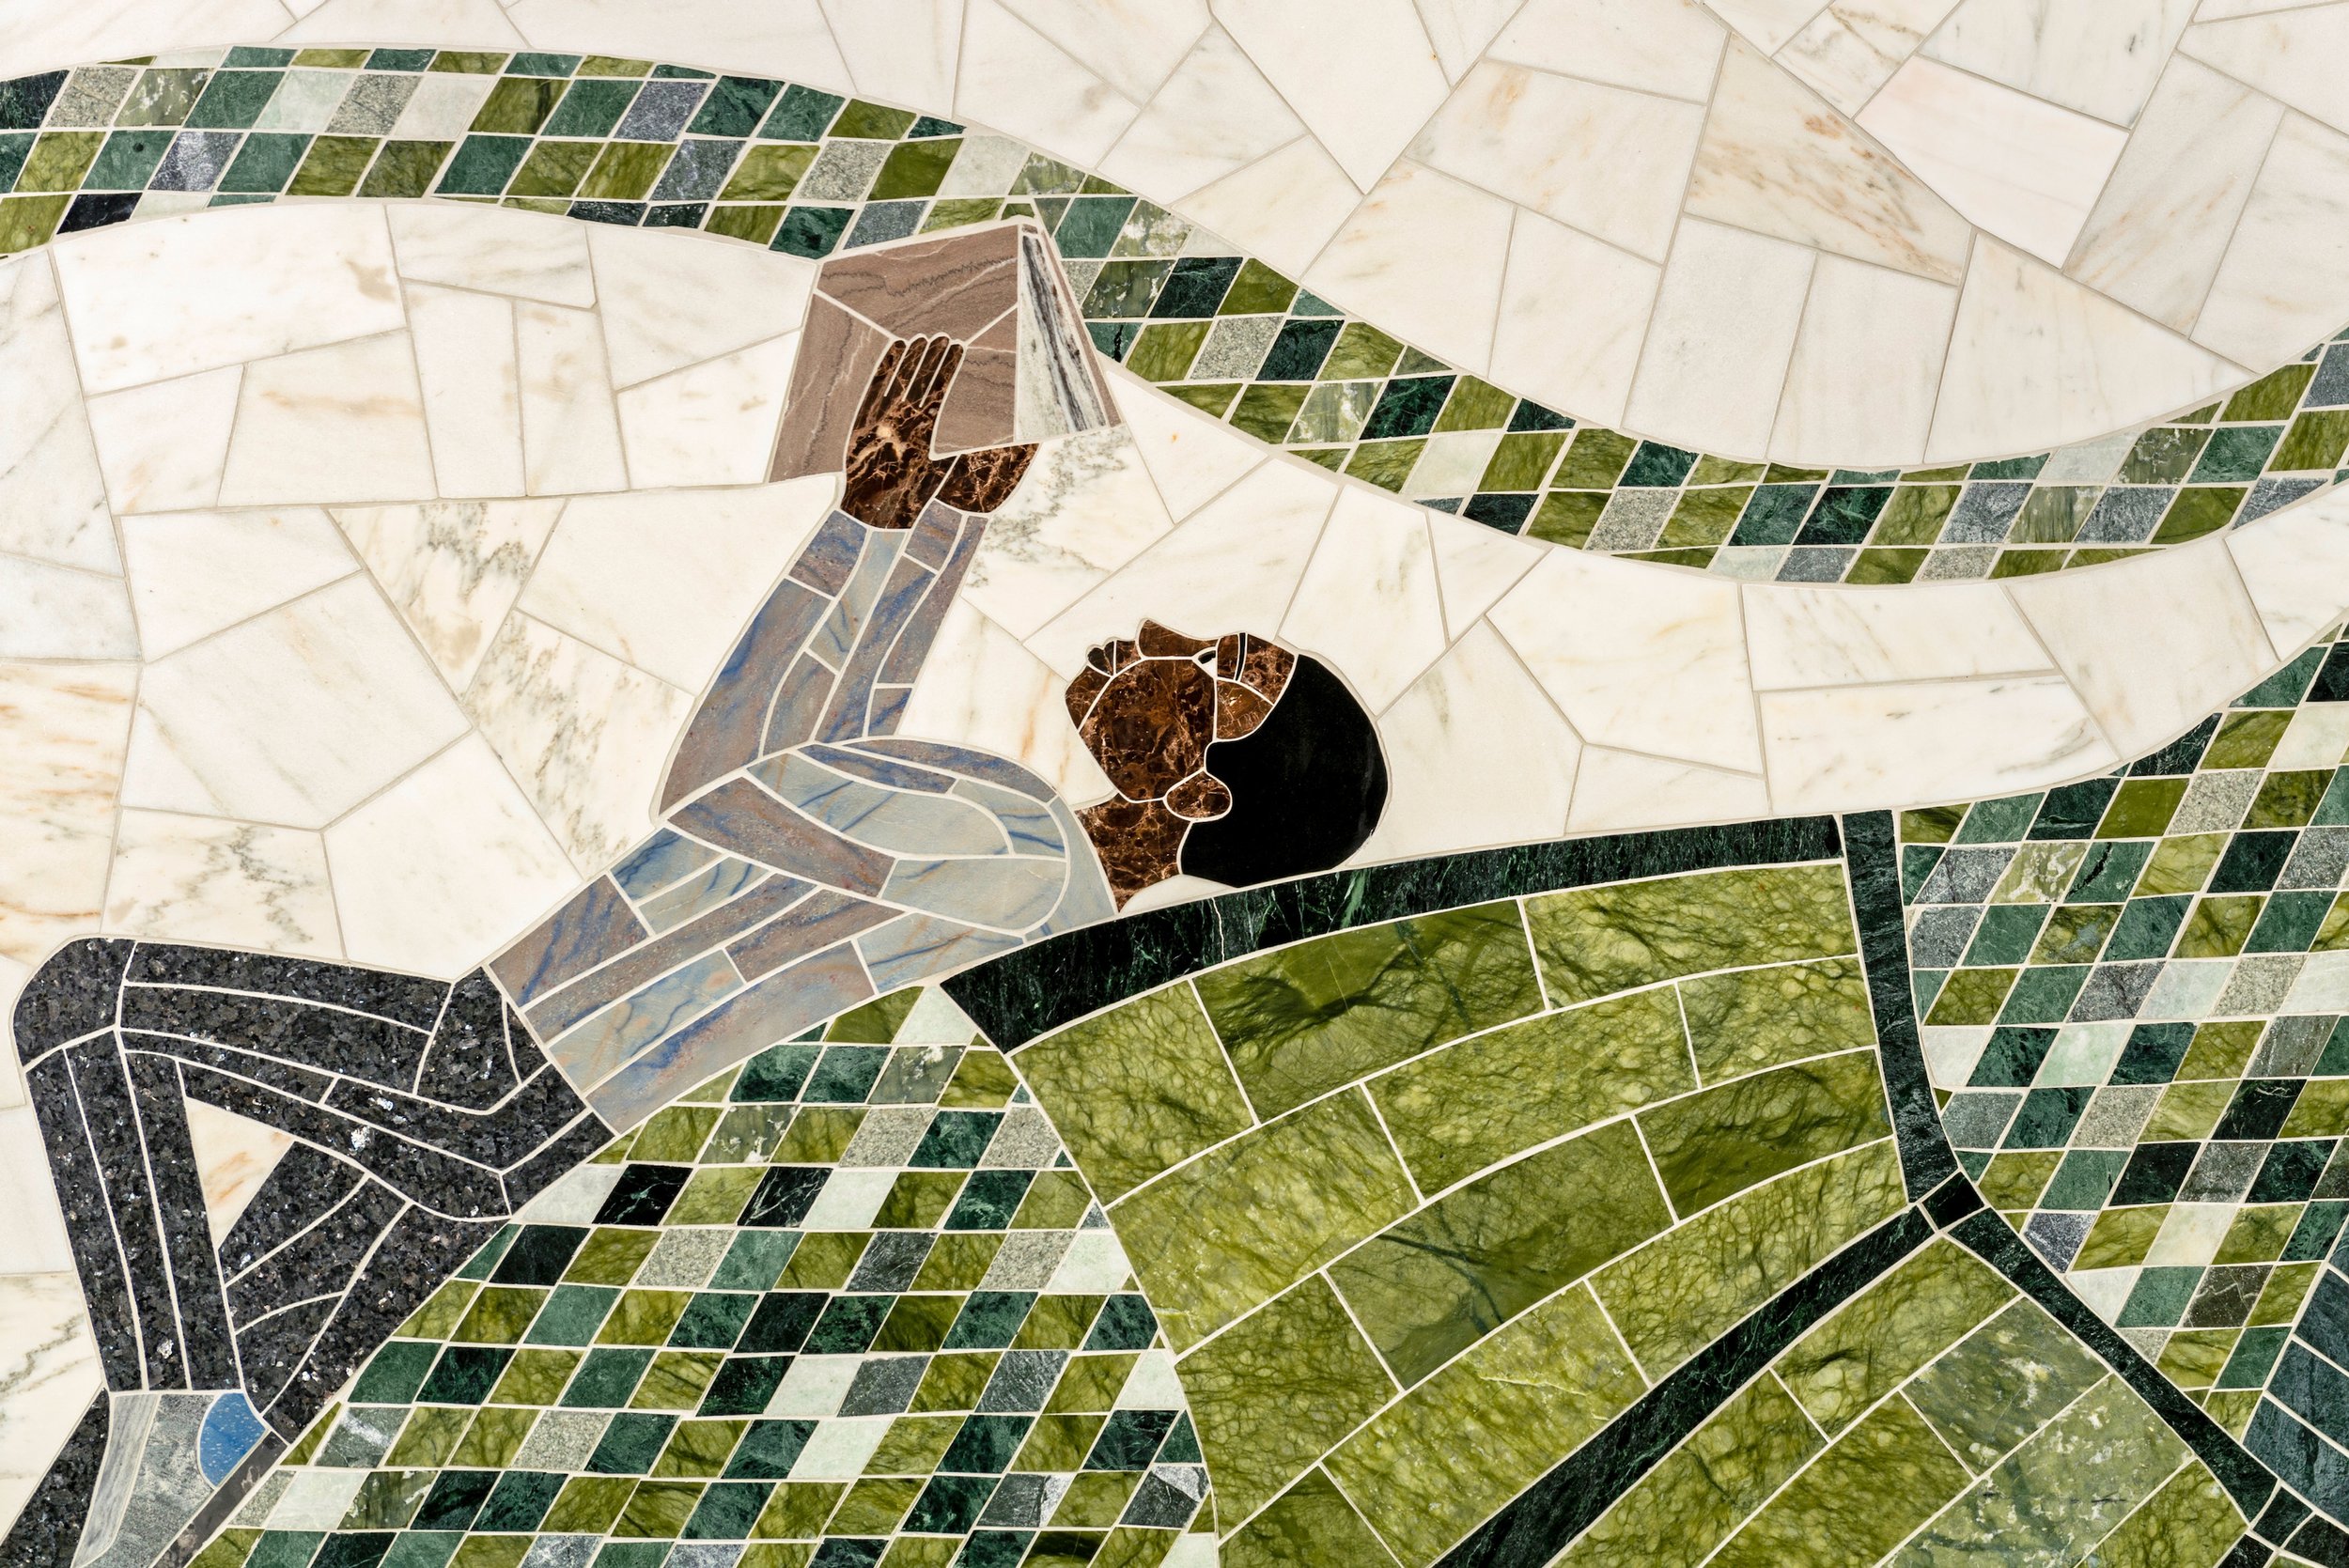
PROJECT DETAILS
LOCATION: Camp Allen Elementary School, Norfolk, Virginia
DATE: October 2019
DIMENSIONS: 18′ by 9′, semi-circle
COMMISSIONED BY: Norfolk Arts
PROJECT MANAGER: Karen Rudd
DESIGNED BY: Marc Archambault
FABRICATED BY: Marc Archambault, Fred Lashley, Jonathan Frederick, Tony Costa, Brian Holda
INSTALLED BY: Marc Archambault, Fred Lashley, Jonathan Frederick, Tony Costa
ENGINEERING: Andrew Terrell of Lysaght & Associates, Raleigh, NC
TECHNICAL SUPPORT: Bo Thompson of Blackstone Masonry
PROFESSIONAL IMAGES: Dave Chance Photography